- 1.What kind of equipment do I need for scanning answer sheets?Scanner – (preferably with a feeder, if the scanner only scans one sheet at a time, the work will be tedious). Scanners that have already proven themselves for scanning answer sheets can be found in:Information system Printing from IS (Tools tile) List of verified scanners suitable for scanning into ISProgram „skenovani.exe“ – installed on the computer with the scanner. If software is not installed, it will be done by faculty’s CIT or . More detailed information on the operation of the scanning software can be found inInformation system Printing from IS
- 2.How much time do I need for the whole process of scanning the answer sheets and who can help me?Preparing the questions – if you have the questions themselves ready, then it will take less than one minute to insert one question into the question set (it doesn't matter whether you have it written on paper or in a text file). It takes about ten minutes to set up the ROPOT description – The best way to set up the ROPOT description can be found below in this help. Setting up the test sheets – this is operation in the IS JAMU that creates the paper assignments. It is not time consuming. Printing the test sheets, answer sheets, dispatch form – it depends on the number of papers, or on the printer's capabilities (printing the assignment double-sided) or whether it is necessary to manually complete papers that have assignments created on multiple pages. Duration of the written examination itself – it's up to you. Scanning – it depends on the speed of the scanner. Recognition of scanned answer sheets – it takes about 5 seconds to recognize one answer sheet. Correction of misrecognised answer sheets – it depends on the number of misrecognised answer sheets. Our experience tells us that the misrecognised papers are in units of one percent. This can be influenced by giving students precise instructions on how to complete the answer sheet.
- 3.Preparation of questionsOnly questions of type :r (radio button; just one of the offered options is correct) or :c (checkbox; at least one of the offered options is correct) can be used for scanning and automatic evaluation of the exam. It is not possible to combine these types of questions in one exam. The test assignment must consist of either :r questions only or :c questions only. There is a maximum of 6 possible answers per question.Information system Help (E-learning) Question setsIf you have a large number of questions, it is a good idea to insert all the questions at once directly from the text file. For this you can use the so-called "simplified entry of questions".Information system Teacher [course selection] Question sets [set selection] simplified entry of questions
This function is described in more detail in the help here.
Even tests that are corrected manually by the teacher can be scanned. This kind of answer sheet is special because there are no questions entered in the IS. The questions can be handwritten or supplied on another paper. LaTeX experts can paste the text directly into the form after downloading the macros on the Print Answer Sheets page.
Information system Teacher [course selection] Work with ROPOT Printing from IS: Answer Sheet Macros for handwritten answers - 4.ROPOT descriptionNow you will work only in the agendaInformation system Teacher [course selection] Work with ROPOTHere first you need to set up a new ROPOT description. It is easiest if one ROPOT description is exclusively for one specific examination date (if one ROPOT description is for multiple dates, then the "Should students be allowed to access this ROPOT application repeatedly?" setting in the description needs to be adjusted accordingly). Use the option "Create a new ROPOT description".
Select "scannable test (multiple choice)" as the default mode. If this is not the first time you are creating a ROPOT description, but you have already scanned in the semester and want to use the same settings as in the previous ROPOT, you do not need to click the settings from the beginning. Select an existing ROPOT description from the "I want to select an existent ROPOT application whose information I want the new one to be filled with" menu. This will create a new ROPOT with the settings of the existing one, so it is necessary to enter a new name (e.g. new examination date). If you are creating a ROPOT for a handwritten test, set mode to "scannable handwritten text and scores". For a scannable handwritten test, give the name of the ROPOT (preferably with the examination date) and save. This type of test is covered in detail in the question Scanning of handwritten tests (i.e. free-form answers, not multiple choice). In case you are creating a scannable test for the first time, follow these steps: After selecting the ROPOT mode, a form with the settings for the ROPOT description is displayed. The ROPOT is automatically stored in the secure folder "testbank", which is by default inaccessible to students. We recommend not changing this location. Next, choose a name for the ROPOT, preferably with the date of the examination. Instructions do not need to be filled in.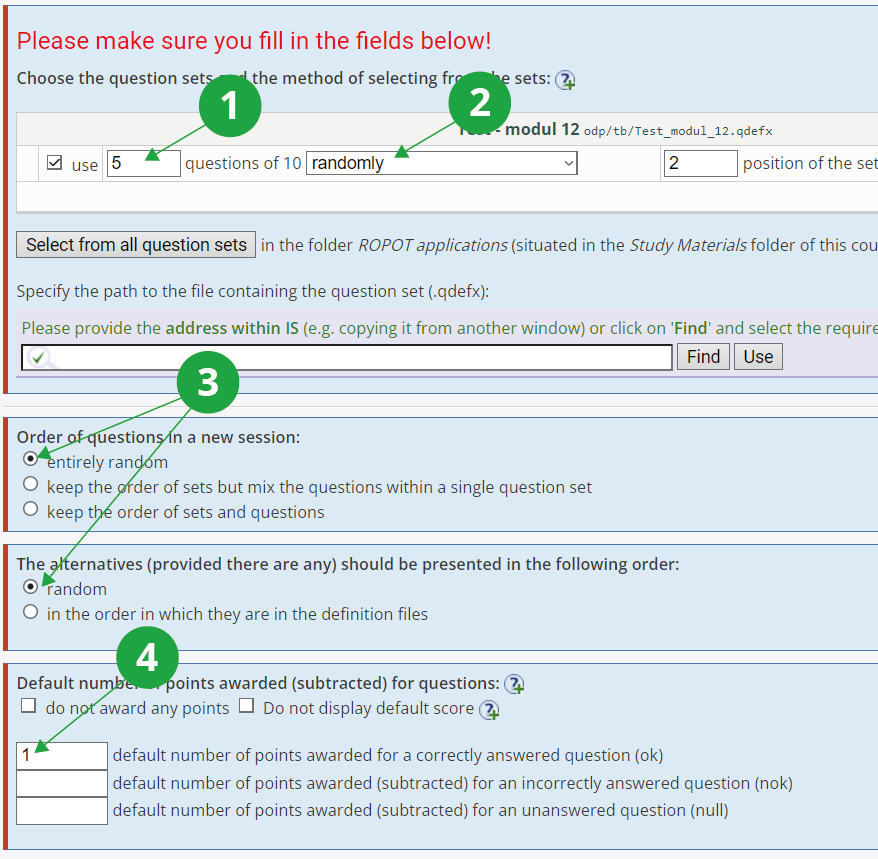
1 Search for the question set to be used and enter how many questions to select from that set. Check "use".
2 The way in which a specified number of questions are selected from a set. The setting is independent of the order of questions in a new session setting below.
3 Choose the order of the questions and alternatives (answers), most often leaving "random".
4 Determine default number of points awarded for each question. It is up to you whether you want to give only plus points for correct answers, or whether you want to penalise students for guessing the answer and substract points for wrong answers.
We recommend filling in the following fields as follows:
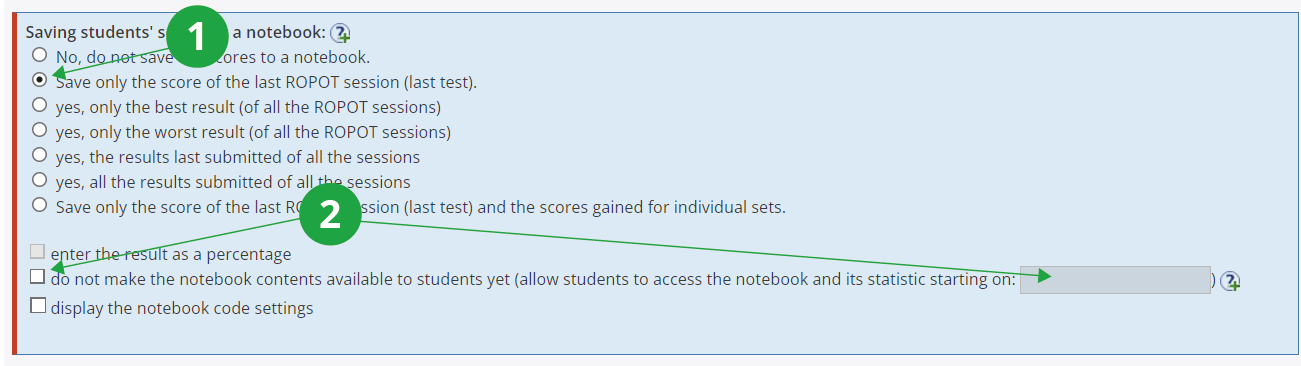
1 Save the results of to notebook.
2 Check if you do not want students to have the scores available immediately after the scanned tests have been evaluated. Alternatively, you can fill in the date from when the scores will be made public to students.

1 For scannable tests, it is typically not desirable to show students the correct answers in the browsing of answers.
2 The sessions for the scannable test are created by the teacher in a separate application, so the responding student does not need to launch a new ROPOT session.
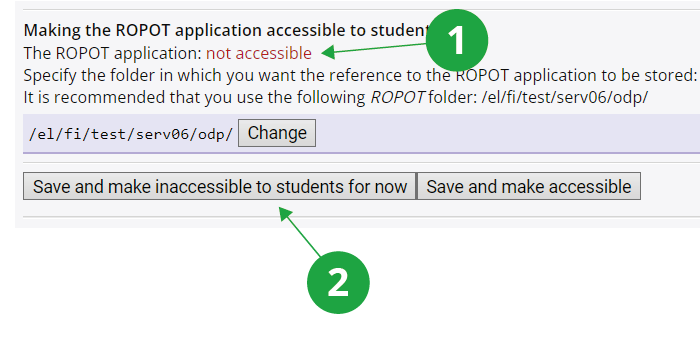
1 Typically, students do not have a ROPOT in the IS JAMU accessible. You make this setting in at the bottom of "Making the ROPOT application accessible to students" when you save the ROPOT description.
2Save the ROPOT description by clicking "Save and make inaccessible" to students for now.
- 5.How to prepare the test (test sheets, answer sheets and dispatch form) for students?
Setting up scannable tests involves several steps.
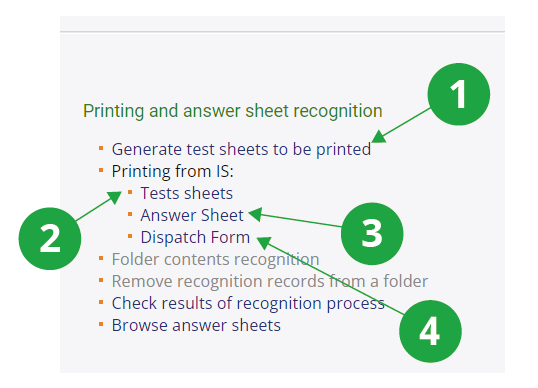
1The first step in the preparation of a scanneble test (right after the ROPOT is created) is to generate the test sheets.
2The test sheets need to be printed for each student.
3It is useful to print a few more answer sheets than necessary so that there are back-ups in case some students complete them incorrectly.
4The dispatch form will automatically assign the scanned answer sheets to the correct ROPOT.
- Setting up printed tests
Information system Teacher [course selection] Work with ROPOT Generate test sheets to be printedThe first step in preparing a scanned test (right after creating the ROPOT description) is to create the test sheets. This is where you select how many test sheets will be generated for printing. If you want to create multiple identical test sheets, specify the number of times the same test sheet should be generated. The application will then create test sheets that are identical in content and differ only in the test sheet number. This option may be useful when you want to prepare assignments with the same difficulty for all students (e.g. a final state‘s examination).
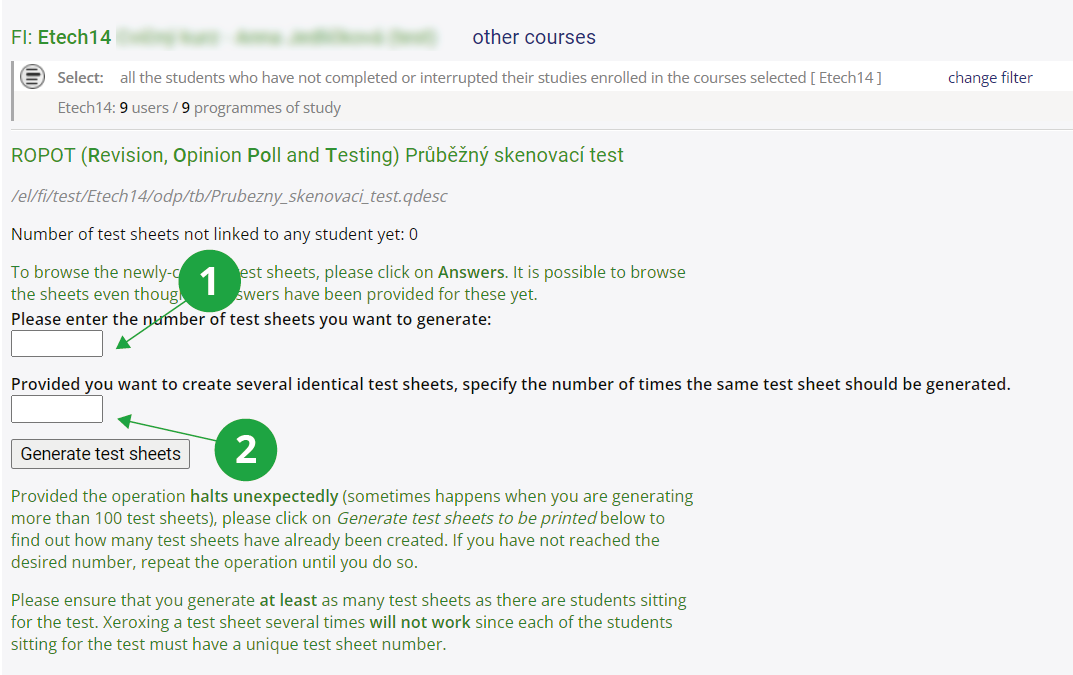
1 The field for entering the required number of test sheets. This can be inspired by the number of students in the course displayed under the course name, or alternatively, by changing the filter, you can display, for example, the number of students registered for an examination date.
2 How many of the above test sheets should be the same. An empty field means that all test sheets will be unique.
- Printing the test sheets
Information system Teacher [course selection] Work with ROPOT Printing from IS: Test sheetsYou need to select the specific ROPOT. Now you basically have two options. Try both on a few assignments and see which one "works better" for your ROPOT:
- Prepare the test sheets to be printed from a browser: Cannot achieve double-sided printing. The output will look exactly as you see it in the browser (the browser prepares the printout), i.e. tables, images etc. should look like the page in IS. Select the number of test sheets you want to print; type all the test sheets on one page, click on "Prepare the test sheets to be printed from a browser" and print. As you print, the browser will print each new test sheet on a new page.
- Printing test sheets into PDF or using a printer: You can check the option to make each test span an even number of pages for two-sided printing . If the original test sheet has an odd number of pages, then each test sheet will have an even number of pages in the resulting printable file. The numbers of the test sheets you print will be offered to you automatically. You will need to select the type of file to print to (PDF file is best) and click on "Download". The PDF file will open straight away. You be able to check that the sheets look as you wish, e.g. for double-sided printing, and print on your chosen faculty printer using the "Print" button. This printing is done by the IS subsystem, more complex elements in the test sheets (tables, images) may not work. Alternatively, you can download the PDF of the test sheet and print it afterwards.
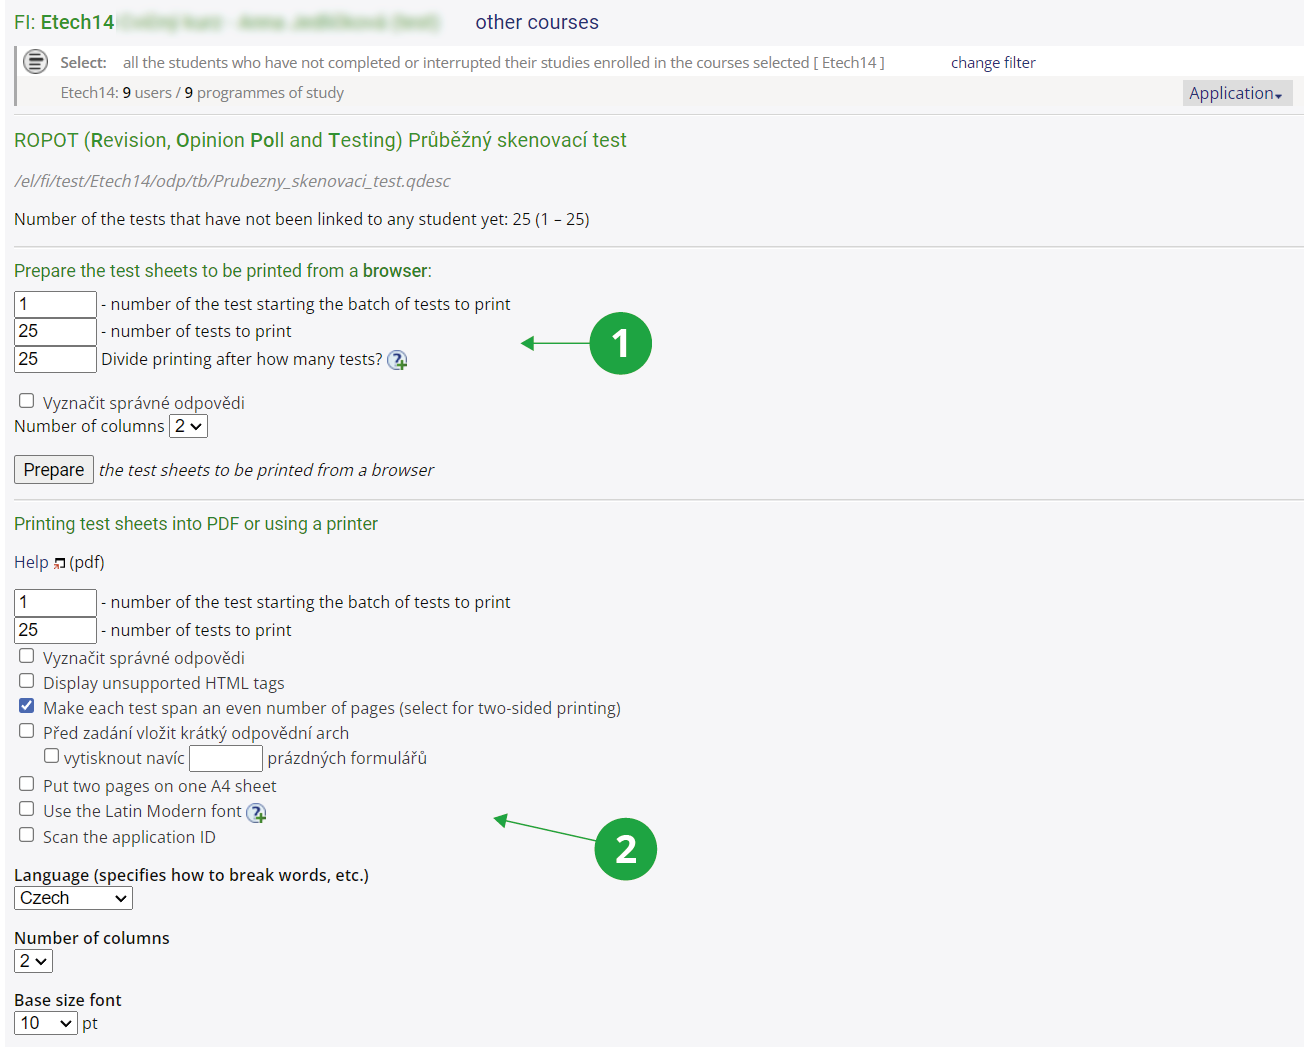
1Preparation of the test sheets to be printed from a browser.
2Printing test sheets into PDF or using a printer.
- Printing the answer sheets
Information system Teacher [course selection] Work with ROPOT Printing from IS: Answer SheetYou can select the type of questions you are using in your test (type :r to select just one correct answer, type :c to select at least one correct answer, or handwritten text with scores if you are using open-ended answers ). Choose the language and the title of the person identification field (typically leave the "personal identification number (učo)" option – other options are used, e.g. for scanning the answers of applicants for study (the "application ID" option) or for answers of persons completely unrelated to the JAMU (the "ID selected by me" option). Then you need to enter the number of answer sheets you want to print (it is a good idea to print more than the number of test sheets you will be using, because if a student ticks a question incorrectly and wants to change his/her answer or has already used up the possible number of corrections, he/she will need to be given a new answer sheet and will fill in the answers again) and print them.
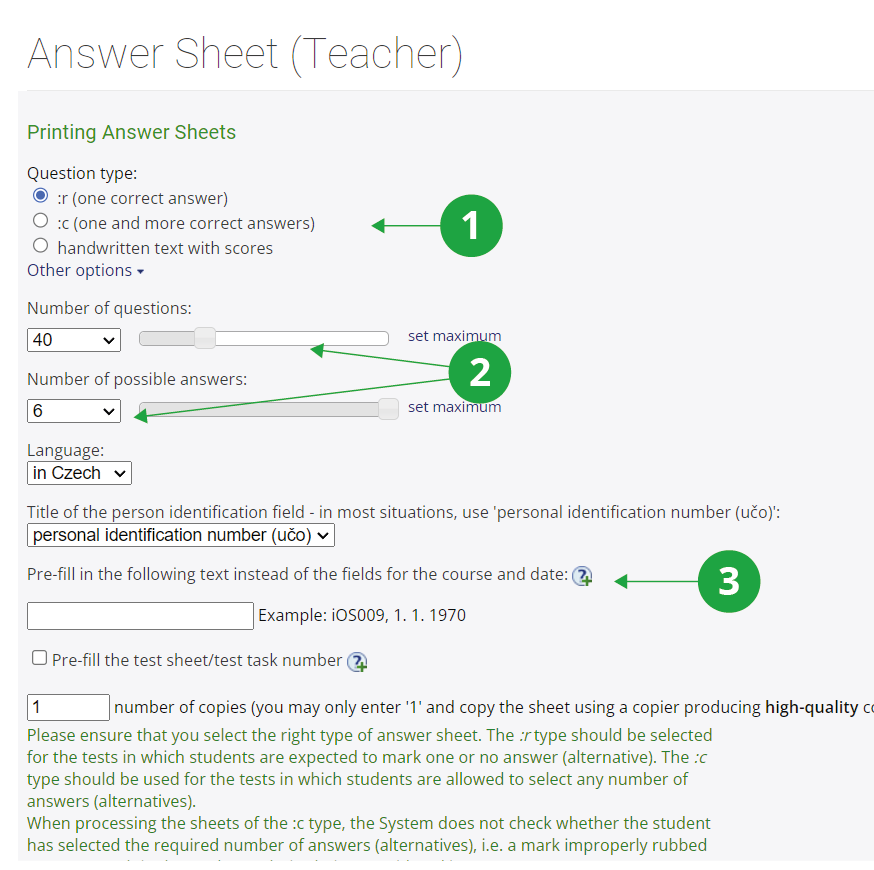
1Selecting the type of questions.
2How many questions and possible answers should be on the answer sheet. Not to be filled in for the "handwritten text with scores" option.
3Other options that affect the appearance of the answer sheet.
- Printing the dispatch form
Information system Teacher [course selection] Work with ROPOT Printing from IS: Dispatch formYou will need to enter the učo (personal identification number) of a person into whose File Depository should the scanned answer sheets be uploaded and check the option to have the test sheets recognized after they were uploaded into the depository. You need to print the dispatch form and scan it when scanning the answer sheets; place it either before or after the scanned sheets. For more information on sending scanned answer sheets to the IS, seeInformation system Printing from IS Skenování do ISu
Creating and printing the dispatch form is typically not necessary if you will be scanning and evaluating the answer sheets yourself (using Check results of recognition process). Scanned answer sheets can be uploaded to a person's depository directly and without a dispatch form by entering the person's učo (personal identification number) in the scanning program's field.
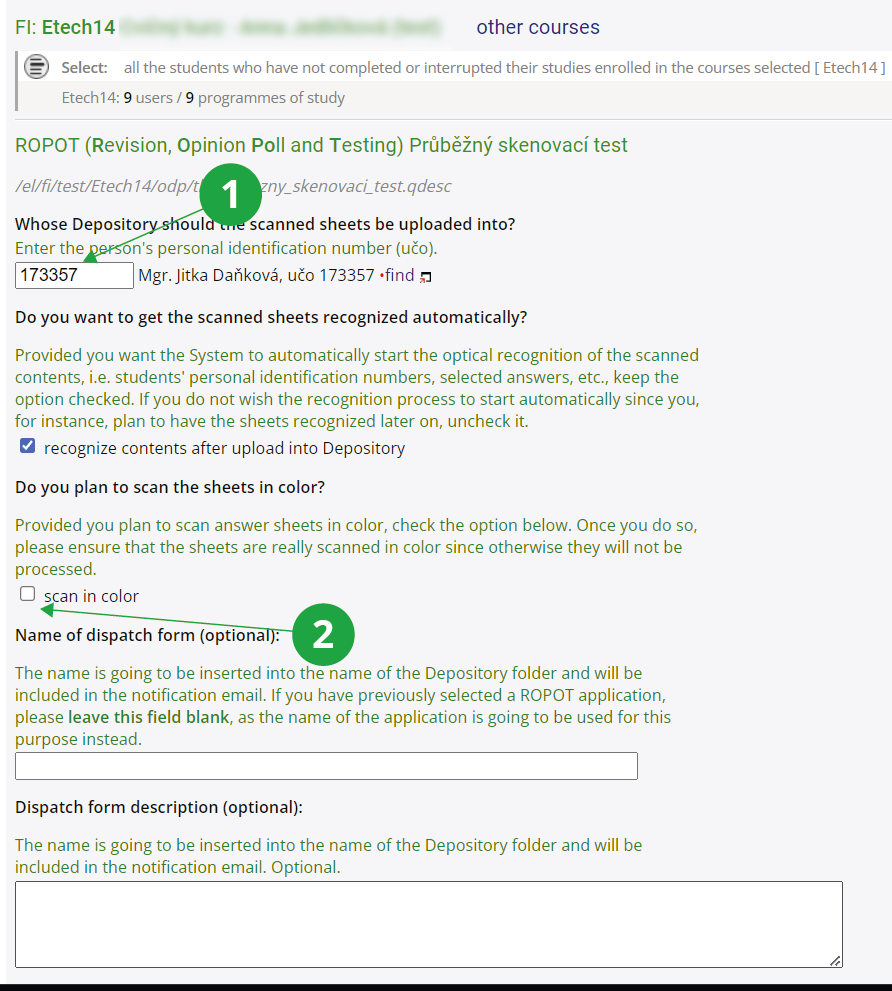
1The UIN (učo) of the person who will evaluate the answer sheets.
2Option typically for handwritten tests that the teacher corrects with colored pencil.
- Setting up printed tests
- 6.What should I tell my students before begining of the test?Instructions for the actual test can be found inInformation system Help Teacher Tips on Examinations Based on Scannable Answer Sheets
- 7.Checking results of recognition process – evaluation of the answer sheetsOnce you have scanned the answer sheets, click onInformation system Teacher [course selection] Work with ROPOT Folder contents recognitionSpecify a folder in your Depository containing the scanned files of the answer sheets and click on "Use the folder selected". Once the answer sheets have been recognised, go to the Checking results of recognition process application, select the appropriate ROPOT description and the folder with the recognised files and click "Check". The application will offer to correct the answer sheets that it either could not recognize or there is some other discrepancy (missing test sheet number, učo, answer is illegible or missing completely, ...).
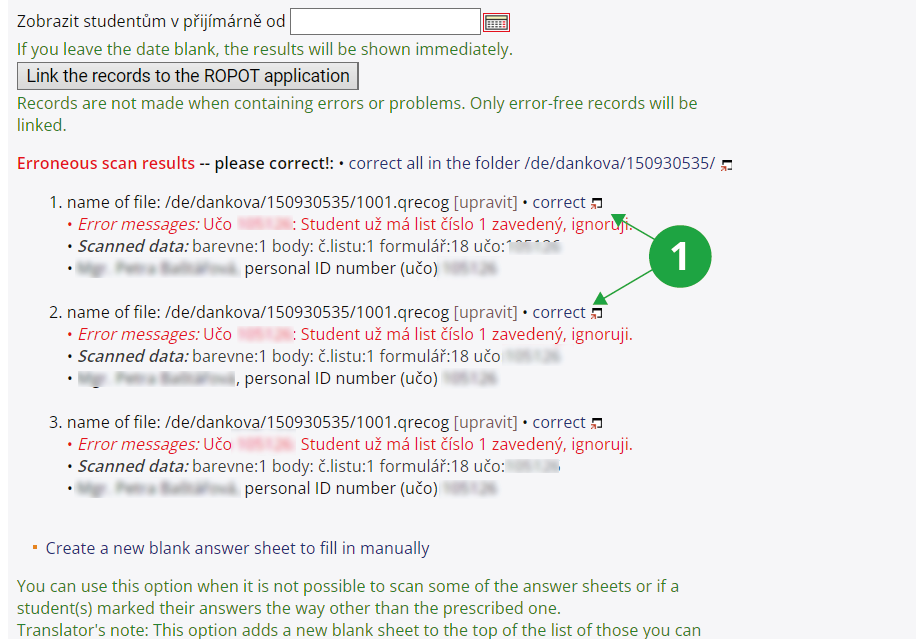
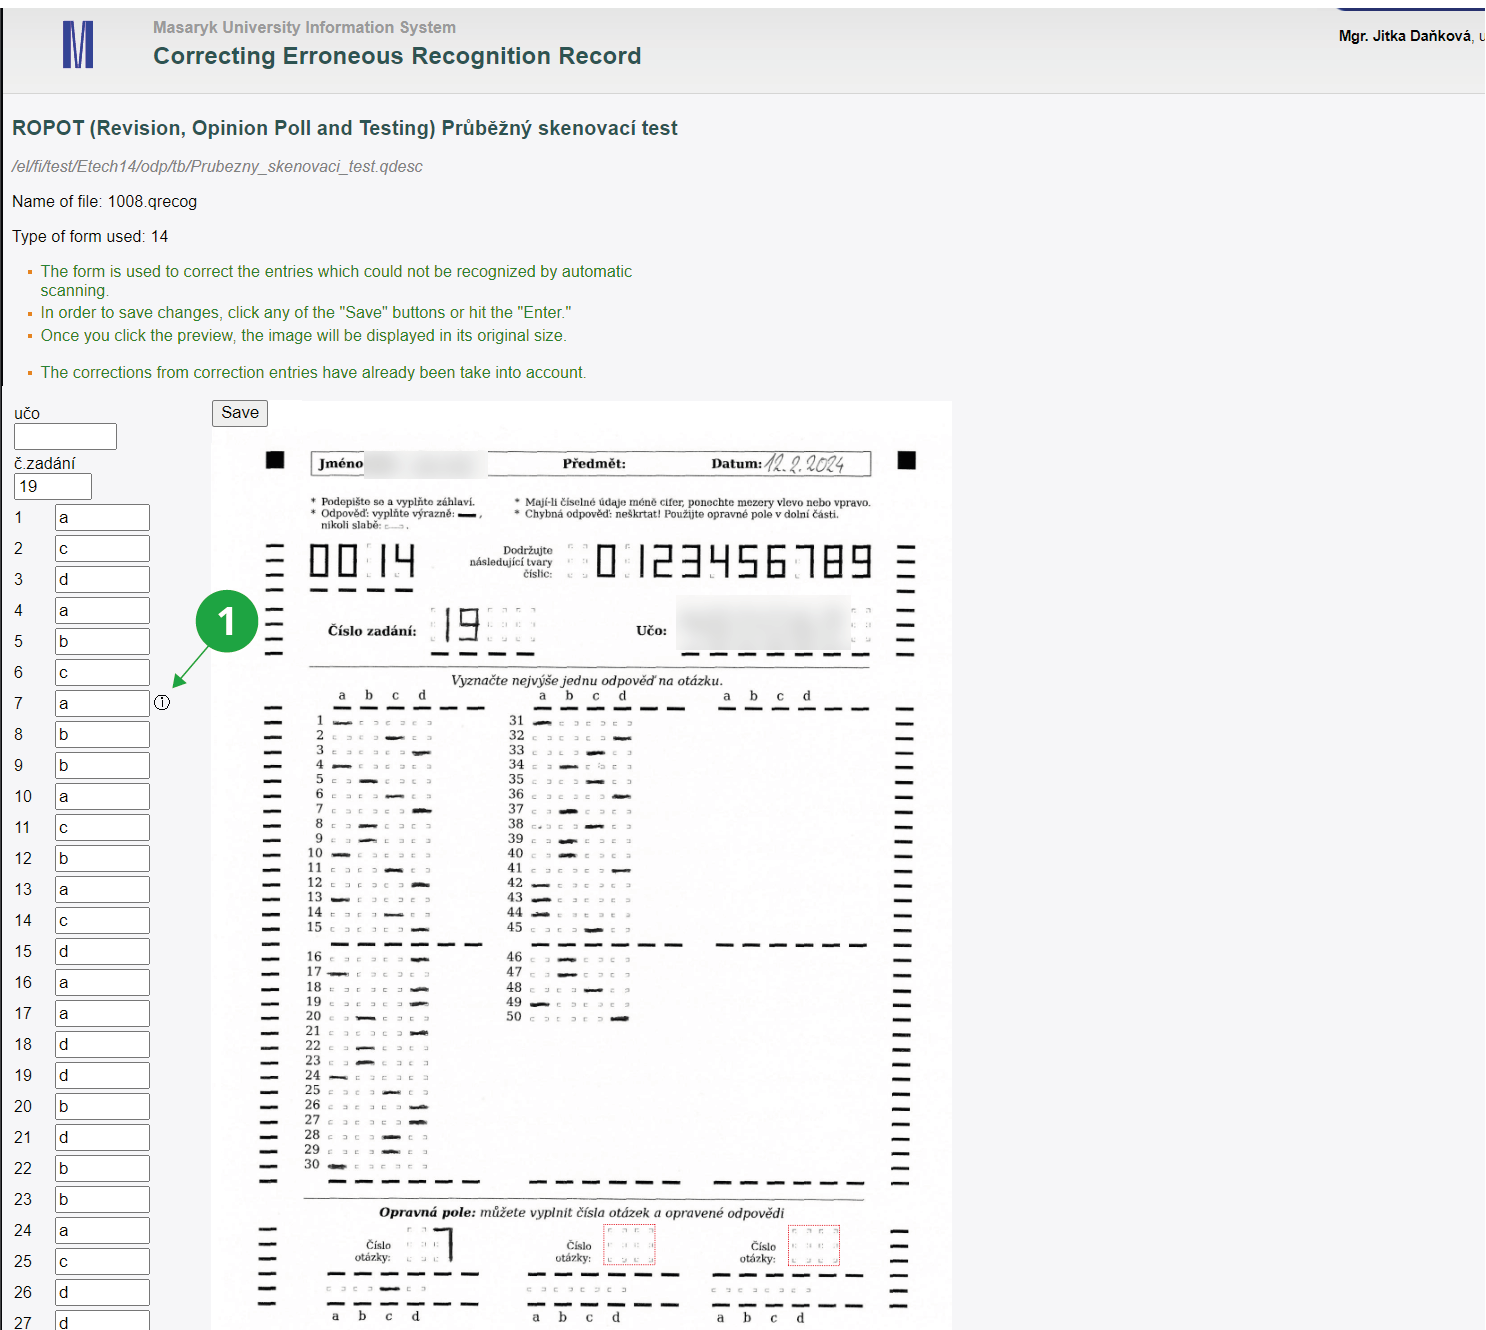
1After clicking on "correct" you can try to fill in the missing data yourself in the prepared fields if the data on the answer sheet is present and just not recognized.
1Correction of scanned answer sheet recognition. The "i" icon indicates that this is a recognized correction.

1Test sheets which have not been used.
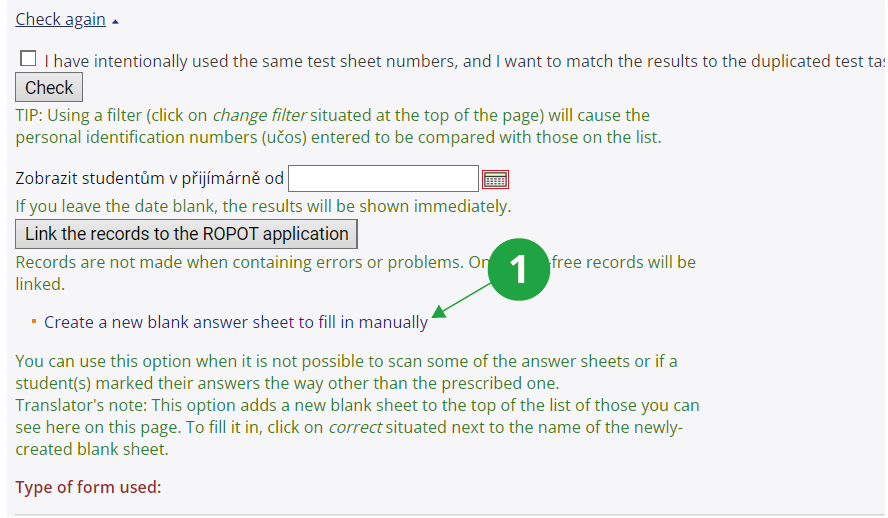
1This option can be used to correct unrecognizable sheet by filling it in manually.
Information system Teacher [course selection] (Notebooks) Evaluate on the basis of scoresand converted to grades according to the specified scale. Using the applicationInformation system Teacher [course selection] (Notebooks) Evaluation transferyou can assign students grades from the notebook as the final course grade. For more information, see the help:Information system Help Teacher NotebooksScanned answer sheet previews and a records of recognition (question number, ticked answer and number of points awarded for the question) can be found in the students' retrieval box:Information system Student Teaching Answer sheetsScores from scanned tests of unauthenticated persons or persons identified by application number cannot be entered in the notebook. Those identified by application number can find answer sheet previews and recognition records in their application.
- 8.I want to allow students to look at the assignment later after the exam – to look at the questions and their answersAfter scanning, recognizing and evaluating the tests, the IS will automatically link the recognized data to the ROPOT with the students' answers as if they had checked the answers directly in the ROPOT application in the IS (although students cannot see these answers yet – not valid for handwritten answers). The teacher can find such answers in the application:Information system Teacher [course selection] Work with ROPOT ResponsesIf the student is to be able to view the responses they provided, this can be set via the ROPOT description. This can be set straight away when preparing the ROPOT before printing the test sheets or at any time afterwards. These are the settings under "Display the correct answers to students after they have finished working with the ROPOT application" and "Rights and time groups":
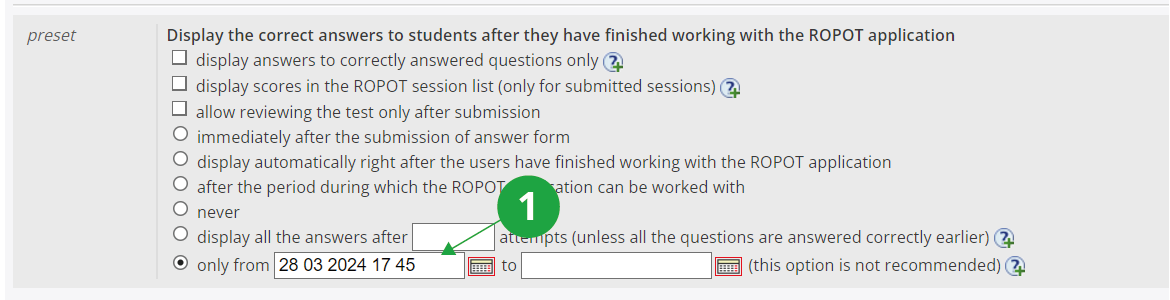
1Display setting options. In case of limiting the viewing "only to", it is necessary to take into account that students can print the displayed questions from the browser and have them available after this date.
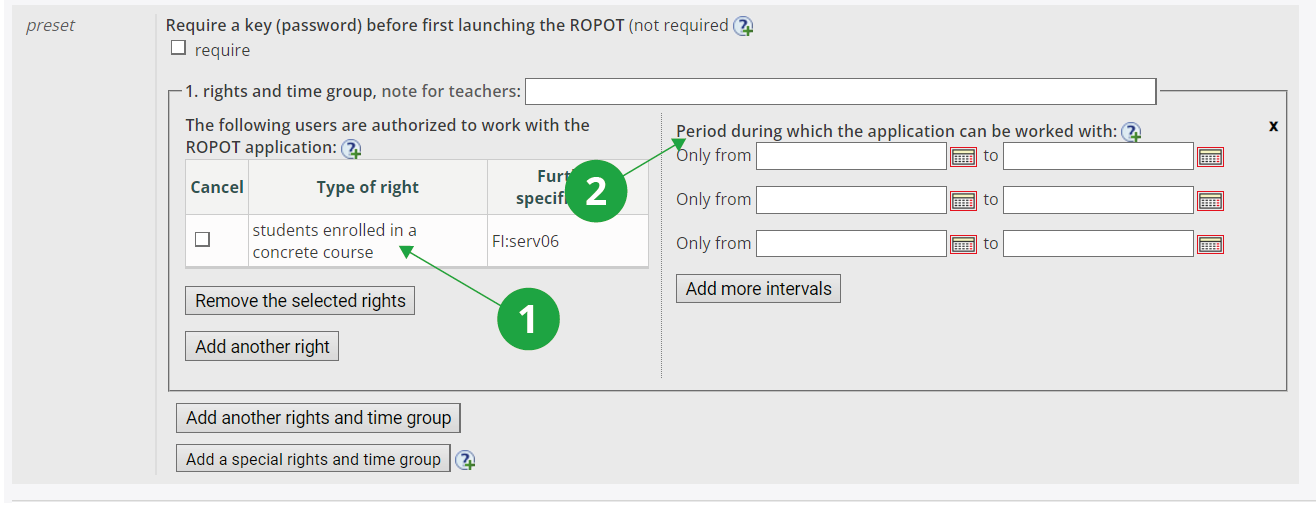
1 Who is allowed to work with the ROPOT: Typically, this will be students enrolled for a specific examination date or all students in a course; it will be those students who are allowed to view the responses they provided. You need to click on "Add another right", here you need to select the option "students with a reservation on an examination date" (or other suitable option), then select a specific examination date (or other refinement) from the menu and confirm by clicking on "Add the right".
2 When the ROPOT can be worked with: If the option "No, never (select this option provided the test is to be scanned and you only want to make it available for browsing)." is checked in the "Should students be allowed to access this ROPOT application repeatedly?" section, the content of the boxes can be left blank and students will only have access to the viewing their answers.
Finally, you need to specify the folder to which the link to the ROPOT should be placed. The course usually has a preset folder for ROPOT (Revision, Opinion Poll and Testing) in Study Materials and this setting does not need to be changed. The description of the ROPOT needs to be saved via the "Save and make accessible" button.
In the case of ROPOT in the "scannable handwritten text and scores" mode, students can see a scan of their answer sheet in their Retrieval Box according to the settings (the time and date from which students will be able to access the previews in the Retrieval Box can be set when checking results of recognition process). You can also make scans of answer sheets available to students in responses view by setting the ROPOT as accessible in the ROPOT description (the "Save and make accessible" button). - 9.Scanning of handwritten tests (i.e. free-form answers, not multiple choice)Scanning handwritten tests is an option a teacher can use if he/she wants students to write the solution to a problem on paper (drawing graphs, pictures, etc.). The teacher can then correct the students' paper solutions and give them a score. The teacher can write the evaluation comment and points directly on the answer sheets and then scan them in, or if the teacher prefers to enter the evaluation comment and points on the computer, he/she can scan the answer sheets first and then add the evaluation comment and points in the Responses application. Students can have multiple problems on multiple sheets of paper. The student writes their answers on the front side of the answer sheet. They can also write on the reverse side, but this is not scanned so the student will not see it in the IS JAMU. Once the paper has been corrected and marked by the teacher and entered into the IS JAMU, students can see their answers and the teacher's comments in the IS JAMU.
The basic procedure is illustrated in the following commented video, a more detailed procedure including all options is specified in the text below:
Procedure:
- Create a ROPOT description for scannable handwritten tests (see ROPOT description).
- Print out the dispatch form if necessary (see How to prepare the test (test sheets, answer sheets and dispatch form) for students?).
- Print out enough answer sheets or copy the answer sheet (see How to prepare the test (test sheets, answer sheets and dispatch form) for students?).
- You can either prepare the assignment on a separate sheet with students writing their answers on printed answer sheets with the header, or you can copy the assignment under the header on the answer sheet. However, you must not interfere with the machine-processable zone (it is marked on the answer sheet).
- The student fills in the sheet number (e.g. 3 sheets in total – each sheet will have one or more questions) and his/her učo. The student will complete the paper.
See
Help Teacher Tips on examinations based on scannable answer sheets
- Correct the handwritten test by hand, you can write your comments on the front side. Only the front side is scanned, the reverse side is not scanned. For correcting, you can choose whether you want to correct and scan the paper in colour or black and white. If you choose to scan in black and white to distinguish corrections and teacher comments, it is recommended that you use a thick black marker, for example.
- Enter the number of points in the box provided. In case you make a mistake and need to correct it, write in pencil and erase any errors. The second way is to write, for example, the letter E instead of a number in a blank, which will cause the error to be reported later. The error can then be corrected manually.
- Scan the answer sheets with the dispatch form either on your own or with CIT support. When sending to the IS, place the dispatch form either before or after the scanned papers.
If you have corrected the papers in colour, you need to set the scanning program skenovani.exe to scan "in colour" instead of "greyscale" before you start scanning.
- The handwritten tests are recognised and checked (see Checking results of recognition process – evaluation of the answer sheets)
- After checking, the results are entered into the IS. The IS JAMU will automatically create notebooks for each answer sheet, i.e. in notebook 1 will be the scores of all students from answer sheet 1, in notebook 2 from answer sheet 2, etc. In the notebooks, the scores are entered with an asterisk.
In the Teacher's Notebook – using the function "Add up scores stored in different notebooks" – will determine the total number of points by adding up the notebooks for sheet 1, sheet 2, etc.
If you plan to correct students' answers on your computer (i.e., you have set the ROPOT description to be manually evaluated), then you can enter the grading comments and scores in the Responses application, where you will find a preview of the scanned student answer sheets and a text box where you can enter verbal comments and scores. - Finally, you can enter an evaluation according to the total number of points (see Checking results of recognition process – evaluation of the answer sheets).
- Scanned answer sheets are placed in the retrieval box for students to review.
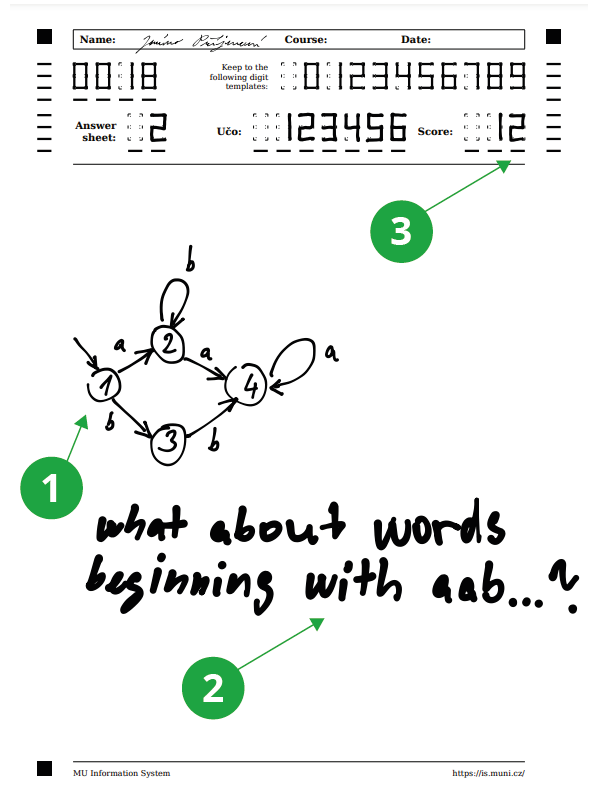
1 Student response.
2 Teacher's comment.
3 Number of points awarded, written by the teacher.
- 10.Is it possible to scan the responses of people who do not have učo?
Yes, it is. The procedure is the same as for scanning the tests of persons with the učo, but when creating the ROPOT description, you need to specify what type of number to scan. The option "change identification method" located next to the ROPOT mode selection on the ROPOT description setup form is used for this purpose. If you want to scan the tests of applicants for study at the JAMU, use the option "Identification method: application No.". If you want to scan the tests of persons without any relation to the JAMU (e.g. if you have your own list to identify them by), use the option "Identification method: ID number selected by me". Within a single ROPOT description, you can scan either only tests of students with učo, or only tests of applicants for study with application numbers, or only tests of people with an assigned number.
Scores from scanned tests of persons with an assigned number and applicants for study with an application number cannot be recorded in the notebook. Persons with an assigned number are not able to see answer sheet previews and recognition records of their tests. Applicants for study with an application number will be able to see answer sheet previews and recognition records of their tests in their application.
- 11.Is it possible to delete a scanned answer sheet from the Retrieval Box of a student to whom an answer sheet has been entered incorrectly?If you enter the answer sheet for the wrong student, or if a preview of the answer sheet is entered into the Retrieval Box by a stranger (this happens when a student incorrectly fills in his/her UIN on the answer sheet), the error can be corrected. If the answer sheet is in "scannable handwritten text and scores" mode, you can correct the error in the Responses application, where you have the option in the view of student's session to turn on deletion of answer sheets and delete sheets one at a time. By doing this (deleting the answer sheet in the session), the sheet will also be deleted from the wrong person's Retrieval Box. Note, deleting the entire person's session will not delete the established previews from the student's Retrieval Box.
Provided you have failed to find the information you were searching for, you can contact us at  fi
fi municz