You log in to the system with the help of učo
(person's university number) and primary password. If you don't know them, they'll tell you
faculty administrator of access rights, contact at
Enter https://is.jamu.cz/ into your web browser and
click on "Log in". For the security of the primary password, you will be redirected to the address islogin.cz. If you want to make sure the connection is secure, check the Information System JAMU certificate. In the browser's address bar, click the lock icon next to the URL (specific locations may vary by browser).
which displays detailed information about the site's security.
In the field "Učo or nickname" enter your učo or login name which
you have set up in IS JAMU. In the "Primary password" field, enter the password assigned to you by the rights administrator, or which you have changed yourself in IS JAMU.
1 Fill in your učo or nickname in the field.
2 Fill in your primary password, do not share it with anyone.
If you have problems logging in, read the appropriate Help.
3 Confirm the login by clicking on "Login" and you will enter the IS JAMU.
After logging in, use
The Information system System Change password
and choose a new (your) primary password, take care of its security. You can also set a login nickname here.
For better orientation in the system, read the help Navigation and search in IS JAMU.
The tiles offered in IS JAMU and other applications behave differently depending on the user's position at school. On the title page you will see the link Teacher. The IS JAMU allows users to manage their data in person, without intermediaries, as much as possible. If you encounter problems, contact support according to https://is.jamu.cz/spravci/. Actions performed in the IS have the same binding force as administrative actions performed on paper. When entering information, pay attention to its security, all operations are recorded (if you need to find something, you can contact the system administrator).
with the teacher's answering machine agenda. Your minimum responsibilities include:
enter the awarded marks into the system in time
list exam dates
annually update the lecture syllabus and your other (teacher) information for the Course Catalog
respond appropriately to any emails from students.
In addition to the listed duties, the system offers you a very extensive set of administrative and e-learning tools to facilitate and enrich your work. The teacher's recorder is described in a separate help section.
If you are included as an instructor in the course and the course does not register any lecturer or seminar group, the course lecture will also be displayed in your timetable.
because your password is not kept in open form in the system.
Wrongly chosen period – semester or faculty
Almost every study page has the identification (name) of the faculty and the period (semester) at the top. You can get to the new (different) semester by clicking on the icon before the list of periods, you can go to another faculty using the icon in front of the name of the faculty.
1 Choice of another faculty
2 Choose a different period
End of work with IS
To end the activity, use the button to log out of the IS, which you will find in the upper right corner or in the footer of the page. Confirm the end of the work once more with the "Logout" button.
Avoid abusing your account
It is necessary to close all windows of the browser, some window of which has been logged in to the IS. Otherwise, another computer user could work under your ID.
1 Logging out of the IS
Incorrect data in the system
Contact the IS JAMU coordinator, the individual departments of the school are responsible for the given data.
Ideas, suggestions, questions, mistakes
Comments on the IS are welcome at jamuis@fi.muni.cz.
When describing your comment, be as accurate as possible, always state the address of the site, the student with whom you encountered the problem, etc. – the system is very extensive.
In applications for teachers (Teacher‘s Notebook), you need to specify which mode you want to work in. The system gives you a choice between the courses you teach in a given semester and those that are set up in the Catalog so that grades can be entered by all teachers (group projects, supervision of theses, etc.). If you have the s_vyuka access right, you are offered a choice of other departmental courses. On the course selection page, always check the faculty and the semester selected at the top.
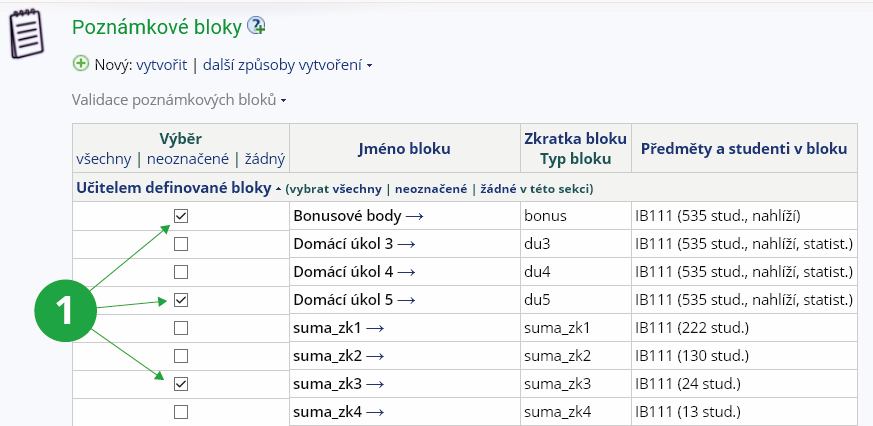
Simultaneous selection of multiple courses
The teacher can select multiple courses at the same time in applications that allow this by checking them at the selection page. The application will then work with a list of all students enrolled in all of the courses selected. You can also add a course to the selection by clicking "Change filter" and then "Select course".
Change of course
To change a course or list of courses, always click on "other courses" at the top of the page next to the course name.
On each page of the Teacher's Notebook, you have a header with an overview of the selected courses. On the right hand side, you will find a drop-down menu called "Applications", which you can use to view links to each Teacher’s Notebook application. With these links, you can easily navigate to other Teacher‘s Notebook applications without having to return to the front page.
The Teacher‘s Notebook header also shows the date and time the selection was made. If there have been any changes to the selection since then, you can recalculate the data by selecting "update".
1 Button to select another course.
2 Button to change the selection limitation or add another course to the selection.
3 Details of the current selection and the ability to update it.
4 Overview of the most used applications.
5 Direct access to the application.
You can access the selection of active students of a course or seminar group from the front page of the Teacher’s Notebook by clicking on the arrow next to the course/seminar group name.
Yes, you can manage one course offered under several codes by adding it to your selection under all codes. You can then perform some operations for the selected courses together, e.g. creating examination dates, entering grades, creating statistics, etc.
1 Overview of selected courses.
2 Selected filters for the linked list of students.
When you select a course offered under multiple codes, you can also clearly view the course syllabus, study materials, etc. for each course code in the Teacher's Notebook. .
The filters listed below can be applied to the student list. We may want to filter the list of students enrolled in selected courses, e.g. to students enrolled for one or more specific examination dates, restrict the list to a selected seminar group, restrict the list to students repeating the course, etc.
If you check multiple filters at the same time, you can select the operator (AND, OR) that will be used to concatenate the filters. Thus, you can include in the selection persons who meet all the conditions simultaneously (AND) or meet at least one of the conditions (OR). By default setting, all conditions are to be met simultaneously (AND).
Any number of filters can be applied at the same time. For example, if we check simultaneously "restrict to students repeating the course as a result of failing to complete it" and "restrict to students who have failed to complete the course" filters, we get a list of students likely to fail their study.
To apply a filter, check the required course(s) at the top, then check the required filter(s) at the bottom, and then click the Selected button below the checked course. It is assumed that you select course without filters more often than you select course applying filters.
To change the current filter, similar to changing the course, click on the (change filter) right below to the course code and name at the top of each page.
For your information, the current list of enabled filters is displayed at the top of each page. Please pay due attention to it.
1 Display the current filters.
2 Link to change the filter.
Work with the current list
If you make changes in the current selection of students when working with the Teacher’s Notebook (e.g. if you have limited the selection to a certain seminar group and then you enroll a student from another seminar group to that group), the selection is not automatically updated. To update the selection, click "Update" in the Teacher‘s Notebook header.
Tip: Quickly select a seminar group
If you want to work with a specific seminar group, you do not need to select a filter. When you enter the Teacher's Notebook, the seminar groups are automatically listed for your courses. You can work with the selected seminar group immediately.
Individual restrictions:
extend the list to those who have registered (i.e. who have not yet had their registration confirmed)
The Teacher's Notebook applications work with the list of enrolled students, i.e. those whose registration has been confirmed by the faculty's study department. If this has not yet been done, the teacher can check "incl. the students who have registered for the course (not enrolled yet)" to extend the processed list of students to include registered students, i.e. students who have expressed interest in registering for the course.
expand the list to include completed and inactive
This option will include students with completed and inactive studies in the list of students.
seminar groups – students
of my seminar groups
The selection of students is limited only to students enrolled in my seminar groups.
of the seminar groups to be selected
This filter allows you to select only students from certain seminar groups. First you need to check this option and confirm with the "Apply filter" button. Then select the required seminar groups and confirm the choice with the "Select" button.
not enrolled in any seminar group
This option selects students who are not yet enrolled in any seminar group.
examination dates – students
selected by examination dates
If you check this filter, click on the selection button (after checking the course or courses), a list of examination dates created for the selected courses will appear. Check one or more examination dates and click "Select". Only those students who are registered for the selected examination dates will then be included in the processed list.
If the selected courses have no examination dates, then this restriction is ignored – a list of examination dates to be selected will not appear.
with no reservation for a slot on any examination date
This option selects students who are not registered for any examination dates in the course.
who have not completed the course yet and who have not made a reservation for a slot on any examination date in the future
The filter selects students with failing grades who are not registered for any future examination date.
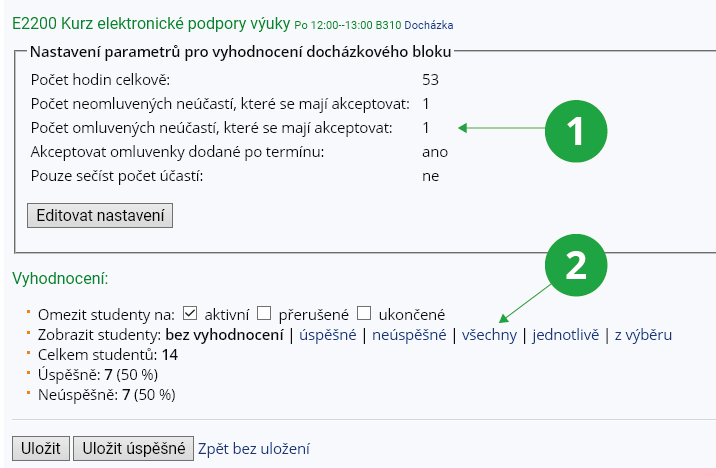
evaluation – students
with no evaluation recorded
Only those students of the selected courses who have not yet been assigned any grade will be included in the list. They have a blank grade string.
with no evaluation and with the "-" mark recorded
All students who have not any grade or a grade of "-" (did not attend) will be included in the list.
with a fail grade, the "-" mark, or no evaluation recorded
The list will include all students who have not any grade, failing grade (i.e. F, N) or "-" grade.
who have failed to complete the course
Only those students in the selected courses who have a failing grade will be included in the list. Failing grades do not include "-" grades (did not attend).
with the "-" mark recorded
Only those students of the selected courses who have a last assigned grade of "-" will be included in the list (did not attend).
those who have completed the course
Only those students of the selected courses who have a passing grade will be included in the list. Grades are sought in the selected courses of the selected period (not in the past).
For the purpose of evaluating pass or fail grades, only the last grade in the grade chain is taken into account.
with evaluation recorded
Only those students of the selected courses who have any non-blank grade chain including "-" (did not attend) will be icluded in the list.
with a certain grade (result)
A page to specify will appear with a list of the ratings used. Check one or more of the ratings offered.
number of re-sits (based on the evaluation already entered) – students
with fewer than two re-sit grades recorded
The list includes students who have taken none or only one re-sit.
with two re-sit grades recorded
Students who have taken two re-sits will be included in the list.
with more than two re-sit grades recorded
The list includes students who have taken more than two re-sits.
with the right to a re-sit
The list includes students who are eligible to take at least one re-sit.
enrolment – studenti
repeating the course as a result of failing to complete it
When you select this filter, only those students who have previously studied the course with a failing grade in the same study will be included in the list processed. The filter does not need any specification.
who, despite fulfilling requirements of the course before, enrolled in it again
Only those students of the selected courses who have already successfully completed the course in the past and are now enrolled again in the same study will be included in the list.
who, despite fulfilling requirements of the course before, enrolled in it again and those who enrolled in it as a result of failing it
Only those students of the selected courses who have already enrolled in the course in the past (regardless of success or failure) in the same study will be included in the list.
enrolled in the course for the first time
This filter creates a list of students who are enrolled in the selected course for the first time.
who did not have the course recognized
This filter creates a list of students who do not have the selected course recognized.
with an approved course repetition exemption application
Only students who should repeat a course due to a previous failure to complete it but have been granted an exception by the study department will be included in the filter.
selected by completion type
A page to specify will be displayed listing the completion types with which students have enrolled in the selected courses. Check one or more of the offered completition types.
selected by enrolment in some other course
The selection of students will be limited to students who are or have been enrolled in a course specified by its code during the selected period. Case is not considered when entering the code. If the code is not entered, the filter will not be applied. If you select "any term" then it will filter to those students who have or have had a course entered by code in any of the terms. The student does not have to have taken the course in the same study, students who have taken the course in any of their studies will be included (assessed via individuals, not studies).
who completed another course
A page to specify will be displayed to select the term and course code of the course taken. You can select whether the student must have taken all courses or only some of the courses listed.
who have not enrolled in the course, but only registered for it (use in combination with the extend the list to registered students option)
Only those students who are not enrolled in the selected course, but only registered for it, will be included in the list. When selecting this filter, you must also extend the list to include registered students. It is also important to note that the check for automatic student enrollment in a course always takes place around midnight. The data obtained by this selection is therefore current as of that date.
type of studies – studenti
selected by type of studies
Types of study are: B bachelor's degree, M master's degree, N master's follow-up degree, D doctoral degree, R advanced master's state examination, C lifelong education.
selected by study mode
The forms of study are: full-time, distance, combined and lifelong.
of the fields/plans of study to be selected
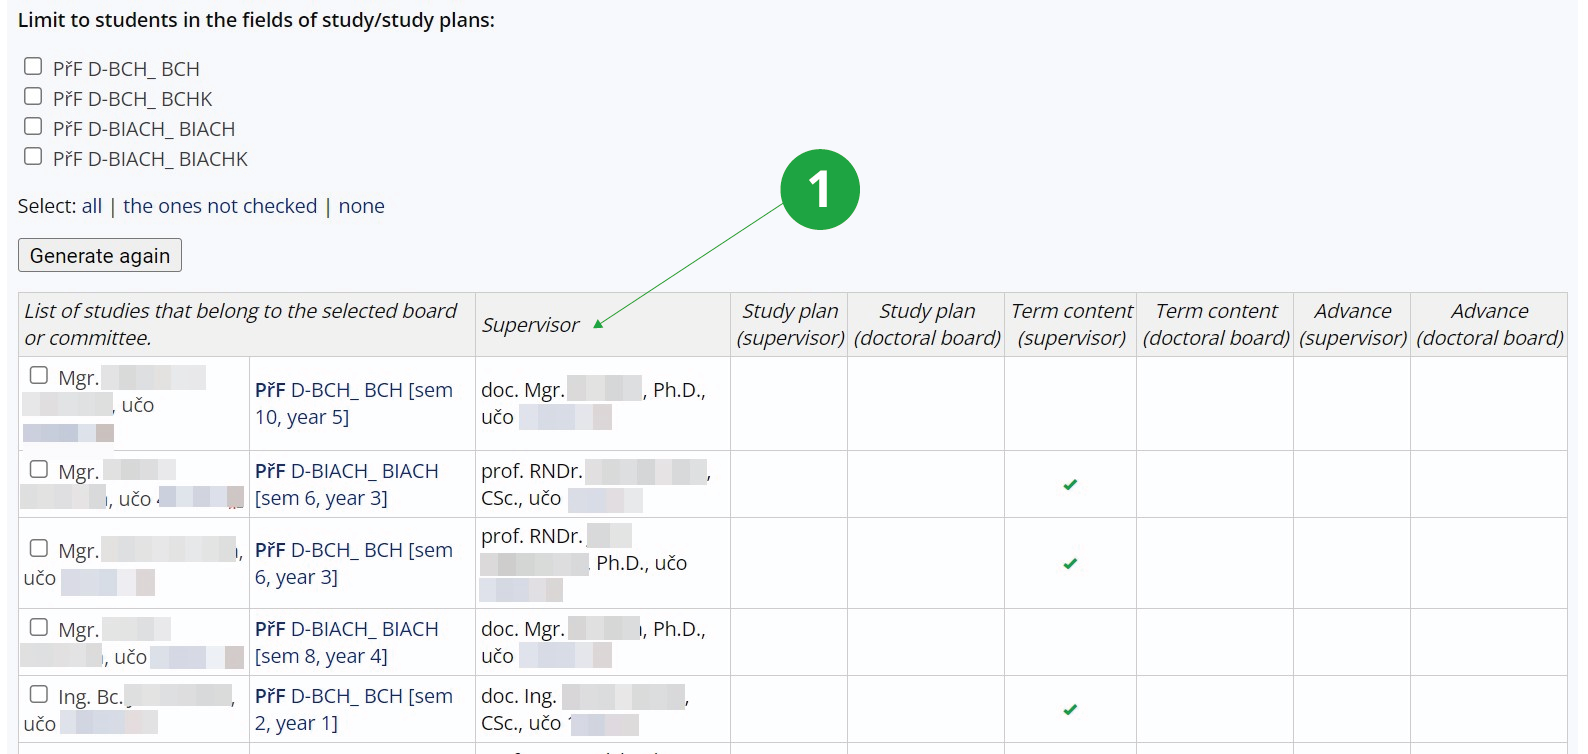
The selection of students can be filtered to students of specific fields of study. You have to first select this filter and confirm it with the "Apply filter" button. Then select one or more fields of study from the list and confirm the selection with the "Select" button.
of the specializations to be selected
The selection of students can be limited to students of certain specializations. You have to first select this filter and confirm it with the "Apply filter" button. Then select one or more courses from the list of courses and confirm the selection by clicking the "Select" button.
selected by the term currently enrolled in
The selection of students can be limited to students who are currently studying in the designated semester. Semester evaluation is done at the current point in time and not at the time the course was/will be taught. Only active (not interrupted or completed) studies are selected. A student may study more than one active studies in one semester and may be in a different semester in each of studies. Therefore, one student may be in multiple semesters at the same time.
selected by the stage, year or block currently enrolled in
The selection of students can be limited to students who are currently studying a particular stage/year/block (depending on the terminology used in the faculty). See also the notes on semester filters. Here the analogy applies. The faculty does not need to record the stage/year/block at all.
selected by study group
Some faculties use a numerical attribute of study – study group. The student is thus assigned to a specific study group for the entire period of study (or at least until the study group number changes). This study group is applied to all courses studied in the degree programme.
After selecting this restriction, a page to specify will appear with a list of study groups to which students registered for the selected courses belong. Check the required study group(s).
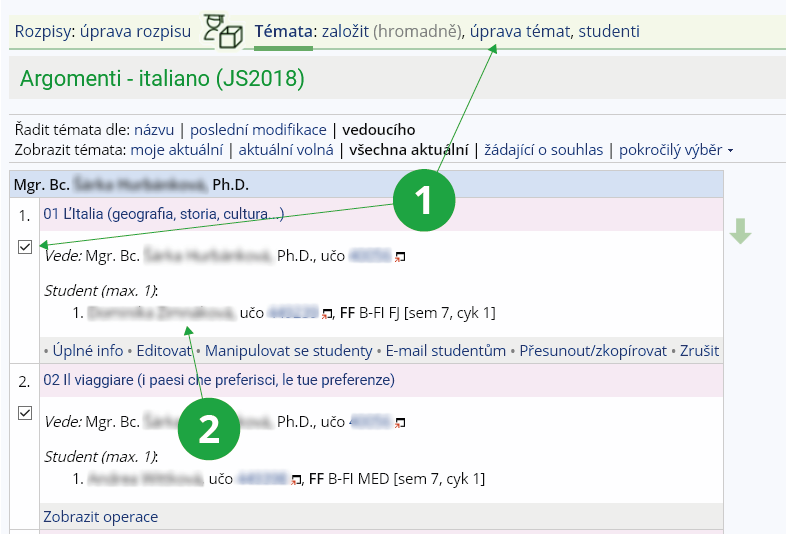
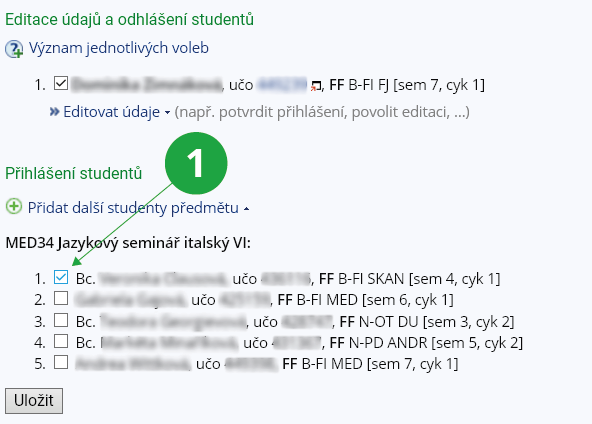
topic lists – students
enrolled in the topics of course topic list to be selected
The selection of students can be limited to only those students who are enrolled in a particular topic from the course topic list. A course topic list is one that is linked to a specific course in which the student will participate. It is not a topic list of theses. You have to first select this filter and confirm with the "Apply filter" button. Then choose one or more topics from the course topic list and confirm the choice with the "Select" button.
not present on any course list
The selection of students can be limited to only students who are not enrolled in any topic on any of the course topic lists.
enrolled in the topics of faculty topic lists to be selected
The selection of students can be limited only to students who are enrolled in a specific topic from the faculty's topic lists. The faculty topic list is e.g. the list of thesis topics. You have to first select this filter and confirm with the "Apply filter" button. Then select one or more topics from the faculty topic list and confirm the selection with the "Select" button.
other – students
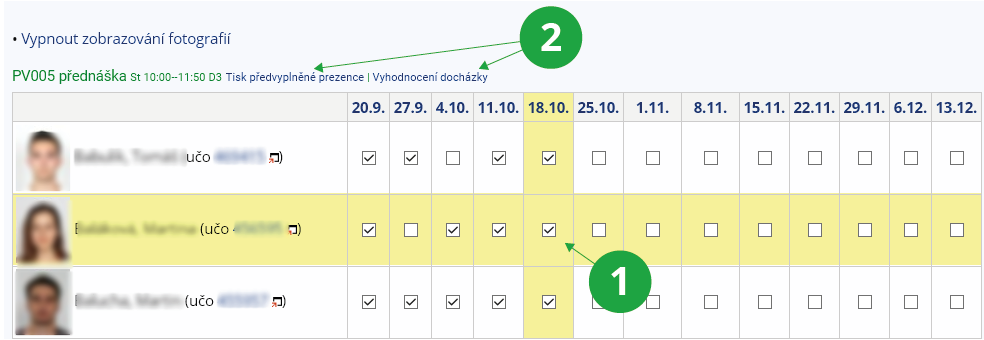
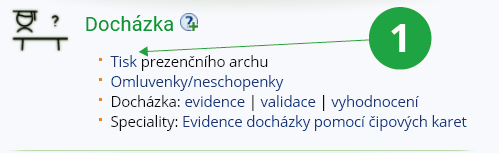
selected by their attendance
To select students by attendance, you have to first select this filter and confirm with the "Apply filter" button. Then specify whether you want to work with students who met attendance requirements (those who have met requirements in all attendance notebooks), with students who did not meet attendance requirements (those who have not met requirements in at least one attendance notebooks while all of notebooks have been evaluated) or with not yet evaluated attendance (those who have at least one attendance notebook that is not evaluated yet).
selected by their score recorded in a notebook
The selection of students can be limited by the number of points achieved by students, which are listed in the selected notebook. You have to first select this filter and confirm it with the "Apply filter" button. Then type the number of points you want to select a group of students on the basis of. You have to confirm the selection by clicking on the button "Select".
selected by the text recorded in a notebook
The selection of students can also be limited by the word given in the selected notebook. The word can only be made up of letters, numbers, asterisk (*), at sign (@) and underscore (_). This filter can also be used to select students who, on the other hand, do not have the word in the notebook. You have to first select this filter and confirm with the "Apply filter" button. Then enter the word or characters you want to select the group of students based on in the free field. You have to confirm your choice by clicking the "Select" button.
with filled Homework Vault
To select students with a filled homework vault, you have to first select this filter and confirm with the "Apply filter" button. Then, on the page to specify, select the required homework vault and confirm the selection with the "Select" button.
selected alphabetically
The selection of students can be limited by the first letter of their surname. On the page to specify, select the required first letters.
female students
The selection of students can be limited to women only.
male students
The selection of students can be limited to men only.
selected individually
The selection of students can also be limited by the list. You have to first select this filter and confirm it with the "Apply filter" button. Then select the required students from the list and confirm the selection with the "Select" button.
excused on a specific date
Selection of excused students only.
Czech citizenship (OP VK)
Limitation of student selection for the needs of the OP VK.
permanent address in the Czech Republic (OP VK)
my doctoral students
The selection can be limited to PhD students.
I supervise
Filters the selection to students for whom you are the thesis advisor or supervisor.
students with an individual study plan (ISP)
students without an individual study plan (ISP)
special-needs students
students who opened the ROPOT
students who submitted the ROPOT
student on maternity leave
Student on parental leave
student on internship
selected by the position(s) they occupy on the alphabetically-ordered list (e.g. the first 100 students)
In the student list, select a section of students by number in order from to, e.g. 101 to 200, and then enter these numbers in the page to specify. Students in the list are numbered from 1.:
Yes, you can find your past selections at the top of the Teacher Notebook page under the "Selections used before" link. Clicking on this link will show you all of your previous selections. You can then select two options for each previously used selection. First, the "Use this selection" option, which uses the student selections you have already created and saved.
The second option is the "Update the students in the selection and use it" option. Use this when you want to update the list of students according to the created condition. For example, if you have selected students in a previous selection with no evaluation recorded and you want to return to this selection later, but with the current number of students who still have not any evaluation recorded, you would select the "Update the students in the selection and use it" option. This will update the selection entered and the resulting list of students will be updated.
This application is intended for advanced users (if you don't know what to do, please contact jamuis@fi.muni.cz). You can use the app if you need to select students through complex combined conditions, e.g. across multiple terms, multiple periods, etc. To make an advanced selection, first select the course(s) you want to use the selection for, click on "change filter" and then "advanced selections". For example, if you have selected students from a previous selection and want to choose further filters on the selection, check the button to include the currently selected group of students in the new selection and select the operator to combine the two selections (AND, OR, MINUS). This allows you to gradually create a whole chain of selections. If you do not check the button to include the currently selected group of students, the choice of operators disappears and only the current request is recorded.
1 Advanced selection options.
If you need to gradually filter a group of students, check the button to include previously selected group of students in the selection and then add filters using the AND operator. This allows you to gradually filter the required group of students you want to work with.
1 Demonstration of gradual filters.
Tip: Changing filters will also affect the original selection
If you create a series filtered by a selection and then modify the filter using Advanced Selections (via the "change filter" option), the change will also be reflected in the series to which the original filter was assigned.
To select another course, click on the "other courses" option next to the course name.
1 Use the "other courses" link to select another course.
In the top right corner of the page, you can change the faculty selection by clicking on the icon in front of the faculty name, and you can also change the period by clicking on the icon in front of its name.
It offers options to limit the list of students in the Teacher's Notebook according to different criteria. For example, you can limit the list to students who are repeating a course for failure, and then send them an email that you want them to sign up for a specific seminar group. Or you can select students who have enrolled in the course with "requirements fulfilled" grade, and then want to give them "requirements fulfilled" grade in bulk.
The Teacher's Notebook applications thus work using the list of students you have selected with the appropriate filters. They display a smaller number of students and perform any bulk operations on this smaller list of students. You can access the filter change as well as an overview of the selected filters in the Teacher's Notebook header.
You can access the list of students of the selected course via:
The Information system Teacher Students Show list
1 Link to a list of all students in the course.
You can further work with the list of students as needed. You can choose which columns will be displayed in the list, e.g. thumbnails, seminar groups, evaluation etc.
1 Column selection.
2 Select the sorting method.
3 Refresh the list to see the changes.
The application also allows selection of output type and encoding for list export or advanced printing options.
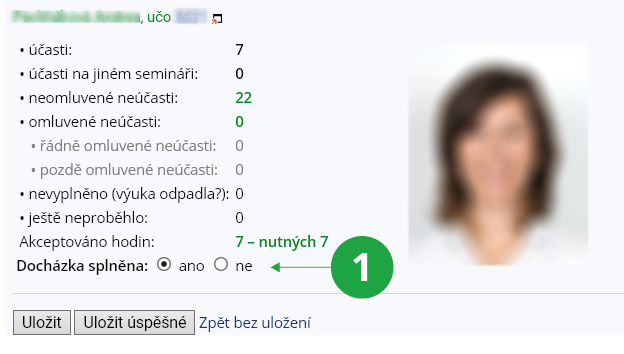
Through the Detailed Information on a Student application, you can view all course information related to each student.
The following information is displayed:
photo
date of registration of the course
date of enrollment into the course
seminar group selected
points/grades from individual notebooks
the date of the examination he/she is registered for (and when he/she registered for it)
records of ROPOT sessions
submitted files
whether or not he/she is excused from the class/exam
There are several ways to access this application. One way is to search for a student through the People application. On the Personal page, as their teacher, you'll see the "My Student" section, where you'll find all the courses the student is taking or has taken with you. Under each course you will then find a link directly to the Detailed Information on a Student application.
1 My Student section in the People application.
The second option is to click in the Student section of Teacher’s Notebook on the link Detailed Information on a Student, where you will see an alphabetical list of all students in the selected course. Then just click on the name of the selected student.
1 A link to the Detailed Information on a Student application.
Identification describes the status and structure of the student's studies. Each student is studying one or more fields of study in the study programme. The field of study may still be specified by the specialization. For more precise information about the programmes and fields of study accredited at JAMU, please refer to the Programme/Study fields/Specializations overview, here we only provide abbreviations.
The Information System Studies Degree Programmes, Fields and Specializations
In each of the fields of study, the student is at some stage (year, semester, block, cycle).
Bc. Jan Novák,
FI
M-SS
VT [sem 7, year 4] PřF:MA [year 3]
The study may be interfaculty, where one field of study belongs to a different faculty.
If the study has a form other than full-time, it is written at the end: combined (combined), distance (distance), lifelong (lifelong). If the study has already been completed, then it is written (compl.), successfully completed (grad.), if interrupted, then (interr.). E.g. Jan Novák, PrF B-PSP VNEM combined [sem 5, block B] Ing. Jana Nováková, ESF M-HPS NH (completed)
Students can cancel their course enrollment during the first few weeks. You will also not find students who have terminated, completed or interrupted their studies in the Teacher's Notebook, i.e. they are not in "active" study. The owner of the s_vyuka access right can work with inactive students in the Teacher's Notebook if needed (adding them there by changing the filter of the student list).
The Information system Teacher (Students) name changes
shows all changes of name, surname and family name in the last two years. It is applied to the list of students in the course, or to a list limited by the filters of the Teacher's Notebook.
To send an e-mail to students, there is an application at
The Information system Teacher (Students) Send mail
The e-mail will be sent to all students who are on the list you have previously filtered in the Teacher's Notebook (see
What is meant by "change filter" of the student list?). All e-mails you have sent and saved (including from your other courses) and all e-mails used in this course (even from other teachers) are offered. E-mails not used for more than two years are automatically deleted without notice.
The mail that the teacher sends to all students in the course is automatically saved in the Mail subfolder of the Course-Related Instructions folder in the Study materials posted under the course. Students who enroll in the course after the group e-mail has been sent will automatically receive an email notifying them of the specific e-mails.
You can also send an e-mail only to students in the selected seminar group of the course (do not limit the filter any further). The e-mails will then be saved in the subfolders of the respective seminar and will be accessible only to students of that seminar group.
The Term Calendar delineates registration period, course enrollment period, and
period of enrollment changes. During these periods, students are allowed to select (register for)
the courses they want to enroll in as well as cancel their registration.
The student selects the courses he/she wants to register for either by looking them up using their codes or by
picking them out from a registration template. He/she can register for any course offered at the University
in the given term.
The start and end dates of registration period, which are specified in the Term Calendar, differ from
faculty to faculty.
Provided the student meets the enrollment pre-requisites specified for the course he/she wants to enroll in, he/she will
succeed in registering for it, i.e. his/her registration record will turn out to be marked white. However, if he/she fails to meet
one of the enrollment pre-requisites, his/her registration record will be marked red (meaning that his/her registration was unsuccessful).
During the course enrollment period and that of enrollment changes, his/her registration records
are processed each time he/she changes his/her enrollment (and then every
night) and he/she is automatically enrolled in the courses for which his/her
registration has been successful.
Once he/she enrolls in a course, he/she has the right and duty to study it.
Students who have interrupted their studies are also allowed to register for courses. Nevertheless, the System does not enroll them in these
unless they have previously resumed their studies. The Office for Studies are authorized to register students for courses and enroll them in these
regardless of the status of their studies.
Students can only register for and enroll in the courses offered in the term they last enrolled in.
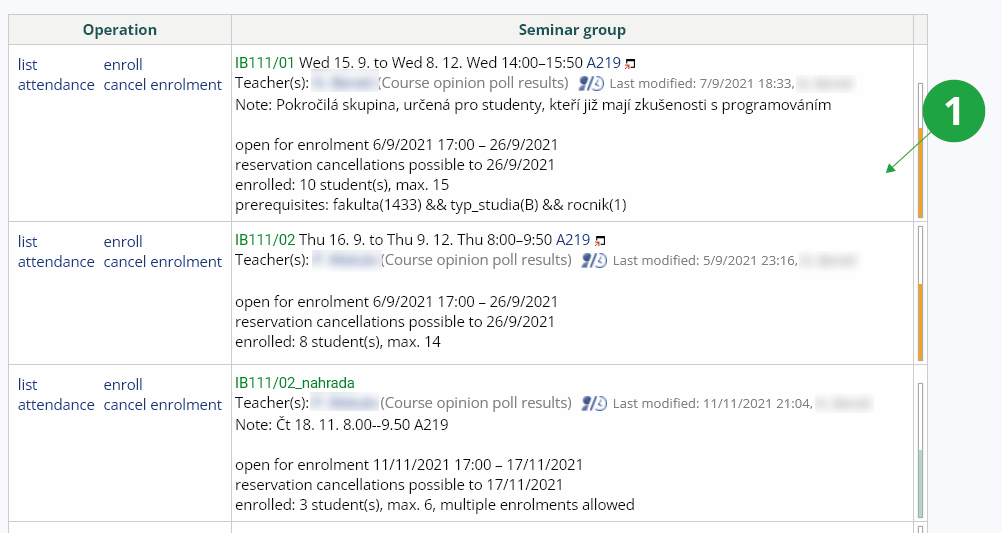
A student will not be listed in your Teacher's Notebook unless he/she has been enrolled in your course.
To include the students who have registered for the course but have not been enrolled in it yet in your Teacher's Notebook, please click on
'change filter' situated next to the name of the course and select 'extend the list to registered students,
i.e. those whose enrollment has not been confirmed yet'.
1 Extending the list to registered students
The Information system Teacher [chosen course] (Course Catalogue) Term Calendar
The Information system Teacher [chosen course] (Course Catalogue) Browse templates
The Course Catalogue specifies the so-called course enrollment pre-requisites. Provided the student meets these, his/her registration is successful and his/her
registration record is marked white whereas if he/she does not (meet these), his/her registration is marked red. However, the unsuccessful registration
may also result from some other factors than just a failure to meet the enrollment pre-requisites.
The most frequent causes of registration problems are as follows:
The course is full and there are no longer any vacancies in it.
The course enrollment pre-requisites have not been met.
The course is only offered to students of certain fields.
1 Unsuccessful registration - prerequisite not met
To browse the list of students with red registration records, use the following path:
The Information system Teacher [chosen course] (Students) Registration: problems
Provided there are many students who did not succeed in registering for your course, please ensure
the enrollment pre-requisites specified for your course in the Course Catalogue are correct. If this is not the case,
please inform your Office for Studies of the fact.
During the enrollment period (not the registration one, though), students with red registration records
can apply with the teacher of the course for being granted the permission
to enroll in it. When doing so, they are expected to give the reasons why they think they should
be allowed to enroll in the course despite not meeting the enrollment pre-requisites. Since the applications
are sent to all the teachers of the course, the teachers are recommended to agree on who will be handling them.
The permission/exception can be granted via the IS application the path to which is as follows:
The Information system Teacher [chosen course] (Students) Registration: grant permission
If the student's application has not been processed yet, he/she can withdraw it – an act of which the teachers
are notified by e-mail.
Provided the permission/exception is granted, the student's registration becomes successful and his/her registration
record changes into white.
1 Not decided yet.
2 Text with reason for comment on the request.
3 Save the request.
'Souhlas' represents a special enrollment pre-requisite in that it requires every student who wants to enroll in the course
to apply for the permission. Hence, the student's initial registration record is always red in such a course.
Nevertheless, some red registration records do not allow students to apply for enrollment permission/exception and
these cannot be granted either. This, for instance, applies to the situation where the student has already completed
the course and thus he/she is not allowed to enroll in it again - a rule an exception to which is the course specified
in the Course Catalogue as the one allowing students to enroll in repeatedly. In such a situation, the student can only be
enrolled in the course by his/her Office for Studies.
The Information system Teacher [chosen course] (Students) Registration: grant permission
check the box "show also processed requests" and click on "apply". You will see a list of students who have requested an exception. For students who have an exception denied, check the "cancel previously granted denial" box and save. You can now agree to enroll the course again.
If the message "error assumed" is displayed during the prerequisite evaluation, information about the last evaluated subsection of the prerequisite is displayed.
Prerequisite is evaluated only until a clear result is known. Thus, for example, if the prerequisite is entered as IB000 && "anything" and the student has not completed the course IB000, then "anything" is no longer evaluated and IB000 is listed as an error. If prerequisite IB000 || "anything" and the student does not meet the IB000, then "anything" is listed as a possible error.
Tip: Example of prerequisite evaluation
( IB000 || IB112 ) && !IA008
The student did not meet the IB000, it is evaluated whether he met at least (because it is IB000 || IB112).
If neither IB000 nor IB112 has been met, then the prerequisite is evaluated as 0 && "anything" and therefore does not need to be evaluated further. The last expression evaluated was IB112, which is also listed as an error.
In some situations, where it is only a limited number of students that can enroll
in a course, those who enroll in it early enough may prevent some others from doing so
later despite the fact the former do not meet the enrollment pre-requisites of the course while
the latter do.
The reason why the Information System does not prevent such situations from occurring is
that the teacher would not be able to grant any student his/her enrollment permission/exception
if he/she found it appropriate (because of the student's illness, for instance).
Provided you wish to avoid the aforementioned problem, you should do one of the following:
enable the 'Souhlas' pre-requisite mode for the course,
send the students not meeting the enrollment pre-requisites an e-mail requesting them
to cancel their enrollment when they know they will not meet them anyway,
contact the Office for Studies asking them to cancel the enrollment of the students
not meeting the enrollment pre-requisites.
Manifestation of the student's request to study the course. The student shows interest by clicking on the course in his / her application at the time of registration, enrollment, or change in enrollment. You will find this time in the Term Calendar.
Enrollment
Formal confirmation of registration by the study department.
Registered
Number of students / number of studies who have registered for the course, ie. showed interest in studying the course.
Zapsáno
Number of students / number of studies for which the course was officially enrolled by the study department. The number of enrolled students is always less than or equal to the number of enrolled students.
If there are too few students (due to the number of registered), then the study department has not yet confirmed the enrollment. Clarify this situation with your Office for Studies.
The teacher has the right to work with a list of registered students in a number of applications. It does this by checking the box “incl. the students who have registered for the course (not enrolled yet)".
To change this type of setting, click on "other courses" next to the code and item name at the top. See this Help for details on student list restrictions..
If students stay unregistered for a long time, it's wrong. Unregistered students do not register for the exam, you do not enter a mark for unregistered students.
Only active students count towards the number of enrolled and registered students. If any of the enrolled or registered students interrupts or terminates their studies, the number of enrolled and registered students will be reduced.
Not specified
Number of students / number of studies for which no evaluation has been submitted yet. Completed studies and studies in the procedure for termination of studies are not counted, because teachers can no longer submit evaluations in these studies.
-, 1, 2, 3, 4, P, N, Z, ...
Number of students / number of studies for which the given evaluation was assigned.
Filled
Percentage completion of the course evaluation. It is desirable that the evaluation be 100% completed at the end of the examination period (unless the faculty issues another instruction). For students who did not attend the exam, about whom you know nothing, etc., enter the rating "-" (minus). This evaluation means "absent" and has not been included in the calculation.
Teachers do not have the opportunity to enter evaluations in completed studies and studies in the procedure for graduation, therefore these studies do not count.
If the user wants to publish more materials, it is advisable to first create folders or even subfolders. You can create a folder by clicking the
icon in the top tool menu above the contents of the currently open folder and clicking the Folder
icon.
If the user has "More Options" turned on in File Manager, he/she will see the Add expanded menu and can create a new folder simply by clicking the Create New Folder
icon.
When creating a folder, it is necessary to fill in the folder name, e.g. "Slides from lectures".
Two more optional sections can be found under the "More options" link. The first is the Abbreviation. This is used to internally identify the file or folder when creating an Internet address that references the file or folder. If the abbreviation is not filled in, the IS will automatically generate the abbreviation. The second optional field is Description. In this field you can write additional information about the folder, e.g. for which study materials the folder is intended. In addition, you can create multiple folders at once by simply clicking the Another Folder button using the Create New Folder option. After filling in one or more names and clicking the OK button, the folder (or folders) will be created in the currently open Study Materials folder.
¨
Uploading study materials from a computer
The file (or multiple files) can be uploaded to the study materials folder in two basic ways.
You can upload a new file by clicking the
icon in the top tool menu above the contents of the currently opened folder and clicking the Upload Files
icon.
If the user has "More options" turned on in File Manager, he/she will see the Add menu expanded and can add files simply by clicking on the Upload Files
icon.
When clicked, a dialog box opens with a Select files button. After clicking this button, the user needs to select one or more files from the user's computer. If the user wishes to upload the files to the study materials under a different name than they are stored on his/her computer, he/she must click on the Rename
icon.
The optional fields Name, Name of file and Description can be filled in here. If the Name field is not filled in, the file will be saved under the same name under which it is uploaded from the computer.
The second way to upload files from your computer to your study materials is by using the Drag&Drop feature. In this case, simply "drag and drop" the selected files from your computer into the currently open folder box in the user's browser window. This procedure will then bring up the Upload files application window itself, where the currently dragged files will already be selected. It is then possible to proceed as with the first method of uploading files.
Uploading a large number of files or a folder tree with materials
If the user wants to publish a lot of materials or a whole tree of materials (e.g. from his/her website), it is necessary to package these materials into one ZIP file. You can import files from a zipped file by clicking the
icon in the top tool menu above the contents of the currently opened folder and clicking the Extract ZIP
icon.
If the user has "More Options" turned on in File Manager, he/she will see the Add menu expanded and can upload zipped files simply by clicking on the Extract ZIP
icon.
From here, simply click on the Select File button and select the ZIP file from your computer. A variety of options can also be set for how to unzip and upload a given ZIP file to your study materials.
Copying study materials from another course
Study materials can also be filled by copying study materials from another course. For this function, you need to go to the folder from which you want to copy the study materials, select the file or folder (or multiple files and folders) by checking the check-box in front of the file name and then click the
button in the right toolbar. A new window will then open in which you need to enter the address in the IS to which the files are to be copied. This can be done either by typing in the exact address or by searching for the appropriate folder using the Find button. The actual copying is done by clicking on the OK button. In case the user wants to copy all study materials in a given course, it is preferable to use the appropriate copying application in the Teacher agenda. In the case of courses where it is desirable to share the material tree completely, it is preferable (rather than copying) to use the sharing application (the other course will not have its own material tree, both courses will have one common one). This application is again available in the
The Information System Teacher [course selection] (Study Materials) Sharing and copying study materials
Files and folders, which the user has the right to manipulate (has the right to fully manage), offer a variety of tools for modifying, deleting and further work. All of these tools can be found in the right toolbar, which appears when the appropriate file (or multiple files) is selected, or when the right-click on the appropriate file brings up the tool menu.
Copy address
The address of the file or folder is copied to the user's computer memory and can then be pasted using the Ctrl+V keyboard shortcut or by right-clicking and selecting Paste.
Share
Displays a list of addresses of the file or folder in the variants Address in the IS (for authenticated users), Address for the users outside IS (for access by a non-user of the IS - ATTENTION the file must have correctly set access rights to be displayed to such a user), Address within Manager, Address within Manager for users outside the IS.
Modify common properties
Allows you to change the Name, Abbreviation and Description of the selected file or folder.
Move to Waste Container
The selected file or folder (or multiple files or folders) is moved to the waste container, where it expires over time. If the remove the object permanently (will not be moved into Waste Container) checkbox is checked instead of moving to the Waste Container, it will be deleted immediately without any possibility of recovery.
Copy
Allows you to copy a given file or folder to a specified address in the IS.
Move
Allows you to move the file or folder to the specified address in the IS JAMU.
Rename
Allows you to change the Name and Name of file.
Set rights
Allows you to set access rights to a given file or folder. For more information about access rights, see the relevant section of this Help.
Set attributes
Allows you to set attributes for a given file or folder. See the next section of this help for more information about attributes.
Download as ZIP
Allows you to download a file or multiple files in a ZIP file. It is possible to download files incl. the formats automatically created by the IS, service information for the IS or it is possible to exclude already read files.
Add to Favourites
It allows you to keep track of a file or folder and receive information about any changes by e-mail. The file will also be listed as a favourite and the user will have a link to it saved in the Files application.
Redirects the user to the View Similarities application, which searches for a match to the text of the currently selected document. For more information, see
Searching for Similar Files help section.
Change position
Allows you to change the order of a given file in a folder. The order is given as the number of the position in which the user wants to place the file or folder.
Mark as read
Marks the file as read without opening it.
Map of Files and Folders
Redirects the user to a page that displays a tree of folders, subfolders, and files that exist in that folder.
Spočítat velikost složek
Redirects the user to the selected folder. The folder size is displayed next to the folder name.
Version
Allows a user with sufficient access rights (manage) to view, download, or delete previous versions of a file or folder (or a file contained in a folder). A user with the access right to read the file is allowed to view previous versions of the file.
Some folders created by the system can be changed only partially by the user (rights can be changed, but the folder cannot be deleted, for example).
The reason is that there should be a unified and searchable university-wide basic structure of study materials with a suitable division into learning materials, assignments and papers, including homework vaults, etc.
If the user wants to easily update the published materials directly in the IS (e.g. instructions for students), he/she can publish them in text format or in HTML format. The text can then be edited via the Edit text
icon.
When you select a folder, the Set Attributes link appears in the right toolbar.
You can use the individual attributes to modify the behavior of the folder. The IS JAMU allows you to set the following attributes for a folder:
append the name of the person uploading the file to its name
Convenient for homework vaults - if the user needs to package the submitted materials into a ZIP and transfer them to his/her computer for correction, this option makes it clear which file has been submitted by which student.
append the personal identification number (učo) of the person uploading the file to its name
As a previous choice.
store information on the reading of the files placed in the folder and its sub-folders
Applicable to published materials and tests. The Study Materials agenda automatically provides anonymous summary access statistics for stored objects. However, if the teacher checks this option, the times of all accesses by individual students are also published. The student is informed that he/she is being tracked in this detail (the option is enabled) - the attribute settings are listed in the folder header.
users can only see files and folders that they are allowed to read or upload into
In a folder with this attribute, the student can see only those files/folders that he/she is allowed to read or upload to. In addition to the attribute, the folder must have read access right set to allow the student to enter the folder. Use the attribute if, for example, you need the student to see only files/folders in the folder that are intended for him/her.
The attribute setting also applies to all subfolders. Once the attribute is checked, it also applies to all subfolders. It is also listed for all subfolders.
On the local computer, the user creates an assignment for each student
(or notes on submitted works, proofreading texts, etc.) and saves them under the name with the prefix "učo-", where the number of učo itself creates a restriction of the right to read the file or folder for this single student.
The user packs the files or folders into a ZIP file.
When uploading this file or folder to the Study Materials in the IS (Extract ZIP
) the user checks the option "grant the right to read only to the person whose učo (UIN) is contained in the name of the file or folder", which automatically grants reading rights only to students with the corresponding učo when uploading individual files and folders.
If you upload a file into the system (e.g. in Word with a .doc extension), the system will convert it to plain text after some time and create a pdf file for it.
Then other versions of the .txt and .pdf file will be added automatically. If you want to insert the same material in PDF to the material in PostScript (.ps), for example,
you can use the so-called expert tools. These are intended for advanced users and must therefore be activated first. The link is available by clicking on the assembly key icon (fig.
) located in the right toolbar.
Use the "Access Statistics" link located at the bottom of the right toolbar.
This feature can only be used after checking an individual file, not a folder.
You must empty the entire course in the new semester before copying (otherwise the copying application will not display the menu). Course Study Materials that contain only automatically created folders, i.e., Learning Materials, ROPOT (Revision, Opinion Poll and Testing) containing an empty testbank folder, Homework Vaults, and Course-Related Instructions (possibly containing an empty Mail folder) are considered empty.
To copy the entire tree of study materials to the new semester,
you must access the Teacher's Notebook in the new semester and use the copy application
The Information System Teacher [select a course in the new semester] (Study materials) Sharing and copying study materials Copy Study Materials
The application will copy all files and folders in the course study materials except for the contents of the "Course-Related Instructions" and "Homework Vault" folders. If you want to copy the contents of these folders as well, uncheck the option "copy only Homework Vault folder structure" or check the option "copy the folder /op/ (Course-Related Instructions)" before copying. In addition, it is possible to select to copy only the folder structure without files (in the entire study material tree), and it is also possible to copy all course peer assessments here along with the study materials.
Also, the dates for the ROPOT description, homework vault and interactive syllabus are automatically adjusted according to the term calendars by faculties of the new semester.
After copying the materials, you need to check that the access rights are set correctly.
If a user wants to expose identical study materials to students in different courses but in the same semester, he/she can share the study materials folder of those courses. In this way, all files (including ROPOT (Revision, Opinion Poll and Testing)s and homework vaults) that he/she uploads to the study materials will be visible to students in all shared courses.
Before sharing, the study materials for the course you want to share must be completely empty (otherwise the sharing application will not display the menu). Which materials are considered empty is described in question How do I copy my study materials into the next semester?
To share the entire tree of study materials, access the Teacher Notebook and use the sharing application
The Information system Teacher [course selection] Copying and sharing study materials Sharing study materials
After sharing the study materials, you need to check that the access rights are set correctly.
If a user now makes a change to the study materials of shared courses, students in all of those courses will see the change. There is no limit to the number of courses that can be linked in this way. If it is necessary to make part of the materials accessible only to students of one of the shared courses, this can be done by setting access rights.
No, it does not. Intellectual property is protected in the Czech Republic and the Copyright Act allows the use of extracts from other people's works, inter alia, in the case of the use of a published work in a lecture exclusively for scientific or teaching purposes and in the case of the inclusion of works in a work intended for teaching purposes to clarify its content. However, it is always necessary to give the name of the author, unless the work is anonymous, or the name of the person under whose name the work is made public, as well as the title of the work and the source.
Yes, they can. If a student wishes to offer his or her materials (notes, etc.) to others, he or she may use
The Information system Student Study Materials File Vaults
He/she will enter the course and upload his/her materials to the File Vault subfolder. Only students enrolled in the course are allowed to upload to the folder (all registered students before the start of teaching in the semester, only enrolled students after the start of teaching). When preparing materials for the next semester (copying old materials into the new semester), you may consider the quality of the student materials so uploaded and copy them for use by the next group of students, or not.
The basic course folders (Learning Materials, Homework Vaults, ROPOT (Revision, Opinion Poll and Testing), Course-Related Instructions, and File Vault) are created when the course study myterials are accessed for the first time.
Right to read: to view and download materials. You can specify the date from which the right takes effect (if you don't specify, it applies indefinitely). We recommend for study materials to leave the right to read to anyone on the internet. You can also set the right to read to (date and time).
Different rights of folders and subfolders
If a user has the right to read a certain folder, it does not mean that he/she is allowed to read all subfolders (a subfolder may have its rights set differently). Conversely, the right to read a particular folder is only applied if the right to read all parent folders is also granted (the user has the ability to browse the material tree up to that folder through the right to read).
If the name of a file or folder starts with a učo and a hyphen, i.e. "učo-", and if the teacher has ticked the option "grant the right to read only to the person whose učo (UIN) is contained in the name of the file or folder" when uploading ZIP files into the IS Study Materials, then only the person whose učo number matches the number at the beginning of the file or folder has the right to read the file (and all its versions) or the folder. However, if the teacher does not check the option, the rights to the file or folder will be set by default according to the parent folder.
Right to upload:
the holder may not edit the folder data, but may upload new materials (subfolders and files). If the user has the right to upload to a folder, he/she automatically has the right to read it (the right to read the folder, not its contents). A date can be specified until which materials can be uploaded. The system then automatically removes the right to upload after the deadline. You can also set the right to upload from.
Right to manage:
absolute right to manipulate the folder ( upload, delete, modify rights, name, description, abbreviation for address in IS). It also applies to all subfolders.
The application right:
this right is held by, for example, teachers, who can perform all operations on the files in the study materials of the course they teach. The holder of the application right is not limited by the rights settings for specific folders, subfolders or files.
If a user uploads material to a folder, he/she automatically gains the right to manage it.
To whom the rights may apply:
anyone on the Internet (read-only rights),
anyone logged in the IS,
students enrolled in the course offered in a concrete term (all registered students before the start of the semester, only enrolled students after the start of the semester),
students enrolled in a concrete course (even those who took the course in another semester),
students enrolled in a concrete seminar group,
students with a reservation on an examination date,
staff (of a particular department),
students (active students of the faculty),
a specific group of users,
teachers,
graduates
doctoral students,
current students and staff, (v čj verzi chybí "aktuální studenti a zaměstnanci školy"),
a concrete person.
Another "named group of persons" can be added in the agenda if necessary
The Information system (People) Personnel Groups
The rights of users without an active relationship to the MU are different
Individual rights (the right to read, upload, manage for a specific učo) do not apply to users who no longer have an active relationship with the JAMU.
How do I check whether the rights are set correctly?
Using the link "Is ... allowed to ...?" in the right toolbar. Enter e.g. a student's učo, the application will detect access to the folder.
Are materials with the right to read for "students enrolled in the course offered in a concrete term" accessible to students after the end of the term?
Materials with this access right will remain accessible to students for life. Only the "manage" and "upload" rights are lost after the studies are inactive.
A basic folder is automatically created for each course, including read access rights settings that can be changed. The default rights to read settings for each folder:
Course Study Materials: anyone on the Internet.
Learning materials: anyone on the Internet.
ROPOT (Revision, Opinion Poll and Testing): anyone on the Internet.
Course-Related Instructions: students enrolled in the course offered in a concrete term.
Testbank (this folder is located in the "Answers" folder): this folder is only available to users with access to the course teacher's notebook.
File Vault: anyone logged into the IS.
Homework Vault: students enrolled in the course offered in a concrete term.
If a user chooses to change the default access rights settings, he/she should first be familiar with how the rights work in the Details about access rights question. This is because careless manipulation of rights could inadvertently make part of the course inaccessible to students. This is not an irreversible action, but it would cause unnecessary inconvenience to users.
Many course materials can already exist in the form of web pages hosted elsewhere than in the IS. These materials can either be linked to (icon
) or the web pages can be copied directly into the IS (if there are many, zip them and select
). Advantages: possibility to set access rights (e.g. limit to the IS users only), possibility to use statistics on the number of readings (which students have seen the material). For the student, the possibility to simply package the whole folder and download it for their work at home.
Check relative and absolute links in the files
If the files are HTML files that link to each other, check that the addresses in the links (within the text of the files) are relative before uploading, e.g.
<A HREF="kap2.html">next chapter</A>,
not absolute, e.g.
<A HREF="https://mujserver.cz/mujadresar/kniha/kap2.html">next chapter</A>.
Folders used to collect assignments, term papers, etc., can be placed in the Homework Vault folder (shortcut /ode/) which is placed in course Study Materials folder (i.e. in the File Manager). If you need this folder to be structured into several sub-folders (e.g. for each seminar tutor in the course), create a new sub-folder using the Folder icon ().
The Information system Teacher [course selection] Work with study materials Homework Vaults
You can create homework vaults either in this folder, or using the application in the Teacher's Notebook which we recommend, see the question
Homework Vault management – simplified).
If you set up homework vault directly in the File Manager, you can use the tool:
set rights and then Open this folder as a Homework Vault,
change rights and attributes individually via Set rights and then Add another right,
set attributes ("allow only the owner and teacher to read the files in the folder and its sub-folders"), for details on attributes see the question What are folder attributes?.
this method is less convenient, so it is to be used in exceptional cases when you need to place the homework vault in the IS folder other than in the Homework Vault /ode/ folder.
Changes to homework vaults created under Homework Vault /ode/ folder are reflected immediately. Homework vaults created outside the /ode/ folder are updated once a day during the night.
For the evaluation of the submitted files, you can use the notebook that you create via
The Information system Teacher [course selection] Work with study materials Homework Vaults
If you want to stop students from uploading their files into the homework vault, you can close it:
immediately – removing the right to upload,
at a certain time – using the "Set validity dates for rights to read and rights to upload" option in setting of the rights. When the time is up, the homework vault will close immediately to students.
Homework vaults created under the /ode/ folder will stop appearing to students immediately after rights removal/expiration, homework vaults outside the /ode/ folder will stop appearing in student applications by the next day.
The Information system Teacher [course selection] Work with study materials Homework Vaults
Here, you can create new subfolders of the homework vaults, edit them and work with them. To create a new homework vault, use the "Create a new Homework Vault" option. You can create homework vault subfolder to each of existing homework vault folders by selecting it in the "Hang under" field when creating the new homework vault. You can also create multiple homework vaults at the same time.
1 Creating a new homework vault.
Any number of subfolders can be placed under the folder with /ode/ shortcut. The application tries to recognize which folders are subfolders just to create structure, and which are the actual homework vault folders, i.e., end folders with student files. The recognition rules are as follows:
The operation menus are only displayed for homework vaults, for what is recognized as a folder there is only the "change settings" operation and clicks to the Study Materials (i.e. File Manager).
Any folder for which any upload right is set is evaluated as a homework vault. If no such right is set, the folder is evaluated as a homework vault in case that:
If it doesn't have any more folders underneath it.
If there are any files uploaded into it (i.e. the folder used to function as a homework vault and the right to upload has expired or the teacher has removed it).
In the application, you can clearly see all the homework vaults, their subfolders and the number of files in them. The expanded view shows those homework vaults where is some file of any student included in the Teacher’s Notebook selection. You can always see the homework vaults for selected seminar groups as expanded, even if there is no file in them. On the other hand, if you have more than 100 people in your selection, you must expand the homework vault by clicking on its name.
For each homework vault, you will see a list of operations that you can use to work with the homework vault and links to the operations in the File Manager. Unlike the File Manager, there are a few extra operations available here:
Access to the notebook used for evaluation of files (if you created it when you set up the homework vault) – In the notebook you will find links to the submitted files of each student. If there are changes in the number of students in the seminar group or course for which the homework vault is open, you can validate the notebook,
Sending an email to students – e.g. those who have not yet submitted their file or to all those who have access to the folder, etc.,
Sending information on changes by email – you can have information on changes in selected homework vaults sent to you by email via the Events application.
1 Overview of possible operations with the selected homework vault.
However, there are some operations with homework vault that you can perform only in the File Manager, for example:
Assigning a combination of upload rights to the homework vault, e.g. only students in the seminar and students registered for the exam etc. are allowed to upload.
Deleting a homework vault that already has some submitted folders or files.
File operations – moving, editing content, renaming, etc.
Creating standard settings of the homework vault – Set the right to upload to the homework vault folder. It is also recommended to check the attributes "append the name of the person uploading the file to its name" and "append the personal identification number (učo) of the person uploading the file to its name". With the setting when a folder has only a right to upload, students cannot see the files of their colleagues and using the attribute "allow only the owner and teacher to read the files in the folder and its sub-folders" is therefore unnecessary.
The system automatically adds the right to manage to the uploaded file for the person who uploaded the file. This allows the person to modify the uploaded file (download it or overwrite it with a new version) during the period when he/she can upload it.
If you remove the right to upload to the homework vault, students will still have the right to read their own uploaded file, but they will not be able to access it without a direct link.
etting up the homework vault for uploading files containing feedback – Set the right to read to the homework vault for the target group of students. When setting the read right, do not check the "Apply the changes to sub-levels" parameter. With this setting, students will get into the homework vault and can only see (read) their own file.
1 Do not check this option.
Tip: Correcting assignments by PhD students
If a group of people not listed as teachers of the course should have the right to upload corrected files or feedback, set them the right to manage the folder (e.g. the right to manage for all PhD students of the faculty). This setup will also make them (even though they are not the teacher for the course or do not have higher application rights) see the icon to load the file under the file.
Individual upload of corrected files
Upload the corrected files under the file submitted by the student by clicking on the icon in front of the file.
1 Icon to upload teacher’s feedback.
Locate the file containing feedback and upload it.
A link is created between both files. The file with feedback automatically gets the same right to read as the parent file. That is, the student who submitted his/her file will get the right to read the file containing feedback.
1 The right to read an uploaded file.
Note
The attribute "allow only the owner and teacher to read the files in the folder and its sub-folders" must not be set on the homework vault folder.
Bulk upload of corrected files
For the homework vault, set the attribute "append the personal identification number (učo) of the person uploading the file to its name" as well as the right to upload.
“.
When uploading the corrected files (the "Extract ZIP" function), check "grant the right to read only to the person whose učo (UIN) is contained in the name of the file or folder". Although no links will be created between the submitted files and its feedback, the files containing feedback will become readable only by the person whose učo is in the file name.
At the same time, the homework vault settings described in "Setting up the homework vault for uploading files containing feedback" apply.
You can find a history of the selected student's operations in the file depository via
The Information system Teacher [course selection] (Study materials) File operations
Here you can, for example, find out whether the student has uploaded the file, who deleted the file and when, etc.
This application can be used by teachers and persons with the s_vyuka or s_studium
access right.
If several people, typically hired PhD students, are involved in teaching a course (e.g. correcting assignments in the homework vault), it is most effective to add them as teachers in the Course Catalogue:
The Information system Teacher [course selection] (Course Catalogue) Edit teacher-related data
All those listed in the course’s Catalogue have the implicit right to manage the course's Study Materials folder and use the Teacher's Notebook, so there is no need to set their access rights.
For the transfer of homework vaults, as well as other materials in the course, the application for copying materials is used:
The Information system Teacher [course selection] Sharing and copying study materials
Here you can select the course and semester from which you want to copy the homework vaults and possibly other files as well. Check the option "copy the folder /ode/ (Homework Vault)" and click on "Copy". The application will copy only the folders contained under the "Homework vaults" folder to the new semester, but will not copy any files located under this folder (i.e., typically student file submissions).
A grade is a one-character expression of the teacher's evaluation of the student (grade). A student is always enrolled in a course with a certain type of completion, e.g. a colloquium or an examination, and may only receive the corresponding grade:
Type of Completion
Grade/Evaluation
z (“fulfilling requirements”; “z” stands for Czech “zápočet”)
Z N
k (colloquium; “k” stands for Czech “kolokvium”)
P N
kz (graded type of “fulfilling requirements”; “kz” stands for Czech “klasifikovaný zápočet”)
A B C D E F
zk (examination; the “zk” stands for Czech “zkouška”)
A B C D E F
Explanation of the marks: Z - requirements fulfilled (passed), N - requirements not fulfilled (failed). P - passed, N for colloquium - failed. A - excellent / in Czech: výborně (1), B - very good / in Czech: velmi dobře (1.5), C - good / in Czech: dobře (2), D - satisfactory / in Czech: uspokojivě (2.5), E - sufficient / in Czech: vyhovující (3), F, X - failed / in Czech: nevyhovující (4). The mark U means "passed by acknowledgement / in Czech: uznáno", i.e. the student did not study the course in the given semester, the performance was transferred from another study.
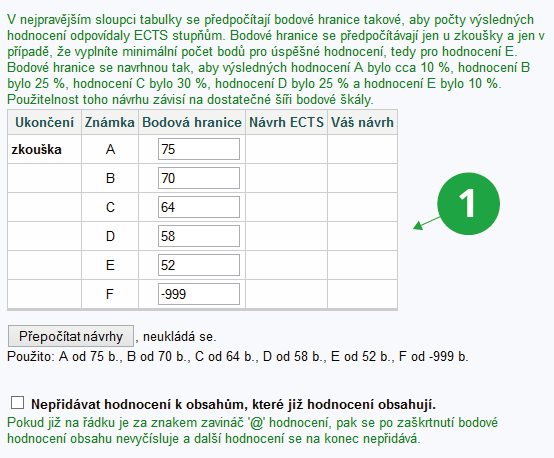
ECTS evaluation tip
In the ECTS system it is recommended to follow the following distribution of grades. The European Credit Transfer System (ECTS) is the standard for comparing learning outcomes in the European Union (further information on ECTS can be found on the Bologna Process - Introducing European Standards into Higher Education website https://www.ehea.info/).
ECTS grades
Share of stamps
Definition of
A
10 %
excellent performance with only minor errors
B
25 %
above average performance but with some errors
C
30 %
overall good performance with a number of significant errors
D
25 %
acceptable performance, but with significant shortcomings
E
10 %
performance meets minimum requirements
F
–
a considerable amount of additional work is required
Grades are entered in the form e.g. FFB A student graded in this way received a grade of F for the first regular examination date, again received a grade of F for the first resit examination date, and received a grade of B for the second resit examination date.
There can be no more than three failing grades (and therefore no passing grades) in the grade chain – they are entered as FFF – and no more than one passing grade – e.g. FFB in the case of up to the third successful term. The pass grade is entered at the right end of the evaluation chain. The final grade for the course is the last grade (rightmost).
It is not necessary to write the grades at once, but it is desirable to keep students informed. Typically, the teacher enters the grade immediately after (or during) the examination. The student can see the grade in the system immediately. Thus, after the first failed examination date, the student will have only an F entered in the system. How many examination dates the student has used up is important for the control of the study.
A grade that is written in a letter can be written in lower case or upper case. The system internally converts it to uppercase and stores it as uppercase.
The date is recorded only for the last entered grade. In the form, the date is entered together for simplicity for all grades that are changed or newly entered. The date is entered in the form 'day month year' and is pre-filled with the current date. We consider this date to be a guide.
If the filter is limited to a specific examination date, the evaluation date is set to the examination date.
If a student fails to appear for an examination, he/she receives a grade of - (minus) in the sense of "failed to appear". This grade is not listed in the list of permitted grades, but can be used for all types of course completion.
In the agenda
The Information system Teacher [course selected] (Attendance) Letters of Excuse
Check that the student has not been excused from the examination date.
1 Checking of letters of excuse submitted by students of the course.
If the setting of the examination date allows it, students can also opt out just before the examination. So, before giving a failing grade to a student, make sure that the student was actually enrolled for the examination date.
Make sure you have your list 100% completed by the end of the examination period. Grade students who are absent from the examination with a "-" (minus). Their grade is counted as a failing grade and they have used up the examination date. The grades are used to calculate the grade point average and the grade point average for the various sequences monitored and to assess how the learning requirements are being met. Therefore, record fairly for all students the examination dates when they were unsuccessful or failed.
The system records the current grade chain and any changes made to it. For each change, it records exactly who made the change and when. The history of changes is accessible to the teacher (we expect this feature to increase confidence in the system).
The grades entered by the teacher are only available to the student to whom the grade belongs, to all teachers recorded with the course, to the contact person, to the guarantor, to the owners of the s_studium access right (usually the study department) and to the s_vyuka access right.
The "Note" column on the form contains the study flags. The "opak" flag means that the student is repeating the course (the student has previously enrolled in this course in the same study but did not achieve a passing grade). The "znovu" flag means that the student has re-enrolled in the course (the student has previously taken this course in the same study with a passing grade). If the flag is followed by, for example, '3x', then in the case of '3x again' the student has previously failed the course three times. In the case of '3x again', the student has previously passed the course three times. The indication '1x' is not given. "isp" is the flag of the individual study plan.
The "Type of Completion" column contains the completition abbreviation with which the student is currently enrolled to the course. Changes to the type of completition may only be made by the study department.
No more than the specified number of lines (e.g. 100) is included in the form. If more than 100 students are selected, only the first 100 are displayed. Change the evaluation for those in the listed section of the form, scroll down and you have these buttons: 'Save and go to another batch' saves the changed grades and moves on to the next selected group of students. "Go to another batch without saving" will not save the changes and will move on to the next graded group of students. "Save" only saves the changed grades and stays in the same selected student group. If you do not enter or change the grade on a line, then nothing happens to the data on that line when you press "Save".
1 Scrolling through the list of students.
If less than 100 lines are displayed, only the "Save" button is displayed. You can change the value of 100 (maximum number of lines). The changed value will be applied only after pressing one of the buttons above.
The "Save" button can be used to continuously save the contents of the form. The top of the page will display information about the currently changed grades.
You can also filter the list of students by selecting a certain criterion - select "(change filter)" at the top of the page after the course name.
You can also sort the list of students by the selected parameter (alphabet, učo, grade, date of evaluation) in ascending or descending order.
If multiple teachers are awarding grades to the same group of students at the same time, they may interfere with each other. If you save a grade form, the application will notify you that someone has changed the grades in the meantime and ask if they should actually be overwritten. Practice shows that this warning can be overlooked - we recommend waiting to write the grades, or using the
The Information system Teacher [course selection] (Evaluation) Enter a student's grade
This application will allow you to enter a grade for a specific student, it does not display a form for a group of students.
1 Entering student grades individually.
Tip
Clicking on "Include a notebook in the form" will display the student's notebook when entering the grade, which can be used as a help.
If you are already seeing the student's notebook when entering the grade but do not want to use it, click on the "select some other notebook(s) " option and then on "Do not use any notebook" option.
enter the same grade (e.g. credit / zápočet i Czech) in bulk
use the appropriate filter ("change filter" at the top of the page) to select a group of students and then select
The Information system Teacher [course selection] (Evaluation) for more than one student at a time
prepare grades outside the IS
via:
The Information system Teacher [course selection] (Evaluation) export
save the list of students to a file with the necessary identifiers, enter the grade and return to the IS using
The Information system Teacher [course selection] (Evaluation) import from a file
calculate a grade based on the points from activities
if you use scored tests that can be clearly converted to a grading scale, use the agenda
The Information system Teacher [course selection] Notebooks
using the "Evaluate based on points" option will guide you through entering the scoring scale and awarding grades to students. A grade will be entered for each student based on his/her points.
enter grades only for students from the selected examination date
via:
The Information system Teacher [course selection] (Examination) Edit examination dates grades
the grades option is listed in the Operation column on the line of a specific examination date.
1 Assigning grades to students individually.
2 Assigning grades to students using a form.
3 Assigning grades to students in bulk.
4 Assigning grades to students by importing from a file.
The grade entry application have been extended to include an auxiliary record to provide information for statistical purposes on how many students have been examined by which teacher. If a teacher has examined a student more than once, they will also be counted multiple times. In the "Entered by" column, three selection fields are provided, offering the names of teachers recorded with the course in the roles "lecturer", "seminar tutor" and "alternate examiner". The first field selects the examiner who awarded the first grade; the second field the second grade and the third field the third grade. If the teacher is entering the evaluation himself, his/her name will be pre-filled and he/she does not need to select anything extra. If someone else is entering the evaluation for the teacher, the corresponding examiner must be selected. Selected examiners for whom the corresponding evaluation is not entered will be disregarded (therefore, ignore redundant examiners).
1 Field for entering grades.
2Pre-filled selection of the abbreviation of the teacher's name – can be changed.
A record of those who have awarded the grade is available in the applications:
Enter a student's grade
History of changes (lists all grade changes in the course)
Enter a student's grade (to individual students),
Other ways of entering evaluation: using a form listing several students,
Other ways of entering evaluation: for more than one person at a time,
Other ways of entering evaluation: import from a file,
Evaluate on the basis of scores (for notebooks).
For courses with the "all teachers can enter grades" setting, no record is possible.
A set of examination dates can be created for a course, and the system ensures that the student is only registered for one examination date for the course at any given time.
In the application
The Information system Teacher [course selection] (Examination) Edit examination dates
the teacher will specify:
Date and time of examination
Which means the day, month, year and hour:minute of the start of the examiantion. A student enrolled in a course may register for only one examination date. After the end of the date (at the time the examination date begins), he/she may register for the next one.
Examination room
Provide an identification of the examination location that your students will understand.
Link the examination date to a series
Each date must be assigned to a series, i. e. group of dates with certain parameters. By default, in the courses is a series of "zkušební termíny" (i. e. "examination dates") into which the dates are placed. If you want to create a new series, select "---" from the menu and type its name (or other parameters) in the field that appears (if you already have a series, select it from the menu).
Type of examination date
– examination, resit
(optional)
The terms may be marked as "examinations only (no resits)", as "resit", "both examination and resit", or left unmarked. Students may only apply for one date marked as "examinations only (no resits)". If he/she is applying for another date (failed), he/she must select the date "resit" or "both examination and resit" or the date unmarked.
Maximum number of students
Capacity of the term. If you share a examination date with multiple courses, you can enter the shared examination date capacity here.
Leave the students who have interrupted their studies on the reservation list
In exceptional cases, the capacity (maximum number of students) may be exceeded. Only active students are counted in the reservation list. If a student's studies are interrupted or terminated, another student may enroll in his/her "place" during the period of inactivity. The problem arises if the inactive student is reinstated or transferred to another study programme – the original enrolled place for the date remains. These exceptions may cause a slight overcapacity for the term. If this is a problem for you, select the "yes, leave the students who have interrupte their studies on the list" option.
Tip: Use this option only rarely
The option was introduced at the request of users, but we do not recommend using it – we believe that extra students are less of an issue than unfulfilled date capacity (inactive students block the capacity of the term).
Reserving a slot on the date
Students can reserve a slot from the moment the "reservations for a slot on this examination date required" option is set. It is usual to enable this option directly when creating the examination date and not to fill in the "open for reservations from" field (see below). If there is no need to reserve a slot for the examination date (e.g. it is a common exam where all students have to come, or the teacher wants to reserve the slots – divide – the students by himself/herself), do not check the "students should log in for this term" option.
Open reservation to – cancellation possible to
Clicking competitions
If it is necessary to run a time competition for students to get more convenient dates, fill in the "open for reservations from" date. Registration will open on this day from 17:00. If "open for reservations from" is filled in, then "reservations for a slot on this examination date required" must also be checked. If "open for reservations from" is left blank (recommended practice), there will be no student click competitions (students will not know exactly when reserving will start).
You can set "open for reservations to" and "cancellation possible to".
The teacher will create a sufficient number of examinations only (no resits) dates and inform the students that they are obliged to sign up for one. After the examination dates have passed and grades have been assigned, he/she will assign a grade of "-" (did not attend) to those students who did not sign up for a examinations only (no resits) date or did not attend the examination. The grade of "-" is equivalent to failing grade.
If a student applies for another examination date of the course (because of failing grade), the system will not allow him/her to apply for the "examinations only (no resits)" date. Students may apply for resit examination dates without restriction (but no more than one date in the future).
The teacher does not have the right to deny a student access to a resit examination date, even if it is the student's first attempt to take the course and the term is designated as resit. To register for a resit examination date, a student must meet at least one of the following conditions:
has a failing grade assigned by the teacher,
has been enrolled for any examination date of the same series of the same course in the past,
no examinations only (no resits) date is posted in the same series of examination dates in the future.
This new restriction only applies to examination dates that are marked as "resit". It does not apply to dates that are both examination and resit.
The teacher has the option of sanctioning the failure to use the examinations only (no resits) date with a grade of "-".
The purpose of the applications for management of examination dates is to create and edit examination dates. These can be managed (created, edited, cancelled) in three ways.
Basic application to manage a single examination date – Edit examination dates
The Information system Teacher [course selection] (Examination) Edit examination dates
Select "A new examination date" to display the form for a new date. You can pre-fill it with data from another examination date.
If some examination dates already exist, the application displays a table listing the examination dates. You can change the examination date parameters by selecting "edit" option.
Edit examination dates (batch mode)
The application displays a table with all of the existing examination dates. It offers the choice to create several new examination dates at once, or to edit the data in bulk. Use if you are already familiar with the parameters of the examination dates, do not need explanations, want to process multiple examination dates efficiently.
1 Application for editing examination dates in batch mode.
Export and import of examination dates of the course definitions
These two applications are important if you are creating or editing a large number of examination dates for your course. If you want to edit the existing examination dates, first export the existing dates to the "Export dates" application file. Edit the file on your computer before loading (importing) it with the second application.
Several types of examination dates/activities – e.g. consultations, mid-term exams, credits, etc. can be created via series. Students will then enroll for each series dates separately. In this way, you can e.g. split the oral and written parts of the examination, allow access to the examination only after the paper has been submitted, etc. When creating a new examination date, select the desired series to which you want to link the date in the "Link the examination date to a series" section or create a new series. By default, the series "zkušební termíny" (examination dates) is created in a course.
You can create a new series of examination dates via:
The Information system Teacher [course selection] (Examination) Edit examination dates (Operations with series) Create a new series
You can then specify the following parameters for each series:
the course to which it relates,
name,
pre-requisites for enrolling to examination dates – they define the conditions under which a student may take an examination in a given course,
number of concurrent enrollements for future examination dates – the number entered is used as the maximum number of dates a student can concurrently apply for in the future,
limiting the enrollement for the series examination dates only to students who meet the criteria of the chosen filter – e.g. selecting only students who have a certain number of points (e.g. for paper) in their notebook.
1 Setting the series parameters.
You can further edit, copy from previous semesters or cancel the created series of the course via links to:
The Information system Teacher [course selection] (Examination) Edit examination dates (Operations with series)
You can restrict student enrollment through a series of examination dates. Before creating a new series, filter students using the required criteria, e.g. by seminar group, grade or notebook score (or text). When filling in the parameters of the series, check the option "limit with this selection". Only students who meet the specified criteria will then be able to register for examination dates in this series. The selection is automatically updated on the night, if you make any changes and want to update the selection immediately, click on the "update" option next to the selected series. A student can also update the selection if he/she is unable to register for a term even though he/she meets the specified criteria.
1 Option to update the series restriction.
If you want to restrict registration to students who have already completed a certain course, for example, you can do so through pre-requisites, which you can also set for a series.
Students who do not meet the series restrictions for a selected course can be found and their reservation canceled via:
The Information system Teacher [course selection] (Examination) Edit examination dates The Information system Teacher [course selection] (Examination) Cancel the reservations made by the students no longer meeting the selection criteria
If you want to cancel the reservation of students from an examination date who do not meet the series restrictions, you can proceed via:
The Information system Teacher [course selection] (Examination) Edit examination dates [selected examination date] cancel reservation
Here, check the box "Zaškrtněte, pokud chcete omezit vybrané studenty na ty, kteří nesplňují omezení přiřazené k sérii termínu". You can then cancel the reservation of selected students from the examination date at any time, regardless of whether they are allowed to register for the examination.
For more on series, see the question I need to create several types of dates (activities), how do I do it?
Tip: Change of the series restrictions
If you restrict a series by a filter and then edit the selection using Advanced selections (via the "change filter" option), the change will also be reflected in the series to which the original restriction was assigned.
This hour is automatically entered for examination dates for which the enrollment is set to begin in the future. The enrollment time cannot be changed, as time competition between students could lead to an excessive load on the system, which could, for example, limit the operability of the study departments during normal working hours. Setting the default time to 00.00 would unnecessarily shift the need to respond to the night time hour. Other time competitions, such as course registration or registration for seminar groups, start at 17.00, so students are used to this time.
In order to be able to register for the examination date(s) of the series, there may be study requirements that the student must meet. Other courses are referenced by their course code. The following requirements may be entered:
the course that already must be taken – enter its code: P10
multiple courses that already must be taken – enter the codes and between them the characters &&: P10 && P11
one course from several options must be already taken – write the characters || between the codes: P10 || P11
the course to be registered or enrolled concurrently with this course – wrap it with the abbreviation "NOW": NOW(P113)
the course that must be registered concurrently with this course and student has to be registered in it within the capacity limit. NOW_LIMIT(P10) The required course (P10) is further checked for matching fields of study / plans the course is directly associated with or prerequisite approval. No other prerequisites of the P10 course are checked.
předmět, které je třeba mít v jakémkoliv období zaregistrován (musí být splněno ve studiu, v rámci kterého probíhá zápis): EVER(P133)
the course that the student must not have taken in order to enroll – prefix the code with an exclamation mark: !P12
multiple courses that the student must not have taken – prefix the course code with an exclamation mark, enclose each code in parentheses and enter && between them: (!P11) && (!P12)
courses that a student may not be concurrently registered or enrolled in: !NOWANY(P10,P11,P12)
explicit (marked in the IS) consent of the teacher is required for enrollment (consent must be requested first): souhlas
a student can only register for examination dates after obtaining a certain number of credits: kredity_min(125)
only students of a certain faculty are allowed to register for the examination dates of this series (instead of the faculty abbreviation the faculty id or its domain name is used as a parameter): fakulta(1411) or fakulta(med)
List of abbreviations: „med“ = 1411, „pharm“ = 1416, „phil“ = 1421, „law“ = 1422, „fss“ = 1423, „sci“ = 1431, „fi“ = 1433, „ped“ = 1441, „fsps“ = 1451, „econ“ = 1456
only students of a certain program are allowed to register for the examination dates of this series: program(M-TV)
only students of a specific field of study are allowed to register for the examination dates of this series: obor(HOT)
only students of a certain plan are allowed to register for the examination dates of this series: smer(BIVT)
only students of a certain form of study are allowed to register for the examination dates of this series: forma(P)
only students of a certain type of study (B, M, N, D, C, R) are allowed to register for the examination dates of this series: typ_studia(BM)
only students of a certain year are allowed to register for the examination dates of this series: rocnik(1)
only students enrolled in the certain semester are allowed to register for the examination dates of this series: semestr(2)
only students of a certain study group are allowed to register for the examination dates of this series: studijni_skupina(N)
only students of bachelor or master study programmes (B, M) in full-time form who have not yet fulfilled 4 credits from courses with the attribute "TV" are allowed to register for the examination dates of this series: nesplneno_tv
students who have less than three grades in the final examination course with the code S_SZZ_PREDMETY are allowed to register for examination dates of this series: maxszz(SZZ_MDP, 2)
students who have the archive of the final thesis filled and confirmed are allowed to register for examination dates of this series: szz_vyplneno
students who are registered for another examination date with the prerequisite szz_vyplneno_tema and who also have an archive of the final thesis filled and confirmed (if the student is not registered for any term with the prerequisite szz_vyplneno_tema, the completeness of the archive is not checked) are allowed to register for examination dates of this series: szz_vyplneno_tema
na termíny této série se smí přihlásit pouze studenti přihlášení do zvolené seminární skupiny: sem_sk(P10/S1)
you can combine the pre-requisites using parentheses: ((P000 && P001 && !P002) || P004) && NOW(P005) && NOW(P006) means that a student may register for an examination date in this series if the student has successfully completed P000 and P001 at any time in the past but has not taken P002. Or has completed P004 in the past, but must also enroll in P005 and P006.
if a student must meet at least a certain number of multiple conditions, the enumeration tag can be used: vycet(4,P000,P001 && P002,P003 && P004,P005,P006) means that the student must meet at least 4 conditions from the options P000 or (P001 && P002) or (P003 && (P004) or P005 or P006.
The application counts students according to various criteria (e.g. course, examination dates, seminar group, etc.). The application can be accessed via the link:
The Information system Teacher [course selection] (Students) Parameter statistics
Here you can select the criteria to display on the left (rows of the result table) and on the top (columns of the result table). Confirm your selection with the "Display statistics" button.
1 Selection of criteria for creating statistics.
Tip: Taking into account the highest semester for students
Students in double majors may be in a different semester in each major. The "highest semester" rubric will reflect the higher of their semesters.
Inform your students of changes after making an important change in examination date parameters (new examination dates, capacity change, change in the date and time of examination, etc.). Please do not forget to notify students by e-mail using the following links
The Information system Teacher [course selection] (Examination) Edit examination dates Notify the students who have not completed the course yet by email
The application allows you to send an email to all those who do not have a passing grade in the course.
The system offers an application for the inspection of examination dates schedules from other courses. Use it to make your students' lives easier – minimize collisions of examination dates.
The Information system Teacher [course selection] (Examination) Edit examination dates When are my students free?
In the list of examination dates you can use links to various operations with students registered for the date (list, photos, excused absances, etc.).
1 Application for editing examination dates.
If you want to work with students of multiple examination dates at once, select "change filter" at the top of the page next to the course name and restrict your list of students to the selected examination dates, then use the usual applications available from the Teacher's Notebook.
Individual actions:
list
This option will display the name and učo of the students who are registered for the examination date.
email
This option allows you to send an email to students registered for the examination term.
photo
Use this option to view photos of students registered for the examination date. The photos can also be displayed in a printable format from the browser and printed.
edit
Use this option if you want to change the settings for a given examination date. You can modify the date of the examination, the classroom or room in which the examination is to be held, the type of examination date (whether it is examination only (no re-sit) or re-sit), or the maximum number of students who can enroll in this examination date. You can also edit other details regarding the registration for a given examination date. You can also add and share another course to the examination date (but you must first add it to your selection). It is not possible to edit examination dates in bulk using this application.
grades
This option allows you to award a grade to students who are enrolled in a given examination date.
cancel
This option will cancel a given examination date. Before the final deletion you will be asked if you really want to cancel. This option can also be used to cancel an examination date for which you already have students registered. Please proceed with caution!
reserve
This option allows you to register any number of students enrolled in the course for the selected examination date. The application allows you to register a student for multiple terms at the same time (the student does not have this option). However, this is only a supplementary application. In usual situations, the student registers for the examination date himself/herself. The teacher modifies the list of registered students in this way only as a last resort.
cancel reservation
This option allows you to withdraw a student or students from the selected examination date.
letters of excuse
This is where excused absences of students which have been accepted by the study department are recorded.
The Information system Teacher [course selection] (Examination) History of changes in examination dates reservation
Through the application, you can follow the sequence of operations with the examination dates of the selected course. You can use it in case of doubts about the operations performed.
The system automatically checks and resolves this for you. The IS checks all registrations for examination dates every night which are to take place in a future and if it detects that a student is registered for an examination date and has already gained a passing grade, it will automatically cancel their reservation from the examination date.
The system will also automatically notify the student by email that his/her reservation of the examination date has been cancelled.
Yes, examination date sharing can be used in a situation where, for example, a teacher teaches several courses in one semester but wants to write a common test at one time and in one classroom. The same can be done even if it is different courses taught by the same teacher at different faculties. The teacher will create a shared examination date through the application, the examination date can have one limit for all courses. To create a shared examination date, follow the steps below:
The Information system Teacher [course selection] (Examination) Edit examination dates
Choose the courses for which you want to share an examination date, e.g. course X and course Y. Then select the option "A new examination date" and set the individual parameters. If you want to share the capacity limit of the examination date, fill in the "Shared capacity" field. The limit set will then be the same for both courses.
If you already have an examination date for one course and you want to share it with another course, add the second course to your selection and click "edit" next to the selected examination date. You will then see an option at the top of the page to add the selected course to this examination date. Check this option and the course will automatically be added to this examination date edit settings, so you will be able to set capacity limit etc.
1 Option to add another course to the examination date.
If you need to share a capacity limit even within courses taught by different teachers, select the "Capacity-limit sharing by multiple teachers" application. For more details see question.
However, we do not recommend using the application due to its complexity.
Note
If another teacher has created a shared examination date that includes courses for which you are not eligible, you may not manipulate that examination date. You may, however, register and de-register students of your course to that examination date.
You can use the Capacity limit sharing by multiple teachers application for multiple examination dates to count enrolled students even if they are enrolled in different courses taught by different teachers. The first teacher creates the examination date, then uses this application to open the possibility for a colleague to add his examination date’s capacity to the examination date of the first teacher. The second teacher will then link the capacity limit. This feature is complicated and not necessary in most cases where a capacity limit needs to be shared. In most cases, the shared examination date is created by the teacher who has access to the Teacher’s Notebook of all courses that have a shared examination date. Therefore, a simpler Examination date sharing option can be used. .
Procedure for creating examination dates with a shared limit
For example, let's have course A of teacher X and course B of teacher Y in the same faculty (but it can be different faculties and it can also be just one course of one teacher). Teacher Y wants to entrust the organization of the exam to teacher X and teacher X wants to write the exam together for courses A and
B in one room K123 with a capacity of 40 seats on 1.1.20ZZ at 8:00 am.
Teacher X creates an examination date in course A
Mon 1.1. 20ZZ 08:00 K123 (examinations only (no resits)), reservations: 0, max. 40
open for reservations to Tue 20 Dec 20ZY?, cancellation possible to Tue 20 Dec 20ZY ?
then teacher X flags the examination date as shareable. I.e., using the Activate and deactivate capacity-limit sharing in the dates to be selected.. The examination date will then be listed in the form:
Mon 1.1. 20ZZ 08:00 K123 (examinations only (no resits)), reservations: 0, max. 40
open for reservations to Tue 21 Dec 20ZY?, cancellation possible to Tue 21 Dec 20ZY, capacity-limit sharing enabled
In addition, teacher Y in course B will create an examination date for students in course B. The maximum number of students for this examination date does not need to be set.
Mon 1.1. 20ZZ 08:00 K123 (examinations only (no resits)), reservations: 0 open for reservations to Tue 21 Dec 20ZY?, cancellation possible to Tue 21 Dec 20ZY
Teacher Y then uses the application Link the capacity limit of an examination date of this course to a capacity limit of some other date. Teacher Y selects his term as the secondary examination date (on the first page of the application) and Teacher Y selects the term of teacher X's course Aas the primary examination date (on the second page of the application). On the second side of the application, all examination dates that are marked with the "capacity-limit sharing enabled" flag are offered, regardless of the course.
Once Teacher Y has made this connection, it will be reflected in the listing of both examination dates as follows. Examination date of course A of teacher X:
Mon 1.1. 20ZZ 08:00 K123 (examinations only (no resits)), reservations: 0, max. 40
open for reservations to Tue 20 Dec 20ZY?, cancellation possible to Tue 20 Dec 20ZY, capacity-limit sharing enabled
The examination date shares a capacity limit with the following: FF:B Mon 1.1. 20ZZ 08:00 K123 (autumn 20ZY) info
Examination date of course B of teacher Y:
Mon 1.1. 20ZZ 08:00 K123 (examinations only (no resits)), reservations: 0, max. 40 open for reservations to Tue 21 Dec 20ZY?, cancellation possible to Tue 21 Dec 20ZY
The examination date shares a capacity limit with the following: FF:A Mon 1.1. 20ZZ 08:00 K123 (autumn 20ZY) [main] info
We now recommend that teacher X of course Ashould remove the "capacity-limit sharing enabled" flag as soon as possible. This will ensure that no more teachers will connect to his examination date. The teacher can remove the flag either in bulk for all his terms by applying the Deactivate capacity-limit sharing in all the examination dates of this course or by Activate and deactivate capacity-limit sharing in the dates to be selected Deselecting the "capacity-limit sharing enabled" flag does not deselect an existing connection!
If you want to cancel an existing link (limit sharing), use the Deactivate a capacity-limit sharing link application. You can only cancel the information for your examination dates. You can cancel your link to another examination date and you can cancel all links to your course examination dates.
Primary and secondary shared examination date
The limit of maximum number of entries can be shared for pairs, triples, quadruples, ..., in general tuples of dates. The term primary shared examination date includes a single examination date to which secondary examination dates are linked. The primary examination date is the one that the teacher must mark with the "capacity-limit sharing enabled" flag.
Any non-zero number of secondary examination dates can be linked to one primary examination date. A secondary examination date cannot be a primary examination date and, conversely, a primary examination date term cannot be a secondary examination date.
The resulting limit – the maximum number of students for a tuple of shared examination dates – is the limit specified for the primary examination date. The limits specified for the secondary examination date are ignored (after linking, the limit of the primary examination date is displayed for the secondary examination date). For all shared examination dates, the sum of all registered students is always displayed. (However, other data is not shared anymore.)
Registering students for an examination on an examination date that has a shared limit
Students apply for examination dates that share a limit in the same way as for non-shared examination dates. The student does not even need to know (apart from a note in small print) that the term has a shared limit. The examination date information line lists the sum of the number of students registered for all shared examination dates as the number of registered students, and always lists the limit of the primary examination date as the maximum number of students.
If one individual (student) registers for both shared examination dates, he/she will be counted twice in the total number of registered students. (One person may only apply for one examination date once.)
I want to work with a list of all students who are registered for an examination date with a shared limit
Follow these steps to get the list:
Selection of relevant courses
Filtering the student list
Both steps can be done at the same time. In the Teacher’s Notebook, enter the course codes from which you want to select students. Enter the codes consecutively, separated by a space. Check ALL of the desired courses.
Select a filter from the list (in this case "selected by examination dates") and click "Apply filter". Now IS has listed all the examination dates for all courses. Select the examination dates and courses whose list of students you want to display and confirm your choice using "Select".
At the top of the screen you can see the courses and examination dates you are working with.
Displaying the list of students
To display the list students, use the "Show list" link in the Students section. The list of students who are enrolled for the examination dates for the given courses will be displayed.
Create a set of questions and a ROPOT description in the IS, generate test sheets to be printed, try whether you prefer to print the assignment from the browser or directly to the printer (via the TeX typesetting system).
In particular, check how any non-standard characters and marks you have in the test sheet will print.
For the time being, you can only print the question containing the image from the browser.
You can send out a group email to students advising them to look at the Student Help so they can understand how to enter the učo and assignment number on the answer sheet.
Check with your faculty's LVT about the scanning procedure: whether you will scan yourself (how and where) or have a service person do it.
Print enough replacement answer sheets.
The answer sheets can also be copied on a good quality photocopier.
Make sure they are not copied diagonally. Even slightly rotated answer sheets may not be read correctly by the recognition program. If you have any doubts about the quality of the copier, we recommend that you try a few sheets in the clear and let the IS to recognise and evaluate them. Or do not copy the sheets, but print them.
You can check the attendance according to the list of those registered for the examination date from the IS and according to the ISIC. During the examination, the supervisor can check whether the student has filled in the answer sheet with the name on the ISIC according to the ISIC placed on the desk.
Explain on the board how to write the digits of the učo and the number of the assignment on the answer sheet (see Student Help).
The answer sheet cannot be scraped, only gently rubberized.
Encourage students to prepare their answers first for the assignment. Before the end of the examination, invite them to rewrite them on the answer sheet. If a student makes a mistake on the sheet and there is no corrections section, tear up the sheet and give thim/her a new one to rewrite the information.
Emphasize to the students to mark their answers using a bold line. Some students may try to cheat by marking answers they are unsure of very thinly, which the recognition program may interpret as an unanswered question. The student then waits and, if it was a correct answer, requests a manual correction of the result. We therefore recommend that teachers ignore claims of non-standard marked answers and leave the decision to the recognition program.
For handwritten examinations that will be scanned (i.e. answers are written on the answer sheet), warn students that they should not write in the margins of the paper and that only answers on the face of the paper are scanned. The reverse side is not scanned and the student will not see it in IS.
Before handing in, ask students to check that they have not forgotten to fill in the assignment number.
You may or may not leave the assignment with the students, e.g. you can publish it to them at the end of the examination period by displaying the correct answers in ROPOT description in the IS (this does not apply to handwritten examinations, here you can post the assignment as a separate file, e.g. in the learning materials).
Tell students the date when they will see the grades, scanned answer sheets, or assignments in IS – save yourself questions.
Perform answer sheet scanning alone or with LVT support; if some are not recognized, correct manually. The result of the operation is to link the answers to the answer sheet (ROPOT description) and store the scores obtained in a notebook.
Grades can preferably be awarded in bulk using the "evaluate on the basis of scores" notebook operation.
Make the scanned answer sheets available to students, someone may complain about the recognition of the paper, solve individualy.
The recognition software is being further improved; if you notice a case of faulty recognition, send the student's name, course code, or other identification of the paper to the IS administrators.
Scanned answer sheets are placed in the Retrieval Box for students to review. Making the sheets available is not dependent on the publication of the notebooks. Even if the assigned notebook is inaccessible but the answer sheets are already scanned, students will see the sheets in their retrieval box.
Students have information on where to find the scanned sheets in the Help.
Teacher can allow students to view the assignment (with or without marking the correct answers) in the ROPOT description.
Teacher can view handwritten scannable answer sheet assignments after grading using the application:
The Information system Teacher [course selection] Work with ROPOT Browse answer sheets
Some courses (e.g. those of physical education, English, special medical courses, etc.) require that students be taught in seminar groups. Although each of them can be found in the timetable, they do not bear any unique course identification codes since they are always subsumed under a certain course. Different seminar groups of the same course may be taught by different teachers (seminar tutors). Dividing students into seminar groups with the aid of Information System is optional. Nevertheless, we recommend teachers to do so mainly in the following situations:
Seminar groups of the same course are taught by several teachers each of whom wants to be able to perform System operations in his/her students only.
Each student only attends one seminar group.
Each of the groups can only be attended by a limited number of students.
Seminar groups are usually created centrally via the application used for importing seminar groups. A Vice-Dean specifies the date on which students can start enrolling in the groups in the Term Calendar. The specification regarding the start time is not required since it is always 17:00 by default.
1 Overview of seminar groups of the subject.
Seminar groups are identified by a designation – subject code, slash and usually a serial number (there may be another string of letters and numbers).
At a glance here. groups, you will find links for further work with groups under the number of individual groups. You can view the list of students enrolled in the seminar group and enroll or unsubscribe students from the group.
Enrolling students in groups is typically problematic (students compete for a lucrative schedule). The start of registration can be set differently for different subjects, only the lesson must start between 17:00 and 19:00 inclusive due to the distribution of the onslaught, by default the time is set to 17:00. start of registration using registration waves). Therefore, find out about the faculty policy..
logging in to groups using registration waves
The registration waves start exclusively on a working day and the registration is moved by two working days in each wave. Closer to the registration waves in the help Registration and Enrollment
logging in to groups without registration waves
If no wave is used, the registration date entered in the application applies to all students; therefore, there is no shift.
Define a seminar group for the subject. It can be done by a teacher or a person with similar rights in a seminar application.
Export data about groups for your own needs (eg schedule) and fill in the group schedule time, capacity limit, etc. by importing from Excel or a text file.
Share capacity limit between multiple groups and different subjects (this only applies exceptionally).
Any manipulation of the seminar group records can also be done by the individual teacher. Normally, however, only after the groups are entered by the central faculty scheduler, he/she specifies who will practice (teach) which group using the application
The Information system Teacher [course selection] (Seminar Groups) Work with groups
Student logins/logouts can be left open or closed on a specific date (in the same application) at will. Then, when a student requests a change of group, he/she contacts the instructor and the instructor applies:
The Information system Teacher [course selection] (Seminar Groups) Enrol, cancel enrolment of a student in a group
A student who has registered or enrolled in the course without any problems can register for (at most one) seminar group. If registration is problematic, the seminar groups of the respective course cannot be selected. The lecturer and the study department may include a student with a red registration in the group. Groups have a capacity limit, you can only register for a group where there is space (you cannot register over the limit and e.g. wait for another student to withdraw).
There is a control application showing the history of students registering for and deregistering from seminar groups. A similar option is also available to the student (it avoids discussions about who has/ has not logged in when, why they are not in the list of students, etc.).
Logging into multiple groups:
In certain cases, it may be advantageous to allow students to sign up for multiple groups of one course. If you choose to do so, you need to set the "multiple logins allowed" flag in the definition of the respective group. This is an exceptional solution.
You can also enroll students in bulk using the application:
The Information system Teacher [course selection] (Seminar Groups) import students
In exceptional cases, it may be useful to assign multiple seminar groups of students to a single capacity. For example, for some reason a course attended by students from more than one faculty is listed under its own code in each faculty. The agenda allows you to set a fixed maximum number of students; the enrolments of students from all such linked groups are added together. In addition to the limit, other data is evaluated for each group separately, i.e. different enrolment/departure dates, different lecturers, etc. can be set.
Recommended methodology for capacity sharing:
After the instructors have agreed that a certain exercise/seminar is to be run jointly for multiple groups, set the desired limit for one of the groups and check the "limit can be shared" flag.
The Information system Teacher [course selection] (Seminar Groups) Work with groups
Using
The Information system Teacher [course selection] (Seminar Groups) capacity-limit sharing
Mark the other groups whose students are to be included in the capacity. Link them to the appropriate group with the set limit. This completes the capacity sharing. If the exercise/seminar is no longer to be shared between multiple groups, uncheck the capacity sharing (in the capacity sharing application) and subsequently the "limit can be shared" flag (in Group handling). The sharing application always lists all courses whose limit can be shared; unchecking the flag prevents someone from accidentally linking to your group and makes the listing clearer for other teachers.
Note that in a credit-based learning system, effectively once a course has been taken, it should always be listed under a single course code, so this solution is an unadvisable compromise.
It is possible to share multiple groups within a single course, multiple groups within multiple courses in a given faculty, or across faculties. Follow-on groups must always all be assigned to the same university time period (semester).
You can keep track of student attendance at lectures or seminars using the Attendance application. The recorded student attendance is then automatically transferred to a special notebook.
You can find the application via
The Information system Teacher [course selection] (Attendance) records
The application works only if a timetable is in place for the seminar group or lecture. The individual seminars and lectures will be displayed in three sections:
The section "seminar groups a student in the selection has enrolled in" shows the seminars attended by students selected in the filter.
The "lecture" section.
The "examination dates" section shows examination dates that are created in the selected course.
By checking the seminar group/lecture and confirming the selection you will be able to edit the attendance of all students in the seminar group/lecture for the whole semester. If you want to fill in attendance for specific days of the timetable, click the "select concrete day" button and select the day or days you want to edit.
1 Attendance records for the selected seminar for the entire semester.
2 Attendance records for the selected seminar for the selected days.
In the attendance overview table, tick the boxes for the selected students and save (you can also click on the date in the table header to tick the attendance for all students). The dates you enter will be saved in a notebook. Checking the box for a student on any date will enter "attendance" in the notebook for that seminar group/lecture, unchecked boxes will enter "non-attendance". Unticking the box for a student and a past date means that "non-attendance" will be entered in the relevant notebook. If the date of the event is in the future, nothing will be entered in the notebook for the unchecked box. If the teacher does not fill in any attendance for a date in the past, the system will evaluate that the class did not take place.
If you select the option to edit the selected seminar/lecture date, you have the option to add a student from another seminar group to the list of students (if they are replacing a class, for example). You can add a student from another seminar by selecting "Add student from another seminar group".
1 Attendance records for the selected seminar group.
2 Links to applications for further work with attendance.
1 Attendance records for a selected date – – adding a student from another seminar group.
The notebook with attendance is automatically created with the name "attendance XY" ("prezence XY" in Czech version of the IS) i.e. "attendance" for participation in lectures. You can change the name of the notebook at will, but do not change the abbreviation of the notebook for the correct operation of the application.
Note
Edit attendance only through the Attendance application, not by editing a notebook.
Tip: Recognizing letters of excuse
The data on student letters of excuse is also transferred to the attendance application, so if a student has a letter of excuse entered, the letter "O" or "OPT" will be displayed next to the excused seminar/lecture for a letter of excuse entered after the deadline. It is then up to the teacher whether or not to credit the student's attendance in these cases.
AYou can find the attendance evaluation application via
The Information system Teacher [course selection] (Attendance) summary
The application works only if a timetable is in place for the seminar group or lecture and attendance is recorded.
First, select the seminar group for which you want to evaluate attendance and set the parameters according to which attendance will be automatically evaluated, e.g. how many excused and unexcused attendance are allowed, etc. Parameters are set for each seminar group or lecture separately and can be edited later.
1 Set parameters.
2 Student list display options.
Based on the entered parameters, the application automatically evaluates whether the attendance requirements have been met or not. For individual students, you can automatically change the pre-calculated result.
1 Evaluation of attendance of the selected student.
After clicking on "Save", the result of the evaluation is saved on the last line of the corresponding attendance notebook ("total: not met *0" or "total: met *1"). You can also use the "Save the ones fulfilling requirements" option, which saves only the attendance with requirements met.
You can easily assign course grades or work with students based on their attendance. To select students with a met attendance, click on "change filter" in the Teacher's Notebook panel, click on the "selected by their attendance" filter in the menu and confirm with the "Apply filter" button. Next, specify whether you want to work with students with met, unmet or pending attendance. You can then enter grades for the students in the selection, send them a bulk email, etc.
If you want to include students from another seminar group in the selection, click on change filter and then on Advanced selection. Here, check the box to include previously selected students and select the OR operator. You then proceed in the same way as for the first selection filter.
You can also enter attendance-based grades using customized addition, see th Customized addition help section for more information.
For each seminar group and lecture you can print the attendance form for the semester.
In the header of the form is the identification of the seminar group. Below the list of students there are always a few blank lines in case a student joins the group after the sheet is printed.
The number of columns depends on the number of seminars during the semester. The system omits non-working days.
PUse the links to print
The Information system Teacher [course selection] (Attendance) Print attendance form
then select one or more seminar groups and select the desired printer. You can also choose from advanced print settings. You can also download the attendance form in the available formats to your computer.
If there are changes in the number of students in seminar groups during the semester, use the
The Information system Teacher [course selection] (Attendance) validate
Validation will cause students who have moved to a different seminar group during the semester to move to the correct notebook. The application also allows you to remove from the attendance record students who have opted out of seminar groups but have not enrolled in elsewhere.
If you wish to remove a student whose study has been terminated, you must do so by validating the appropriate notebook.
The Information system Teacher [course selection] (Poznámkové bloky) Zobrazit nabídku validace poznámkových bloků
The topic lists within the course is an agenda by which the teacher defines a set of topics and allows students to select them, sign up for them. Typically, topics such as papers or group projects can be divided in this way. It is similar to the agenda for recording the topics of final (diploma, bachelor) theses.
1 Select the check boxes for the selected topics in order to go to the bulk edit topics.
2 If you want to edit only one topic, select "Edit" in the Display operations menu.
One topic list is recorded using the following data:
name, abbreviation, instructions,
when enrollment is allowed (from → to), can also be set for topics (see below),
how many maximum topics a student may choose from the topic list,
pre-filling capacity for topics,
topic list features → allowing students to create their own topics, setting up a homework vault / notebook for topics, setting up an email to be sent when enrolling to a topic,
prerequisites → prerequisites (as for course registration, not usually used),
filtering according to the selection in the Teacher’s Notebook → filtering to students meeting the selection criteria,
sharing the topic list with other courses,
what events to record for the topic (usually just that the topic is finished, e.g. the paper has been turned in).
It is also possible to restrict registration (from-to) for individual topics in the topic list. The specified deadlines will take precedence in assessing whether a student can enroll over the deadline specified in the common topic list setting (the common deadlines applicable to the topic list will apply if no from-to dates are specified for the topic).
Topics may be chosen by a student registered or enrolled in the course without enrolment problem. A student who is not registered without a problem may be registered individually by the teacher.
If the topic does not have a "student's enrolment in the topic must be approved by its supervisor" setting, the application will register the first candidate in time until the topic capacity is exhausted. Otherwise, using
The Information system Teacher [course selection] (Topic Lists) Enrol and cancel enrolment of students
specify who you are enrolling to the topic.
1 Select the desired student and save the change.
A student cannot enroll out of a topic if the enrolment has already been closed, or if it is a topic for which the teacher has to confirm the enrolment (after confirmation the student will not log out) or a topic for which an action is registered. If the topic has its own login date, this date takes precedence over the schedule setting (see previous question).
The Information system Teacher [course selection] (Topic Lists) administration
Choose the topic list you want to share. Then use the "Edit" topic list and under "Other options (e.g. code, enrolment date, recorded events) select the courses you want to share the topic list with.
If you restrict the shared topic list to any seminar groups in the first course, you must select this restriction for the second course. If you want to share the topic list with the entire second course, please select all of its seminar groups.
The Information system Teacher [course selection] (Topic Lists) Topic lists – administration Create a list
and in the "List option" section, check the option "students can propose their own topics".
Students from the fields of study for which the topic list is intended and at the time when the topic list is set up to enroll for topics can create topics. Students can access the topic creation via the "Create new topic" link in their usual application for enrolling in topic.
The student proposes a topic and a supervisor and enrolls in the topic. The topics created by the student are automatically set with the "student's enrolment in the topic must be approved by its supervisor" flag. The supervisor can confirm or cancel the student's enrolment or the entire proposed topic in the application:
The Information system Teacher [course selection] (Topic Lists) Enrol and cancel enrolment of students
The request can also be confirmed/rejected directly in the list of topics in the list.
(Students can also list topics with higher capacity and enrol other students in them. This can be used in course topic lists, e.g. grouping students together for projects, etc.)
Tip: Give students instructions
You can use the "Instructions" section of the topic list application to specify the conditions under which students can propose new topics, e.g. whether they must agree with the teacher in advance or specify the framework from which they should come up with topics.
If you want the enrolled student to be able to add e.g. more detailed assignments and literature to the topic, go to:
The Information system Teacher [course selection] (Topic Lists) Enrol and cancel enrolment of students
for the selected student, click on the "Edit information" option and select the "Enable the student to modify the name, description, literature" flag.
You will be notified by email when the student makes the change.
The link to send an email can be found in the operations menu for the selected topic list and for the specific topic.
1 Link to send email.
A person with the "s_studium" access right can also select a group of students by selecting "Students enrolled in the topic list" in bulk in the application:
The Information system Office for Studies Batch selection
Batch selection selects students who have teacher approval or are enrolled in a topic where approval is not required.
Another option is to use the filter in the Teacher's Notebook (the "change filter" link in the header of the page) and only send to students who are:
enrolled in the topics of course topic list to be selected ,
enrolled in any topic to be selected of the course-unrelated topic list.
If a student is unenrolled from a topic, he/she is automatically informed of this fact by e-mail (if the study for which he/she was unenrolled is still active).
The Information system Teacher [course selection] (Topic List) Topic lists – administration Create a list
In the "List options" section, check the option "create a Homework Vault section for the topics of the list" or "create notebooks for individual topics of the list".
The homework vault will be set up immediately after the topic list has been created, and the notebook will be set up for each topic after the students have enrolled in it.
1 Set up a homework vault / notebook to the topic list.
You can find a link to the edit history by clicking the "Full info" link in the available operations for the selected topic. You can easily check how and who has manipulated the editing of the topic, students, supervisors/advisors, thesis attributes, topic attributes or recommended reading.
The agenda uses a similar mechanism to the course topic lists
The Information system Studies Topic Lists
for the selection of thesis topics, applications for various events, schedules for training courses, etc. These topic lists usually concern a large group of students, typically whole courses.
Topic schedules are created by authorized persons from the faculty (access right s_rozpisy or s_studium). They also set the timetable of work with the topic list displayed for the selected topic list or in the topic creation application.
The topic supervisors themselves will define and publish/offer the thesis topics to the students and gradually specify the assignment or title. Before the thesis defense, the study department will use the information obtained to transfer the thesis to the thesis archive and to print final certificates, etc.
A detailed description of the options is given in the question Outlines for Student Rosters → Final Thesis Evidence.
select the desired topics and under the topics table in the "Operations with selected topics" section, select "Convert to outdated".
Only topics that have no active students, or for which the "thesis/dissertation evaluated/closed" event has not been set to yes (if it can be set), or that have a full topic capacity can be converted this way. After conversion, topics will appear in the list of outdated topics with the "not current" flag.
One topic list is made up of individual topics. Some topic lists have a prominent position in the faculty (typically, completion of a similar assignment is required for passage, examples of assignments are included in faculty accreditation materials, assignments are part of the faculty presentation on the public website). These significant assignments are broken down into the following types for presentation purposes:
Bachelor thesis,
Thesis,
Dissertation,
Final theses of non-degree studies,
Projects,
Yearbook,
Other.
Other topic lists are of type "Other" and are not part of the external presentation of the faculty. The university public can see the topic lists and the topics presented in them even if they are of type "Other".
After selecting a specific topic list there are several common options that you can use to view the topics. If you want to view topics by a different filter than the one directly listed in the topic list, use the advanced selection.
1 Advanced selection.
The most frequently used topic selectors:
my current – topics where I am enrolled in or listed as the topic supervisor and the topic is current,
my not current – topics where I am enrolled in with my studies already completed, as well as completed topics where I am listed as a supervisor,
all current – all current topics in the topic list (excluding closed/outdated topics),
all not current – topics with no active students (does not select unpublished topics),
currently available ones – topics that have free capacity and are published,
which have not been made public – topics that do not have the "open the topic for enrolment" option checked are selected,
published– topics are selected that have the "open the topic for enrolment" option checked.
Course-unrelated topic list shall be created and its description shall be governed by the holder of the s_rozpisy or s_studium access right. For the creation of topics, he/she shall check the department and groups of persons in the description of the topic list. Topics may be created by academic staff of the designated departments and members of the designated groups of persons. If the topic list has the option "students can propose their own topics" checked, students who are allowed to enrol in to the topics in the topic list are also allowed to add topics at the time the enrolment is taking place. A topic that has already been created may be changed by the person listed as the topic supervisor, responsible person or contact person, even if they are not allowed to create new topics in the topic list. If "Enable the student to modify the name, description, literature" and "Enable the student to enter or edit only the English name"options are checked for a particular enrolled student, the student can edit the topic data, e.g. add English title, literature items, etc.
If any of the confirmations are required by the topic list, the following rules apply:
confirmation of the correctness of the topic by the supervisor / list administrator
confirmation of the correctness of the topic by the supervisor / list administrator
if only the supervisor is to confirm, the supervisor or list administrator can confirm the topic; if only the list administrator is to confirm, only the list administrator can confirm,
if the topic is not confirmed, it is flagged as "not approved",
if a student creates a topic and enrolls to it, the topic is flagged as "not approved" until confirmation occurs.
the topic is suitable for defense → student confirms enrolment for defense, confirmation of the topic for defense by the supervisor/list administrator
the topic must be confirmed,
if confirmation is required, it is not possible to print the description or convert it to a SZZ,
if confirmation by the student or supervisor is required, the list administrator may also confirm the topic,
if not confirmed, the topic is flagged as "unconfirmed",
after confirmation, nothing can be changed on the topic (only the list administrator can), the only exception is the readers, which the supervisor can edit even after confirmation (until the list administrator approves them).
addition of readers → the supervisor is allowed to add readers, confirmation of readers (by the list administrator)
if the readers are proposed by the supervisor, the list manager can confirm these proposals, after confirmation they cannot be changed,
if not confirmed, the topic is flagged as "reader not confirmed".
The timetable of operations is set by the person with s_rozpisy or s_studium access rights when the topic list is created, and thus determines the sequence of actions that are normally required, e.g. student/supervisor adding or editing topics, enrolment into topics, etc. The timetable of operations is displayed when manipulating topics of course-unrelated topic lists or in the detailed information of a specific topic list.
1 View topic list details.
2 View the timetable of operations next to the topic list.
The holder of the s_rozpisy access right (in the position of the Vice Dean or in collaboration with him/her) will define the main course-unrelated (faculty) topic lists for the collection of thesis assignments. The topic lists are to be arranged as is customary in the faculty, typically students from one or more fields of study are allowed to choose from a particular topic list together.
Teachers create the topics of the theses (or the secretary may assign them).
Students will be able to enrol in topics during a limited time or during the entire semester, depending on conventions.
The coordinator will inform the teachers about the possibility to record their own topic lists in the Teacher’s Notebook.
Doctoral students can fill in the thesis topics themselves and collect the necessary data from them.
If you have a suggestion to use this agenda for a type of faculty topic list not mentioned in this text, you can consult with the developers on the best layout.
The application creates a file with data about students, which is the basis for the preparation of documents such as applications for thesis defense. Depending on the practices of the particular department, the document is printed by the student himself or by his thesis supervisor or by the departmental staff in bulk. The application exports the data of students who are enrolled in the course from whose Teacher's Notebook it is called. The list of students in the Teacher’s Notebook can be restricted in the usual way (when entering the Teacher’s Notebook).
from the title page of the Information System or via the student's personal page (section My student). If you don't see the student, check the correct term and faculty settings in the page header.
Insert a review
by creating it according to a template (see Administration of final thesis reviews), if your workplace uses them, or upload it as a file. To upload the file, click on "Upload in a file" or in the final thesis archive via the "Upload a file" link.
1 Entry into the archive of the final thesis.
1 Upload a report.
3 Creating a report according to the template.
In the type of file to upload, select "Supervisor's report", leaving your name as the author of the file. We recommend that you name the file as report_name or report_uco.
Confirm the entered data with the "Insert" button.
1 Reporting form.
If you are uploading the file for another person, proceed in the same way, only select the correct person in the form for introducing the report or find it in the IS JAMU.
The archive of the final thesis can be manipulated in the following cases:
Student (author of the thesis) – the final thesis was not taken over by the study officer in the past or he was granted a three-day exemption for manipulating the archive.
The supervisor/opponent – final thesis, whose opinions are submitted, has been taken over by the study department and has not yet been evaluated.
Authorized person with the right to s_vyuka – the final thesis was not evaluated or 180 days have not elapsed since its possible acceptance.
An authorized person with the right s_studium or d_su – can manipulate the archive at any time.
Read files in the archive can:
Student (author of the work) – at any time, even if the archive has not yet been published.
Thesis supervisor – after the archive has been taken over by the study department, even if the archive has not yet been published.
Changes to the rights for manipulation of the final thesis files (insertion of a new file, acceptance of the thesis, etc.) will be made within a few minutes.
Reports can be in electronic form in MS Word format (.doc or .docx), in the form of a text document in OpenDocument ODF format (.odt), in the portable format of PDF documents (.pdf), or scanned in JPEG format (.jpg ) or BMP (.bmp).
The supervisor can check the published work on plagiarism through the application in the IS JAMU, confirm its legibility and confirm the legitimacy
temporary hiding of files and the date of their publication (overview of hidden files).
Use links:
The Information system Supervisor Archive of Theses/Dissertations
After performing the checks, confirm the operation with the "Theses checked" button. A PDF report on the similarities found will be stored in the archive of the final thesis.
In some cases, it is necessary to enter special characters in the title of the final thesis that the normal keyboard does not contain. Prints of documents with the title of the thesis are realized in the IS through the TeX system. If we want to achieve the correct display of special characters, we use the TeX convention to write.
We enter the name in the field „TeX: Title of the final thesis, optional“.
Pokud má být nad nějakým cizím znakem čárka, píšeme před znak „ \' “ , např. powie\'s\'c historyczna
Označení slova, ve kterém jsou speciální znaky – Každé slovo,
kde chceme použít něco z možností níže, obalíme do dvojice $, např. $slovo$
Dolní indexy, např. H2SO4
Zapíšeme pomocí podtržítka:
$H_2SO_4$
(Jeden znak za podtržítkem se vytiskne jako dolní index.)
Horní indexy, např. Prostory Rn
Zapíšeme pomocí stříšky (je na klávese s číslicí 6):
Prostory $R^n$
(Jeden znak za stříškou se vytiskne jako horní index.)
Konvenční označení množin
Zapíšeme pomocí speciálního slova mnozina, např.
\mnozina{R}
Složitější případy
Pokud je potřeba do indexu umístit více než jeden znak, je potřeba celý index uzavřít do složených závorek: H23SO45
zapíšeme:
$H_{23}SO_{45}$
V případě složitějšího zadání je možno se ozvat. Doporučujeme také konzultovat s vedoucím práce, zda je skutečně nutno speciální znaky použít,
zda raději místo H2SO4 nenapsat „kyselina sírová“ (publikace bude lépe fungovat ve vyhledávacích systémech atd.).
Do pole pro textový název práce zadejte přepis dle svého uvážení, např. H2SO4 – takto se bude bežně zobrazovat na obrazovce a v tisících mimo systém TeX.
V sekci Katalog předmětů může učitel upravovat údaje o vybraném předmětu.
1 Sekce Katalog předmětů v Záznamníku učitele.
V této sekci má učitel k dispozici odkazy vedoucí do příslušných
aplikací agendy Katalogu předmětů, ze kterých se tyto údaje dále
generují do Stručného výpisu informací o předmětu. Studentům je tento
stručný výpis primárně nabízen při hledání předmětů v Prohlídce
katalogu.
1 Stručný výpis informací o předmětu v Katalogu předmětů.
V době přípravy Katalogu předmětů pro další rok jsou vyučující v této
aplikaci žádáni, aby potvrdili, že evidované údaje jsou správné. S
požadavkem na opravu základních údajů se mohou obracet na vedoucího
garančního pracoviště daného předmětu. Doplňující údaje si opravují učitelé
sami.
Potvrzení správnosti údajů mohou provádět osoby uvedené u předmětu jako
přednášející, cvičící, kontakní osoba nebo garant a dále také vedoucí
garančního pracoviště předmětu. Správnost údajů však nemohou potvrzovat
náhradní zkoušející ani pomocníci.
Podrobnější informace k plnění rubrik lze v případě potřeby (obvykle je vyučující nepotřebuje) nalézt v nápovědě
Plnění základních údajů předmětu.
Označení rubrik:
Kód předmětu
Jedinečná krátká identifikace předmětu.
Krátký název předmětu
Zkrácený název, používá se ve výpisech omezených délkou.
Zařazení předmětu na fakultě
Pracoviště fakulty, kam předmět patří. Přístupová práva pro správu Katalogu (katal_a, katal_b, katal_c) lze přidělovat
s rozsahem na toto pracoviště.
Garant předmětu
Ten, kdo odpovídá za odbornou úroveň předmětu, jeho obsahovou náplň,
zajištění a rozvoj jeho kvality.
Garanční oddělení předmětu
Oddělení, které zajišťuje realizaci předmětu.
Kontaktní osoba předmětu
Ta, na níž se lze obracet, nereaguje-li vyučující např. na e-mail.
Ukončení předmětu
Předmět je vypsán s jedním nebo více typy ukončení (např. zkouška, kolokvium). Podle toho, s jakým ukončením si student předmět zapíše,
je mu uděleno příslušné hodnocení. Doporučené ukončení – to, které se studentům implicitně registruje. Jiné možné – předmět může být možné si zapsat s různou obtížností (ukončením).
Jaká existují ukončení předmětu a jejich hodnocení lze najít na
Informační systém Předměty Přehled ukončení a hodnocení
Související rubrika „je ukončení odložené?“ se obvykle vyplňuje „ne“ – předmět
je třeba ukončit ve zkouškovém období semestru.
Rozsah předmětu
Znamená počet hodin týdně. Informativní údaj, dále se nezpracovává.
Četnost předmětu
Zde lze vyznačit, zda je výuka pravidelná nebo bloková. Informativní údaj, dále se nezpracovává.
Periodicita předmětu
Údaj, dle kterého se předmět automaticky vypíše či nevypíše v dalších semestrech.
Počet kreditů předmětu
Zde je vyznačena kvantitativní (časová) náročnost předmětu. Studijní plány jsou postaveny tak, aby semestrální zátěž byla přibližně 30 kreditů.
Kreditová funkce předmětu
Rubrika se použije, je-li kreditace předmětu závislá na typu ukončení.
Prerekvizity
Jsou seznamem pravidel, která se kontrolují při zápisu kurzu.
Limit předmětu
Znamená kapacitu, kontroluje se při zápisu kurzu.
Mateřské obory předmětu
Zde lze vyznačit, kdo má v zápisu přednost, kontroluje se.
Atributy předmětu
Volitelné informace, používají se pro vyznačení studijních plánů a jako podklady pro tvorbu registračních a kontrolních šablon a tisk brožur studijních programů.
Typ výuky a zkoušky předmětu
Rubrika pro požadavky učitele (docházka, průběžná práce, podmínky závěrečné zkoušky), které učitel musí zveřejnit na začátku semestru.
Literatura k předmětu
Obsahuje návrh doporučené literatury.
Navazující předměty
Obsahuje návrh souvisejících předmětů. Informativní údaj, dále se nezpracovává.
Vyučující lze zadat do Katalogu v různých rolích podle rozsahu jejich podílu na výuce –
přednášející, cvičící, pomocník, náhradní zkoušející.
Osoba uvedená u předmětu jako „přednášející“ může přidat do záznamu další vyučující osoby. Použijte aplikace
Informační systém Předměty Úprava základních údajů
nebo
Informační systém Předměty Hromadná manipulace s vyučujícími předmětu
Vyučující sám spravuje část údajů o předmětu v Katalogu – doplňující údaje vyučujícího
nebo-li sylabus. Použijte
Informační systém Učitel [výběr předmětu] (Katalog předmětů) Sylabus a doplňující informace učitele
Údaje lze měnit, pokud má příslušný semestr nastaveno „lze editovat sylaby“. Toto nastavuje proděkan, stav lze zjistit na
Informační systém Učitel [výběr předmětu] (Katalog předmětů) Harmonogram období
Dále nelze měnit údaje v období, které začalo už dříve než před třičtvrtě rokem.
Právo editovat doplňující údaje o předmětu má osoba, která je v záznamu o
předmětu uvedena mezi vyučujícími jako „přednášející“ nebo „cvičící“,
garant kurzu, vedoucí garančního pracoviště předmětu a majitelé
přístupového práva katal_a, katal_b, katal_c, katal_d a s_vyuka.
Začátečníci využijí při úpravě sylabu volbu „Vypisovat podrobnou nápovědu“ – volte ji hned při vstupu do formuláře předmětu:
1 Klikněte na odkaz „Vypisovat podrobnou nápovědu“.
Jednotlivé rubriky pak vyplníte dle pokynů „Poznámky“ u nich uvedených. Pokud už byla rubrika vyplněna (např. minule), objevuje se testovací výpis jejího obsahu (s modrým podkladem).
1 Rubriky ve formuláři k vyplnění.
Rubriky jsou následující:
Předpoklady předmětu zadané garantem
Jsou automaticky vyhodnocované podmínky, které student musí splnit pro zápis. Vysvětlení použitých značek lze najít v nápovědě
Plnění základních údajů předmětu.
Předpoklady
Slouží jako textové informace vyučujícího, informující o potřebných znalostech pro vstup do předmětu, např. „znalost jazyka C na mírně pokročilé úrovni“
nebo „vyžadován je předmět A000 Úvod do oboru, předmět B000 Základy jazykovědy je výhodou, ale ne podmínkou“.
Předpoklady anglicky
Anglická verze.
Anotace předmětu
Krátký (max. cca 3000 znaků) popis obsahu předmětu.
Anotace anglicky
Anglická verze.
Osnova předmětu
Bodově zadejte probíraná témata, oddělte znakem <p>. Zvykem je zadat přibližně tolik témat, kolik přednášek proběhne.
Osnova anglicky
Totéž v angličtině. Pro usnadnění práce můžete použít tlačítko „Zkopírovat českou osnovu do anglické“ a poté upravit.
Literatura
Doporučenou literaturu vybíráte zejména z titulů obsažených v univerzitní databázi. Vyhledat titul je možno podle části názvu, autora či ISBN. Pokud titul v databázi chybí, prosíme doplňte ho přímo do systému pro správu publikací
Informační systém Publikace Vložit novou publikaci
a poté ho dohledejte a začleňte k předmětu. V krajním případě je možno mezi literaturu zařadit i položku, která není publikací, např. „Slajdy z přednášek; k dispozici u vyučujícího“ – to uveďte do pole formuláře „Náhradní obsah“.
Typ výuky a zkoušky
Zaznamenáme podobu závěrečného hodnocení (např. písemná zkouška), zda je vyžadována práce či docházka během semestru a podobně.
Navazující předměty
Zde můžete studentům nabídnout předměty, kterými je vhodné pokračovat po absolvování vašeho předmětu.
Odkaz na webovou stránku předmětu
Existuje-li ucelená stránka dalších informací o tomto předmětu, uveďte její adresu. Studijní materiály, zajímavé odkazy do Internetu ap. lze evidovat v agendě
Informační systém Učitel [výběr předmětu] Studijní materiály
Informace učitele
Nepovinné, lze uvést konzultační hodiny, kde lze nalézt další informace k předmětu ap.
Pomocí
Informační systém Předměty Prohlídka Katalogu
se lze inspirovat, jak rubriky vyplnili vaši kolegové u jiných předmětů.
A notebook is a record sheet where you can insert a note of any length for each student.
1 Application for editing student's notebook.
The student can view their record if you allow students to access the notebook’s content,
The Information system Student [course selection] Notebooks
or you can keep the notebook unpublished for your own use. The contents of the notebook can be attached to a bulk letter to students (records are displayed in the application and added to the email for each student individually).
The notebooks also support continuous assessment throughout the semester – awarding points. If the notebooks contain numbers with an asterisk (e.g. *23, *-1, *5.4), the applications understand them as points, can automatically add them up, display statistics and graph. After entering the grading scale, they can suggest grades and transfer them to the Evaluation application.
Typical uses:
your own notes on submitted papers, exams, etc.,
comments on worked out credit examples, requests for corrections – publish to students,
classroom/exam seating chart, which you will email to students in advance,
scoring of tests and assignments.
If your assistant is correcting papers, enter him/her as an "Assistant" in the Course Catalogue:
The Information system Teacher [course selection] (Course Catalogue) Edit teacher-related data
When creating a notebook in a specific application, the notebook is assigned a shortcut that classifies the notebook into one of the following types. In the application, you can then choose to sort the notebooks according to these types, making it easier to navigate. Notebooks can be sorted not only by type, but also by notebook name or abbreviation by selecting it in the notebook header. In addition, you can select and perform other operations only on a selected group of notebooks. The division of notebooks is as follows:
Teacher-defined notebooks – this group includes all notebooks that have been created by the user directly in the Notebooks application.
Automatic addition – Autosummary notebooks sum the contents of designated notebooks at regular intervals.
ROPOTs notebooks – contain the scores from the ROPOTs. Their content can be changed and rewritten at any time, e.g. by changing the ROPOT description setting.
Homework vault notebooks – these notebooks can be created via the homework vault management application. They are used to enter assessment for submitted student files.
Discussion forum notebooks – notebooks assigned to topic discussion forums. They are used to enter assessment of student activity in these forums.
Attendance notebooks – notebooks used to record attendance in class.
Categories are only listed if there are notebooks associated with them.
The teacher is allowed to create any number of notebooks. A notebook is identified by name and is assigned to a specific course in a specific term. In the Teacher's Notebook, select the notebooks you want to work with or create a new notebook.
1 Select the notebooks you want to edit.
Take advantage of operations in
The Information system Teacher [course selection] Notebooks
New: create | create and pre-fill | create by copying | create with evaluation of another course | create by adding up scores stored in different notebooks
Edit settings: settings | add a student | remove a student | delete the notebook
Contents: edit | browse | add text | add asterisks
When creating, you need to specify
name of the notebook,
whether the student can view his/her record in the notebook,
whether the student can look at the overall statistics (in the form of rankings and point counts),
whether students should be added during validation
optionally, you can set the date and time from which students can view their notebook record and the statistics.
It is not recommended to set up notebooks in the first weeks of the semester (unless necessary) when the list of students in the course is not complete. Otherwise, it will be necessary to use validation afterwards (see also below,
on validation). You can create a notebook in multiple courses at the same time (enter the application with multiple courses selected at the same time).
When editing the content, you have a line containing the student's name, the programmes studied, how the course was completed, and the grade if already entered. If you have multiple courses or multiple notebooks selected at the same time, then the course code or notebook name will also appear. You can also edit the contents sent flag individually.
If you do not want to edit the notebook, but only view it, select Contents: browse.
You can also add text or asterisks to the notebook in bulk (the number behind the asterisk will then be treated as score).
If you enter the application to create a notebook with a filtered list of students, the application will offer the option "I want all the students enrolled in the course to be included in the notebook." If you intend the notebook to be only for students of a seminar group, an examination date, etc., do not check the box. On the other hand, check "do not add missing students (programmes of study) to the notebook during the validation process" so that you do not extend the notebook to all students (see also on validation
below).
The Information system Teacher [course selection] (Notebooks) Import/export
Send email
sends out a bulk letter, stores its common body for future use. In the letter, the content of the specific student's notebook is placed in place of the <BLOK> tag you inserted.
You can use the option "send the message without saving it" if you know you don't want to use it as a template in future years. When you enter the application, you can select from all your last saved drafts, as well as drafts saved this semester by the co-teachers of this course. Use "save the message as a new one (do not rewrite the original used)" to save a new draft. A saved draft can be deleted at any time.
Contents-sent flag
The notebook also includes a flag for sending a letter. The flag is recorded separately for each student entered in the notebook. This flag is set by the application sending the contents of the notebook by email whenever the corresponding content is sent to the student.
When sending the contents of a notebook, you have the option to check „do not send the message to the students with the contents-sent flag“.
This will ensure that the letter is not sent to those to whom it has already been sent once. By default, it is always sent to all students introduced in the notebook (or only those to which the selection has been restricted).
When sending a notebook, you also have the option to check „do not add the contents-sent flags to the notebook after sending the message“. In this case, the send flags are not set.
In bulk, flags in selected notebooks (all students or just a filtered list) can be deselected using the Remove the contents-sent flag. application. Individually, you can deselect it when you edit the content.
Incorporating the notebook content into the body of the letter
The contents of the notebook belonging to the student to whom the letter is being sent are placed either at the end of your letter or where you write
<BLOK>
. The content can only be inserted once in the letter in this way. The content is always inserted on a separate line, i.e. a newline character is inserted before and after the content.
Tip: Example: Incorporating the content of a notebook in the body of a letter
Subject: results of intermediate examination 15.5.2020
	    Text of the letter:
      Hello,
      The test on 15.5.2020 turned out to be harder than I expected, many of you made a mistake in the second example. I
      will explain the correct solution again in the next lecture. You were to solve a total of 5 examples, I attach the
      scores of each example and the total number of points obtained for this paper:
      <BLOK>
      Sincerely
      Michal Brandejs
When such a letter is sent, the line with the <BLOK> tag is replaced by the content of the notebook belonging to a specific student and the text of the letter will be e.g:
Subject: results of intermediate examination 15.5.2020
	    Text of the letter:
      Hello,
      The test on 15.5.2020 turned out to be harder than I expected, many of you made a mistake in the second example. I
      will explain the correct solution again in the next lecture. You were to solve a total of 5 examples, I attach the
      scores of each example and the total number of points obtained for this paper:
      3 -2 1.5 2 4 *8.5
      Sincerely
      Michal Brandejs
The application sends a maximum of one letter per individual per operation to send the contents of a notebook, regardless of how many times their study occurs in the selected notebooks. If the individual occurs in the selected notebooks only once, only the contents are inserted in place of <BLOK>
(or after the end of the note). If the person appears more than once, all the contents belonging to the person are inserted on separate lines, followed by the study identification and the course code.
Enter evaluation (notebook content displayed) is an alternative application in the Notebooks section of the Teacher's Notebook, which allows you to add your desired notebooks to the web form for your information and then fill in the evaluation manually more conveniently.
Go to
The Information system Teacher [course selection] (Notebooks) (Evaluation/Scoring) Enter evaluation (notebook content displayed)
and then select the notebooks to be displayed into the form. You can also choose whether to display the notebook in a row or a column. We will keep those notebooks in a row that contain more information and that are not appropriate to display in a column. To change the row/column display, click on "select some other notebook(s)".
It is possible to set the parameter „Is 'requirements fulfilled' recorded in a notebook?“.
in the course catalogue. Then the Notebook will offer to create a notebook where the auxiliary "requirements fulfilled" is recorded. When the course is evaluated, the "Enter evaluation (notebook content displayed)" application is then used to visually check whether the auxiliary requirements fulfilled has been awarded.
In general, any information can be entered into the notebook. However, if you use an application that works with points (statistics, graph, summarization, evaluation), then it will search the contents of the notebook for sequences of characters starting with an asterisk (*) followed by numbers, a minus sign (-), a decimal point (.) or a decimal comma (,). This sequence may occur anywhere in the content and any number of times. Examples of allowed point value notations:
*23
             *-14
             *3.5
	     *8,2
A scoring assessment beginning with asterisk can appear anywhere within the text, e.g. it is allowed:
The 1st example was worse *3.5, the 2nd was better *8 and the *third* was the best *100!
If you enter multiple point values in one content, they are always added together first before being used again. The values 3.5, 8, and 100 are selected from the example line for addition purposes (so the sum is 111.5). Numbers not immediately preceded by an asterisk are ignored when processing points; likewise, asterisks not immediately followed by a digit, minus sign, period, or comma are ignored.
Negative numbers and decimal numbers are allowed. Decimal numbers must contain a decimal point or a decimal comma. Often, rounding to two decimal places occurs in the subsequent processing of decimal numbers.
The application loads the specified notebooks either in their entirety or only a limited list of studies. It only processes content that contains at least one score (the number after the asterisk). If more than one score is found in the content, then they are added together before use. From the values found, an overview statistic is calculated, or a graph is displayed according to the user's instructions.
Tip: Bulk addition of asterisks
You can also insert asterisks in front of selected numbers in the notebook using the application.
The Information system Teacher [course selection] (Notebooks) (Content) Add asterisks
You can also record the resulting grade in the notebook. It must be preceded by an at sign (@). Allowed grades are
-1234ABCDEFNPUVZ
(can also be lowercase). If you want to insert multiple evaluations (from multiple examination dates) into the content, you need to insert the at sign before each one, e.g.
@F @E
If you use scoring, use the application
The Information system Teacher [course selection] (Notebooks) (Evaluation / scoring) Evaluate on the basis of scores
Define the grading scale: for each course completion and each grade, specify the minimum number of points the student must achieve for it. The specified intervals are saved as default for all selected courses (the application can be accessed with multiple courses at once).
The notebook used in this application must have the number of points correctly introduced with *, if there are more than one on a line, they are added together. The application copies the notebook to a new one and adds a "@grade" entry at the end according to the number of points found in the notebook.
1 Application for entering the score according to the score threshold after the sum of the points in the notebook.
The following flags can be used to modify the way the evaluation is done: the "do not add any grades (evaluation) to the students who have already gained some" flag means that if there is already a grade after the @ sign on the line, then the content evaluation is not calculated, and no further grade is added at the end. If you check the flag "use '@-' if no score is found", then for each of processed content that does not contain any scores, a "did not attend" score is added, i.e. "@-".
The grade transfer application retrieves the specified notebook and searches it for all grades after the @ sign. If there are multiple grades in the content of one student's notebook (after multiple at signs), then they are combined into a grade string in the order they appear in the content of the notebook.
The application always addsgrades to the evaluation. That is, it will repeat the grades in the evaluation when you rerun it, which is probably not the desired behavior. If you need to replace the assessment with data from the file (not add it), you need to use the application to import the evaluation (without using notebook).
When the application is opened, a mock assessment is transferred, and any error messages are displayed. After clicking on "Transfer the grades (evaluation)", the error-free grades are added.
The Information system Teacher [course selection] (Notebooks) (Content) History of notebook-related operations
Then select the notebook for which you want to view its history. Through the application, you can follow the sequence of operations with the notebooks of the selected course. You can use it in case of doubts about the operations performed.
Add up scores stored in different notebook is an operation that creates a new notebook, copies the point values from the specified (multiple) notebooks into the notebook, and adds the values. This is a one-time action.
Automatic addition is an operation that creates a new notebook, copies the point values from the specified (multiple) notebooks into the notebook, and adds the values. The data in the newly created notebook is recalculated every hour unless the recalculation is exceptionally prevented by the current increased system load.
When you enter the application, you select the names of the notebooks to be used to create the (automatic) addition notebook. You can only select from notebooks that have at least one content with a score.
A notebook is created containing students who had a non-blank score in at least one of the added notebooks. This can be changed by checking the "only those with a score" flag for the appropriate notebook. Then students with a blank score in the ticked notebook will not be included in the resulting notebook.
In the resulting notebook, data in the form e.g.
23| -2|12.5| | 10| *43.5
In this case, five notebooks were added together, and the fourth notebook had a blank (unentered score). After the asterisk, the sum of all the entries is inserted, in this case 43.5 points. The vertical line is a visual separator of the individual input notebooks.
Customized addition is an operation that creates a new notebook that contains the result of the operation defined by the bc script.
When you enter the application, you can see all the available notebooks that can be used to create the resulting notebook. You can only use notebooks that have a score in a form of *34 in at least one line. To select only students who have a non-blank score in a given notebook included in the calculation, mark the notebook "only those with a score". Thus, only students with a score in the notebook marked as such will be included in the resulting notebook. To select students in a particular notebook, mark the notebook with the "only students in selected notebooks" flag. The resulting notebook will include students who have scores in at least one of the notebooks so marked.
Unlike simple summarization, it is possible to perform more complex calculations using a bc script.
Example of use: you want to determine the result of condition met from several tests, each of which has a different contribution to the grade. You have two tests, each of which can score a maximum of 100 points. Their results are recorded in notebooks called test1 and test2. The first test has a 25% share of the grade, the second test has a 75% share and the student must achieve at least an 80% pass rate. In the "Enter a custom bc script" field, enter the command
print "*"; 0.25*test1 + 0.75*test2;
if (0.25*test1 + 0.75*test2 >= 80) print "@Z" else print "@N"
and run the script.
The result notebook will display the corresponding number of points in the form *12.3 that the student has obtained in both tests and at the same time it will determine the grade (Z or N), which you can then use the "evaluation transfer" to write to the students.
If you want the resulting customized addition notebook to be updated periodically (typically when variables in source notebooks are changed), it is possible to check the "vyhodnocovat opakovaně automaticky" option when creating it (i.e. evaluate repeatedly automatically in Czech). The resulting notebook is then recalculated regularly every hour.
If you want to recalculate the customized addition notebook immediately, select the rotary arrow icon after the notebook name.
An immediate recalculation will occur and you will be informed by a "re-calculated successfully" message.
The notebook can be printed on a properly set up printer (provided by the faculty LVT) or saved to a Postscript file. You can choose to print to a row or to a column.
Exporting a notebook gives you a file containing your notebook in a format that you can process outside the IS, e.g. with Excel on your computer. After you have added information to the file (e.g. after entering the score for a test), you can load the contents of the notebook import operation file back into the IS.
The produced file contains columns in the following order:
učo (university identification number) of the student
surname and first name of the student
abbreviation of the field or fields of active study
course code
flags: 'opak' and 'znovu' for repeating a course and 'isp' for an individual study plan
enrolled course completion
identifier for information system – do not change!
the current contents of the notepad line
Columns F (6.) and H (8.) are important for reading back the contents of the notebook. The others are insignificant. If you change or delete an identifier, the contents will not be loaded.
With the notebook import application, you enter the contents of a notebook that you have processed/filled outside the IS, e.g. in Excel on your computer, into the IS.
This application can only load a file that was created by the notebook export application. This file must retain the student and course identification column. Importing into a notebook will irreversibly overwrite the existing data in the notebook.
When outputting from Excel, it is necessary to select the tab-delimited text output format. The Excel workbook will not be accepted by the application.
You can have a notebook of just one name in one file, even if it belongs to multiple courses at the same time. However, when importing a file, you must first select all (or more) courses that appear in the file. That is, you must have the courses into which the contents will be imported listed in the page header. If you don't have any there, you will probably get an error message "You don't have permission to the course".
When importing a file, only some columns are read. Columns are separated by tab or colon (:). They are numbered from one. Two or more columns are relevant for import. The first mandatory column is the identification string.
It contains a unique identifier associating the evaluation with the course, the period, the individual, his/her study and the course enrolment. This data must not be changed in the process of processing the assessment outside the IS. The first number of the identification string is the student's učo and the second is the course code. The identification string contains some extra data in order to recognize an inadvertent change of the identification string as an error. In the form above, you must set the sequence number of the identifier column. If you do not fill it in, it will be an error. The pre-filled column number value corresponds to the column number where the identifier is inserted by the export application.
The second mandatory column is the content column. You can specify more than one content column number if you are processing the exported notebook in Excel and you have your own data in multiple columns. When importing the notebook, all the columns you specify are taken and combined into one content column (separated by a single space). The imported file must not contain the ¨ character (single consonant).
If more than one row is stored for one student, i.e. the content is made up of multiple rows, the so-called continuation rows are created when exporting to a text format separated by colons (not for Excel!). The continuation line starts with the character "|" (vertical bar) in the first column. The notebook can also be loaded in the same form.
We recommend that you import at least twice. On the first attempt, leave the default "try without saving - used for checking purposes". No changes will be made in this mode, but all error and informational messages will be displayed.
If you select "import and save", then the contents of all the correct records will be imported. Erroneous ones are left unchanged.
If you discard some rows from the exported file, the content of the notebook in the IS is not changed when importing the discarded students. Only the contents of those students and courses that are listed in the identification string are imported.
If in Excel you need to add "*" before numbers in a specific column to indicate a further processable point value, proceed as follows (in Excel): select Format -> Cells -> Number tab -> Custom -> enter e.g.
The list of students in a notebook is static, it is created when the notebook is created. However, the occupancy of the course changes in the first weeks of the semester or even later. Validation is the process that puts the occupancy of students in a notebook into a correct state. A table of this type will appear on the front page if an inconsistency is found:
1 Expand/hide the validation options.
2 If an inconsistency is found in the notebook you can use "validation".
Operations:
automatic validation
is automatically executed when entering validation. All situations that are not of (probably much) interest to the teacher are automatically resolved in the first step. These situations include: a student's course enrollment was cancelled by the study department and then reinstated; a student's study was deactivated, a new study was created, and the student was enrolled in the course in that study. All these operations performed will be listed on the teacher's information page. It is recommended to study this information. If you find something in them that you do not understand, you can ask your study department. A list of study departments can be found at
https://is.jamu.cz/studijni/.
add the listed students to the notebook
These are usually students who did not have the course when the notebook was created and now have the course already enrolled. If you do not want to add students (you have a notebook for a certain seminar group only), select "do not add missing students (programmes of study) to the notebook during the validation process" when defining the notebook.
to remove students who do not belong
Note that if the "Date of last change of study status" is close to the current time, it is possible that the study department is, for example, transferring the student to another programme. Wait with the operation, you would lose the contents of the block of students affected in this way.
Any of the above operations may not be displayed or executed if there is no case to be solved by the operation.
This agenda is accessible to all persons who supervise or oppose the final theses of students of bachelor, continuing master, doctoral or lifelong studies in a given semmester and at a given faculty. Here you can enter grades for the final thesis and for courses related to it.
Check the header of the page to set the correct term in which you want to enter the grade and the faculty – the student is displayed under the faculty to which he/she is assigned and the term in which he/she have been active for at least some time. The student will appear in the Supervisor if the supervisor is listed in the student's thesis record or as the supervisor for the topic in the Topic Lists for which the student is registered.
Tip: How to see all students
If you want to include students who finished their studies, check the "Include the students who have recently completed or terminated their programmes of study" option and press "Apply". If you use the "also include students who interrupted their studies" option, students who were inactive during the selected period will also be included. If you have students in more than one faculty and want to show them all in the same page without switching faculty, check the "Include the students studying at other faculties as well" option.
Check the header of the page to set the correct term and faculty to which the student is assigned. Only courses that the teacher teaches or that have the "All teachers of the department the course is associated with can enter grades for the course" flag set are offered in the Supervisor. Evaluations for other courses can be entered via the Teacher agenda.
If the supervisor of the thesis is not a teacher of any course in a given period and at the same time the student's topic is not listed in any of the Topic Lists (of the type Bachelor's Theses, Master's Theses, Dissertations, Final Theses of Non-Master's Studies, Projects or Year Theses, which allow entering evaluations by linking them to the relevant courses), the supervisor needs to be added as a teacher to one of the courses in which he/she needs to enter grades.
In the Supervisor agenda, it is possible to perform only operations intended for the thesis supervisor (awarding grades for courses related to the thesis, semester evaluation of the doctoral student). The evaluation of other courses has to be done through the Teacher agenda.
Information system Supervisor [student selection] Evaluation
Under the name of a particular student, the course of the final thesis is listed with a link to the assessment and possible types of course completion. After clicking Evaluation, enter the appropriate evaluation in the box and save.
The application is used for the overall evaluation of the doctoral student by his/her supervisor. The members of doctoral studies board can see the list of students of the corresponding programme, the full texts of the supervisor's evaluation, a list of grades/credits, a table with an overview of the student's publications and other information from the student's record (internships, final examination).
Access for supervisors
Information system Supervisor Approval and Evaluation of Ph.D. Individual Study Plans
1 Click on the link to enter the application as a supervisor.
2 Click on the link to view the list of students.
Access for doctoral studies board members and s_studium rights holders
Information system Supervisor Doctoral Board Entry - Approval and Evaluation of Ph.D. Individual Study Plans
1 A member of doctoral studies board can search the list of students for the data entered by the supervisor. In addition, the chairman can see a link to edit the section.
All other sections can be seen by the student, the supervisor, members of the doctoral studies board and holders of the s_studium access right. The chair of the doctoral studies board completes the evaluation on behalf of the board. All sections can be edited by persons with s_studium access right even after the deadline set in the term calendar.
The semester evaluation of a doctoral student can be completed in the application
Information system Supervisor Approval and Evaluation of Ph.D. Individual Study Plans
for a particular student. The supervisor approves the plan for the entire study at the beginning of the study; if changes occur in subsequent terms, these changes also have to be approved. At the beginning of the term, the supervisor approves the planned term content, and at the end of the semester, the supervisor evaluates its implementation. The deadlines for approval and evaluation of the term content are governed by a term calendar that is common to all faculties and is available directly in the application.
The supervisor has the option of returning the term content to the student for revision at the beginning of the semester. If the time for editing the student's proposed term content has passed, the student will have three days to submit a revised proposed term content. However, no later than the end of the supervisor's approval period.
Tip: Recommendation
It is recommended that you do not return a proposed term content for revision just before the close of the supervisor's approval editing period, as the student would have limited time to work on it.
Click on the "listed in Lists of Students" link for the respective student to display the topic, which you can then edit using "View operations" → "Edit". Don't forget to save your changes. If you are editing a topic after you have transferred the data from the Topic Lists to the Final Theses (procedures vary between faculties), inform the relevant persons (typically the study department, the department’s assisstant) about the changes.
Information system Supervisor Select group email recipients Select studies
By checking one or more options and clicking on "Select studies", you will see the students of the corresponding study type that you lead or oppose and who are actively studying at the beginning of the selected term. To send a letter, continue by selecting "Send a group email to the selected students".
1 The selected variant of the type of studies to which the group email is to be sent.
2 Click on the link to enter the application to send the group email.
You can search for emails you have sent that have the "archive this message" flag checked using the
The application allows you to create reviews of final theses directly in the IS through templates of reports of individual faculties / departments. Thesis supervisors can also edit and save their previously written reviews here.
Tip
Inserting assessments via templates is voluntary, if you do not want to use the fulfillment of assessments via IS, you can enter any of your assessments in the Archive of Final Theses. More about inserting testimonials in the help Final Thesis – supervisor's duties.
Different versions of report templates can be created in the IS JAMUat the request of individual departments / institutes so that they fully meet their requirements (faculty logo, different appearance, different assortment of sections, etc.).
If you are interested, send the report template you use to jamuis@fi.muni.cz. Your template will be transferred to the IS and available in the template menu for individual workplaces.
You enter the application for the administration of final thesis assessments via
The Information systém Supervisor
Here, select the student whose work you want to fill in the report and click on "Create using a template".
1 Link to report administration.
If you have not yet filled in any report in this application, first select the template you want to use from the menu and click on "Select template". You can choose from all templates or from the templates of the final thesis department. You will then find the reports you have created in the section "My report drafts" and "My reports uploaded into the Archive section". If he chooses a template from the template menu, which you have saved in the drafts of the reports, you can use it and pre-fill in the data of one of the older reports, or only open a blank template.
1 Option to select a report template.
2 Overview of created concepts of reports.
3 Overview of already established reports.
Fill in the individual sections in the report template.
1 Example of a completed report.
You can check what the report will look like by clicking on the "Create a preview of the report" button (printable PDF version). You can also save the report in the "My draft reports" section or save the finished report in the archive.
You can use saved drafts when writing additional reports, so you don't have to fill in the template each time, but only edit the report you have already created.
You can find your drafts in the section "My draft reports", it is also located in the drafts folder, accessible via the My website application (in XML format). If you want to use a draft template (even with pre-filled data), click on the "apply" option. To edit an existing draft report, click "edit". You will also be offered the option of pre-filling the template with the data of one of the older assessments if you select a template that has already been used (and saved) from the template menu.
1 Possibilities of working with concepts of reports.
posbírat každoročně informace o publikacích pro centrální databázi RIV,
umožnit uživateli udržovat si seznam svých publikací (i těch, které nelze vykázat do RIVu),
umožnit uživateli udržovat i cizí publikace (např. pro doporučenou literaturu k vyučovanému předmětu; pro seznamy odkazů v bibliografiích
vědeckých článků atd.),
dovolit uživateli vybrat, které publikace mají být automaticky připojeny za jeho životopis a/nebo zobrazeny na osobní webové stránce.
Bližší informace o vykazování publikací do RIVu najdete v Nápovědě Publikace – RIV.
Z hlediska uživatele se publikační záznamy dělí na:
záznamy, které lze upravovat
Upravovat (tj. měnit název, autory, vydavatele atd.) nebo smazat záznam smí každá osoba, která je uvedena mezi autory publikace, pokud je
nastaveno „Záznam smějí upravovat všichni autoři“. Implicitně mají všechny publikace nastaven přístup pro všechny autory. S publikačním záznamem smí dále
manipulovat ten, kdo provedl poslední změnu záznamu (publikaci zavedl nebo ji naposledy opravil).
Aby ostatní autoři nemohli záznam modifikovat, lze zrušit povolení editace pro ostatní autory v editačním formuláři publikace. Povolení editace ostatním
autorům může zrušit buď některý z autorů publikace nebo osoba, která publikaci naposledy editovala.
Note
Rušení povolení editace používejte pouze výjimečně.
Tip
Autorem publikace pro potřeby systému je osoba zadaná číslem učo.
1 Povolení editace záznamu všem autorům.
Ten, kdo není autorem publikace, ale do systému ji zavedl (např. doktorand, sekretářka), s ní taktéž může manipulovat do doby, než záznam
upraví/pozmění některý z autorů; pak s ní mohou nakládat opět pouze autoři.
Cizí publikace (celého pracoviště) mohou spravovat osoby s právem v_publikace (např. sekretářka), i když nejsou autorem publikace.
Preferováno však je, aby si každý uživatel zanášel do systému publikace sám.
záznamy, ke kterým lze pouze poznačit svoje příznaky
Kromě vlastních publikací je výhodné v systému udržovat i záznamy jinak užitečné, např. informace o knihách/článcích pro reference studentům či pro citace do vašich prací.
Cizí publikace nemůže kromě autorů nikdo upravovat. Lze si ji však označit poznámkou/příznakem nebo štítky. Příznaky a štítky dovolují publikace
kategorizovat a následně tisknout/zveřejňovat jejich seznamy.
Lze např. označit příznaky či štítky „tema1“, „tema2“, „tema3“ doporučené texty pro okruhy referátů semináře a studenty odkázat na webové stránky
s příslušnými seznamy.
Na titulní straně Publikací vidíte mrak štítků, které jste publikacím přidali. U seznamu vašich publikací v IS najdete příznaky, které jste jednotlivým publikacím přiřadili a také, kdo a
jaké příznaky vytvořil na vaši publikaci.
Tip
Pro označení publikací doporučujeme používat štítky, tento způsob označování se používá i v jiných aplikacích ISu.
Informační systém Publikace Vložit novou publikaci/nový výsledek
1 Vložení nového publikačního záznamu.
Pracujete-li s aplikací poprvé, zatrhněte na začátku stránky „Zobrazit podrobnou nápovědu“ a klikněte na „Uplatnit“. Do formuláře se vypíše podrobný zelený návodek, který upřesní, jak
vložit publikaci.
Formulář pro vložení publikace můžete omezit na nejnutnější položky volbou „Zobrazit jen nejnutnější položky pro identifikaci výsledku“. Vkládáte-li
publikaci, která se bude přenášet do RIV, zvolte „Zobrazit jen položky povinné pro RIV“. Po vybrání některé z položek (i více najednou) na začátku
formuláře vždy zvolte „Uplatnit“.
1 Zestručnění formuláře pro vkládání publikačních záznamů.
Před vložením nové publikace je vhodné na titulní straně Publikací použít vyhledávací okno
Informační systém Publikace .. Vyhledávání publikací/výsledků
Vyhledáním ověříte, zda podobná publikace již v systému neexistuje. Údaji některé vyhledané publikace můžete předvyplnit nový záznam, doupravit ho
a uložit (jde-li o podobnou leč novou publikaci). K vyhledané publikaci lze též přidat štítky nebo vlastní příznaky (když je její záznam v pořádku, ale
nejste autorem, abyste jej mohli měnit).
Importování publikací šetří váš čas, jelikož odpadá nutnost vyplňování nového formuláře pro vkládání publikací.
Publikační záznamy lze do ISu importovat z těchto databází:
Aleph Národní knihovny
Publikační záznam vedený v systému Aleph Národní knihovny ČR můžete importovat pomocí Vzdáleného vyhledávání.
Informační systém Publikace Vzdálené vyhledávání
Pomocí vyhledávacího pole zadejte dotaz (vyhledává se ve všech dostupných údajích). Zobrazí se seznam, který odpovídá vašemu výběru. Záznamy, které
budete chtít do ISu importovat, přidejte do výběru. Následně v pravém sloupci zvolte „Uložit vybrané publikace“.
1 Import záznamů z publikační báze Národní knihovny ČR.
Po uložení záznamu je nutno výsledky projít, zkontrolovat, doplnit nebo opravit. Správci IS JAMU neručí za stav, v jakém jsou údaje v jiných
databázích, proto tuto kontrolu doporučujeme provést.
Web of Science (WoS)
Formulář pro vložení nové publikace je možné předvyplnit záznamem z citační databáze Web of Science.
Pro předvyplnění formuláře je třeba vyplnit identifikační kód článku, tzv. UT WoS kód, a záznam načíst.
1 Naplnění formuláře záznamem z WoS.
Možnost předvyplnění formuláře je dostupná pouze pro články v odborném periodiku nebo ve sborníku.
Z vloženého bibliografického záznamu aplikace načte data do formuláře a usnadní tak jeho vyplňování. Lze označit např. všechny autory
publikace, přičemž systém si je sám rozdělí do příslušných kolonek formuláře a pokusí se k nim z databáze dohledat učo nebo občanství. Obdobně
funguje i dohledání informací o časopise podle ISSN.
Informační systém Publikace Vložit novou publikaci/nový výsledek
Bibliografický záznam např. z Google Scholar, CiteSeer, CiteULike apod. nebo i z poznámek ve Wordu vložte do okna formuláře. Vlevo v menu zvolte
položku Autoři a z vloženého záznamu obtáhněte myší část se jmény autorů. Poté opět zvolte vlevo další položku a v citačním záznamu obtáhněte myší
příslušnou část. Opakujte u všech položek z citačních záznamů, které lze použít. Nakonec stiskněte tlačítko „Načti“, aby se vybrané položky přenesly
do formuláře.
Množství položek, ke kterým můžete záznamy přiřazovat, se mění podle typu zvoleného publikačního záznamu (např. typ J, B, C atd.).
Některé publikační záznamy vašich publikací nejsou navázány na vaše učo (např. byly převedeny z knihovních databází v době, kdy jste učo ještě
neměl/a), nebo výjimečně mohl někdo chybně zadat vaše učo k cizí publikaci. Připojení či zrušení uča u publikace provedete v aplikaci
Informační systém Publikace Pomůcky k publikacím/výsledkům (Úprava) Přihlášení se k autorství
Pokud si změníte jméno (nejčastěji u vdaných žen), můžete do publikačního záznamu stále uvádět své původní jméno.
Nejprve zkontrolujte, zda je vaše původní jméno uvedeno v historii vašich jmen a případně jej doplňte v aplikaci
Informační systém Personální Editace historie mých jmen, příjmení a titulů
U publikace následně uveďte do pole pro jména autorů původní jméno a zároveň vepište své učo. Teprve poté stiskněte tlačítko „Dohledat“.
Aplikace k zadanému uču dohledá nynější příjmení a to vypíše šedým písmem.
1 Výpis nynějšího příjmení.
Dále vyplňte všechny ostatní údaje a formulář uložte. Ve výpisu publikací se uvede zadané jméno.
Při kliknutí na něj však odkaz povede na Osobní stránku Lidé s novým jménem.
Pokud není na Osobní stránce potlačeno zobrazení původního jména, uvidí každý uživatel obě jména osoby.
To, v jaké spojitosti s vámi se vaše publikace objeví v IS, lze ovlivnit nastavením tzv. štítků nebo příznaků. O štítcích více v otázce Jak přidám publikaci štítek? K čemu štítky slouží? této Nápovědy.
Příznaky se typicky nastavují na konci editačního formuláře publikace.
Informační systém Publikace Vložit novou publikaci/nový výsledek
Jejich význam je:
Recenzováno
Publikace prošla recenzním řízením před uveřejněním. Nevztahuje se na dodatečnou informativní recenzi. Jedná se pouze o doporučený údaj.
Mezinárodní význam
Je dán mezinárodním složením odborné komunity v daném oboru, pro kterou může být publikace předmětem zájmu. Mezi kritéria „mezinárodního
významu“ patří: světový jazyk obvyklý pro obor, v němž je publikace psána; uveřejnění práce v mezinárodně uznávaném časopise nebo sborníku evidovaném
ve světové databázi, nebo ve sborníku z mezinárodní konference; zvěřejnění v časopise nebo sborníku s Impakt faktorem. Opět se jedná pouze o doporučený
údaj.
Životopis
Obsah záznamu se má zobrazit u všech vašich životopisů.
Nevystavovat
Příznak se vztahuje na celou publikaci. Po jeho zaškrtnutí se obsah záznamu nezobrazuje v neautentizované verzi ISu, přihlášeným uživatelům se zobrazí
pouze přes přímý odkaz na publikaci nebo pokud v pokročilém vyhledávání zaškrtnou políčko „Včetně publikací označených příznakem nevystavovat“.
Autorům se publikace vyhledá při použití základního i pokročilého vyhledávání.
Máte-li vystavený životopis, automaticky se za něj připojí ty publikace, které v agendě publikací označíte příznakem „Životopis“.
Na Osobní stránce (Lidé na JAMU) klikněte na „Publikace“ pod fotografií, aby se vypsal seznam publikací. Automaticky jsou zobrazeny veškeré
publikace, jichž je uživatel autorem.
Pokud některou publikaci na svůj seznam uvést nechcete (např. máte stovky publikací a chcete uvádět spíše „Selected bibliography“), označte ji příznakem
„Nevystavovat“.
Je-li u publikačního záznamu uvedeno více autorů, výsledek volby Životopis se uplatní jen pro vás.
Kliknutím na „Kdo má příznaky u této publikace“ zjistíte také, zda je publikace uvedena jako Doporučená literatura u sylabu některého předmětu.
Další příznaky lze vytvořit a přiřadit publikaci volbou „Vytvořit další osobní příznaky“ na konci formuláře.
Kromě výše popsaných příznaků („Životopis“, „Nevystavovat“) si lze vytvořit i vlastní příznaky v aplikaci
Informační systém Publikace Pomůcky k publikacím/výsledkům Úprava seznamu mých příznaků a přidání
nových
a označit jimi vlastní i cizí publikace. Tyto vaše osobní příznaky se nepromítnou do chování aplikací IS JAMU, ale pomohou vám rozčlenit
vaše publikace. Např. máte-li jich stovky, lze je rozdělit podle tématu. Publikace označené jistým příznakem lze poté vytisknout s určitým nadpisem (viz
odkaz z titulní stránky „Moje autorské publikace/výsledky“) a nebo zobrazit na samostatné webové stránce. Například rozdělit reference
k seminárním pracem na tematické okruhy a studenty odkázat na příslušnou webovou stránku. Pro vytváření takových stránek je k dispozici skript
https://is.jamu.cz/pub, kterému můžete zadat tyto parametry:
uco
Zadáváte univerzitní číslo osoby, např. 2660. Lze zadat i více čísel učo, oddělených čárkou (pub?uco=2116,2660) pro publikace více lidí.
atr
Zadáváte seznam vybraných příznaků osoby, kterou jste uvedli parametrem uco. Uvádíte-li více příznaků, pak je oddělte např. čárkou. Možným příznakem je
riv, pokud chcete vypsat publikace předávané do RIVu. Pokud je zde uvedeno více atributů, zobrazí se ty publikace, z nichž každá vyhovuje alespoň jednomu
z nich.
rok
Rok vydání publikace, tj. omezení na publikace v určitém roce.
proj
Publikace vykazované v RIV pro určitý výzkumný záměr nebo projekt; je potřeba zadat celé číslo (pub?proj=MUNI/G/0835/2016). Lze kombinovat
s jinými volbami, např. publikace projektu k určitému roku (pub?proj=MUNI/G/0835/2016;rok=2018)
nadpis
Uvádíte nadpis, který se má stránce s přehledem publikací nadepsat. Musíte uvést potřebné HTML formátovací značky. Neuvedete-li název, pak stránka
žádný nadpis mít nebude. Je však nutné ošetřit nebezpečné znaky, např. mezeru nahradit %20 (viz následující příklad).
zpet
Pokud uvedete a naplníte tento parametr, pak se na konci stránky objeví „Zpět na předchozí stránku“. Parametru přiřaďte URL, které se má použít
po kliknutí na tento odkaz. Opět ošetřete nebezpečné znaky: ampersand (&) nahrazujte %26, otazník (?) nahrazujte %3F (opět viz příklad).
typ
Pro další zpracování dat můžete použít např. „typ=sgml2“ nebo „typ=html2“. Vhodné pouze pro počítačové odborníky.
Uveďme několik příkladů. Do své webové stránky můžete kamkoli napsat např.:
V RIVu najdete <A HREF="https://is.jamu.cz/pub?uco=2660&atr=riv&nadpis=Moje%20publikace">tyto</A> moje publikace.

Vše o mých <A HREF="https://is.jamu.cz/pub?uco=2660&atr=veverky&nadpis=Vše%20o%20veverkách">veverkách</A>.

Publikace výzkumného projektu MUNI/G/0835/2016 za rok 2018: <A HREF="https://is.jamu.cz/pub?proj=MUNI/G/0835/2016;rok=2018">najdete zde</A>.

Vaše publikace jsou přístupné též prostřednictvím autentizovaného webu na adrese: https://is.jamu.cz/auth/publikace/publikace.pl?uco=2660&atr=...
Tip
Pro označení publikací doporučujeme používat štítky, tento způsob označování se používá i v jiných aplikacích ISu.
Podle štítků lze vytvářet seznamy publikací, které můžete prezentovat (např. jako seznam doporučené literatury předmětu). Pomocí štítku
lze v aplikaci publikace též snadněji vyhledávat.
Informační systém Publikace
Buď můžete do vyhledávacího políčka zadat požadované heslo či slovní spojení a pod odkazem „Kde hledat?“ zvolit možnosti vyhledávání v „mých
štítcích“ a/nebo „cizích veřejných štítcích“, nebo můžete využít tzv. mrak štítků. V sekci „Moje štítky“ nebo pod odkazem „Zobrazit mrak školy“
kliknutím na štítek vyberete seznam všech publikací, kterým byl daný štítek přiřazen.
Štítek lze publikaci zadat již při vytváření nového publikačního záznamu
Informační systém Publikace Vložit novou publikaci/nový výsledek
Publikace může mít neomezené množství štítků. Všechny vaše štítky a cizí veřejné štítky dané publikace naleznete pod formulářem na vytvoření nového
štítku. Jedním kliknutím na vybraný štítek v přehledu jej publikaci přidáte, druhým kliknutím štítek opět odeberete.
Note
Nedoporučujeme již vytvořené štítky do formuláře přepisovat. V případě překlepu či jiné nesrovnalosti by se vytvořil
nový štítek. Do okna formuláře proto vepisujte jen štítky zcela nové.
Chcete-li přidat štítek k již dříve zavedené publikaci, vyhledejte ji v aplikaci
Informační systém Publikace .. Vyhledávání publikací/výsledků
a klikněte u dané publikace na odkaz „Štítky“. Rozbalí se nabídka, kde můžete přidat veřejný nebo soukromý štítek publikaci, případně si můžete
prohlédnout veřejné štítky jiných uživatelů k této publikaci. Soukromý štítek a seznam publikací s tímto štítkem uvidí pouze majitel štítku.
Volbou „Mé seznamy obsahující tuto publikaci“ zobrazíte jednotlivé www stránky se seznamy publikací, na které jste danou publikaci přidali. Seznamy
budou dostupné na adresách:
https://is.jamu.cz/publications/<uco>/<stitek>

nebo

https://is.jamu.cz/auth/publications/<uco>/<stitek>
Pokud ovšem zvolíte zobrazovat pouze neduplicitní výsledky, např. v Pokročilém vyhledávání, systém vybere publikaci s lepším hodnocením. Publikace
s nejvyšším skóre se pak podle přednostně zobrazí ve výsledku vyhledávání. Vyhledejte publikaci v aplikaci
Informační systém Publikace Vyhledávání publikací/výsledků
a klikněte u dané publikace na odkaz „Info“. Rozbalí se vám podrobné informace o publikaci, kde na jejím konci můžete zvolit hodnocení buď „kladně“
nebo „záporně“.
U publikace, kterou už jste jednou ohodnotili, zůstává druhá možnost, pomocí které lze předchozí hodnocení kdykoli později opravit.
Seznamy publikací lze použít např. jako seznam doporučené literatury v předmětu. Jednoduchý odkaz na něj lze vložit např. do interaktivní osnovy
nebo studijních materiálů předmětu. Seznamy publikací se tvoří automaticky po přidání štítku publikaci. Každá publikace může mít i více štítků – bude tedy
zařazena do více seznamů. Kliknutím na štítek v mraku štítků na stránce
Informační systém Publikace Moje štítky
se vypíší všechny jím označené publikace. Publikace též můžete podle štítků, víte-li jejich název, vyhledat buď v aplikacích
Informační systém Publikace Vyhledávání publikací/výsledků
Informační systém Publikace Pokročilé vyhledávání
nebo si zobrazíte všechny veřejné štítky pomocí „Zobrazit mrak celé školy“ a kliknutím na vybraný štítek zobrazíte jemu odpovídající seznam publikací.
Pokud vyhledáte konkrétní publikaci, zobrazí se u ní i seznam veřejných štítků, které jsou k ní přiřazeny. Po kliknutí na ně jsou vyhledány další publikace s tímto štítkem.
Informační systém Publikace Vyhledávání publikací/výsledků
a pod hledanou publikací zvolte „Přidat do výběru“. Vpravo se v sekci Vybrané publikace/výsledky objeví nabídka operací, které lze s publikací provést. Zvolte možnost „Zobrazit/editovat
citace“ a pomocí „Vyhledat“ dohledejte a kliknutím na zatržítko přidejte novou citující publikaci.
Chcete-li citaci u publikace zrušit, vyhledejte citovanou publikaci v aplikaci
Informační systém Publikace Vyhledávání publikací/výsledků
postupujte opět jako u přidávání citace, zvolte „Přidat do výběru“, a pak „Zobrazit/editovat citace“. V tabulce se u dané publikace vypíše seznam citujících publikací, kdo je přidal a v
posledním sloupci možnost citaci zrušit pomocí „Vymazat“.
vyhledejte požadované publikace a zvolte „Duplicity publikací“ pod formulářem. V seznamu vybraných výsledků vyberte duplicitní záznamy a potvrďte
pomocí „Označit vybrané jako duplicitní“. Duplicitu tímto pouze nahlásíte, ale potvrzení již přísluší osobě s právem v_publikace. Duplicity
se slučují i automaticky, pokud systém pomocí algoritmu takové nalezne.
Pokud chcete zrušit duplicitu publikací, použijte k nahlášení této skutečnosti opět
Informační systém Publikace Pokročilé vyhledávání
vyhledejte požadované publikace a zvolte „Duplicity publikací“ pod formulářem. V seznamu vybraných výsledků vyberte duplicitní záznamy a potvrďte
pomocí „Označit vybrané jako neduplicitní“. Potvrzení může opět provést pouze příslušná osoba.
lze vyhledávat dle údajů o publikaci, autorů, štítků, pracoviště (ke kterému patří některý z autorů), projektů (v jejichž souvislosti publikace
vznikla) či dle ne/zařazení publikace do RIVu. Pomocí voleb „Nevybírat duplicitní výsledky.“ a „Vybrat jen duplicitní výsledky.“ lze ve výsledku vyhledávání vyloučit/zahrnout duplicity v publikacích.
Zcela na konci formuláře je důležité rozhodnout, zda se má vyhledávat výsledek splňující všechny podmínky současně (AND) nebo výsledek splňující
alespoň jednu z podmínek (OR). Vyhledávání spustíte tlačítkem „Vyhledat“ na konci stránky.
Z vyhledaných publikací dále můžete pomocí zatržítka vybrat všechny či jen některé a použít je v další aplikaci k:
přenesení do základního vyhledávání
Výsledky vyhledávání se přenesou do základního vyhledávání na titulní stránku aplikace, kde ještě můžete některé (nebo všechny hromadně) zrušit.
Aplikace vám dále nabídne export a tisk přenesených výsledků, jejich editaci, rozdělení na počty druhů výsledků, editaci štítků, citací, slučování
duplicit nebo výpis seznamu publikací ve formátu RIV XML.
roztřídění dle druhů
Publikace budou roztříděny a sečteny dle oborů, zařazení do světově uznávaných databází, dle publikování v neimpaktovaných periodikách vydávaných
v ČR, podle zařazení ke světovým jazykům a podle ne/zařazení do databáze ISI Proceedings.
zobrazení seznamu nalezených publikací
Zobrazí seznam vybraných publikací.
vytvoření sestavy publikací
Slouží např. pro tisk, výpis či export seznamu publikací.
nahlášení duplicit
V seznamu vyhledaných publikací můžete označit, které jsou dle vás duplicitní, případně nahlásit, které za duplicitní nepovažujete. O potvrzení
těchto ne/duplicit však rozhoduje osoba s příslušným právem (b_publikace).
vypsání publikace ve formátu RIV XML
Aplikace zobrazuje k vybraným publikacím označeným pro přenos do databáze RIV XML strukturu jejich údajů tak, jak by byly do databáze RIV
odeslány.
Informační systém Publikace Vyhledávání publikací/výsledků
nebo pokročilého vyhledávání
Informační systém Publikace Pokročilé vyhledávání
vyberte požadované publikace a zvolte operaci „Export a tisk“. Vyberte formátovací šablonu, podle které se má sestava exportovat/tisknout a zvolte
operaci, kterou chcete s výslednou sestavou provést, tj. zobrazit v textu, novém okně, vytisknout či uložit do souboru. Dále lze „Zalamovat text na
stránku“ a „Zobrazit načtenou šablonu“.
Pro práci se šablonou je vhodné použít Prezentátor. Podrobnou nápovědu k prezentátoru naleznete
Informační systém Publikace Pomůcky a nastavení (Informace) Prezentátor Návod
Tato aplikace Vám dává do jisté míry univerzální nástroj na vytváření, správu, uchovávání, zveřejňování a poskytování životopisů. Všechny tyto funkce jsou dostupné pod odkazem
Informační systém Personální Životopisy
K dispozici máte jak možnost životopis do počítače pořídit, tak jej poskytnout pro účely hodnocení fakult a školy např. v celostátním registru RIV.
Ve formuláři, který budete vyplňovat, je váš (budoucí) životopis rozdělen do odstavců. Cílem je, aby životopisy členů akademické obce univerzity byly aspoň částečně shodně strukturované.
Systém vám nabízí možnost vytvořit si několik životopisů a to i v různých jazycích. Předpokládá se, že budete mít alespoň jednu cizojazyčnou variantu životopisu (např. anglickou nebo německou), primárně dostupnou pro zájemce o informace ze zahraničí. Českou verzi budete používat např. jako přílohu ke grantovým přihláškám, k podkladům pro habilitační či profesorské řízení apod. Více variant životopisů i v témže jazyce vám systém umožňuje zadávat proto, abyste si mohli vytvořit speciální verzi životopisu pro konkrétní (možná i jedinečný) účel. Aby se vám tato verze snadno vytvářela, můžete si tvořený životopis předvyplnit jinou hotovou variantou (vaší nebo i jiné osoby).
Systém umožňuje rozlišit, které vaše životopisy uvidíte/můžete použít pouze vy, a které budou zveřejněny. Dále lze stanovit míru zveřejnění: zpřístupnit dokument pro uživatele tohoto informačního systému, nebo ho zpřístupnit celému světu.
Práci na tvorbě svého životopisu začnete v sekci „Vytvoření nového životopisu“ na manipulační stránce. Vyberte jazyk tvořeného životopisu, buď z předpřipraveného menu nejobvyklejších jazyků, nebo výběrem ze Seznamu všech jazyků. Tím se dostanete do editační stránky/formuláře pro zápis životopisu.
Každý odstavec formuláře pro vyplnění životopisu se skládá ze dvou editovacích polí. V prvním je uveden nadpis rubriky. Znění nadpisů pro vás nejsou závazná, ale je vhodné je ponechat,
či alespoň dodržet přibližný význam jednotlivých rubrik. Pokud neuvedete žádný nadpis, rubrika se ve výsledném životopisu nezobrazí. Druhé editovací okno je určeno pro vlastní text odstavce. Kliknutím na tlačítko „Nápověda“ nebo „Příklad“ si můžete zobrazit další návody. Před odchodem z formuláře (kliknutím na link vedoucí na jinou stránku) nezapomeňte zmáčknout „Uložit“ nebo „Průběžné uložení“, jinak bude vaše práce ztracena.
Při vyplňování je možno použít následující formátovací symboly:
Nerozdělitelná mezera
Nerozdělitelnou (pevnou) mezeru v podobě vlnovky ~ použijte všude tam, kde nechcete, nebo kde je z typografických důvodů nevhodné rozdělit řádek. Tzn. že nedovolíte, aby neslabičná předložka zůstala na konci řádku (píšete k~šípku, v~blátě aj.), nedovolíte rozdělit datum (17.~listopadu) apod.
Výčet
Z důvodů typografické úhlednosti používejte uvnitř jednoho odstavce jeden styl odsazování. Buď výčet nebo hladký text. Formátování výčtem provádíte tak, že jednotlivé položky oddělujete symbolem <LI>. Tedy např. text:
hrášek,<LI>
zelená paprika a<LI>
špenát
se naformátuje do tvaru:
hrášek,
zelená paprika a
špenát
Hladký text
Hladký text nepřerušujete formátovacími symboly (užíváte však nerozdělitelných mezer tam, kde to je třeba). Můžete však hladký text rozdělit do více odstavců použitím značky <P>.
Tučné písmo
Tam, kde to je opravdu nutné (např. pro zvýraznění jména majitele životopisu), můžete zvýraznit část textu uzavřením do dvojice značek <B>tučné písmo</B>. Uzavírací značka obsahuje lomítko (/). Pokud uzavírací značku neuvedete, bude zbytek Vašeho textu psán tučným písmem.
Nový řádek
Opět pouze v odůvodněných případech (zápis poštovní adresy) můžete použít značku pro ukončení řádku <BR>. Tuto značku prosím používejte skutečně pouze výjimečně, protože pamatujte na to, že text se uživatelům naformátuje tak, aby se jim vešel na papír či obrazovku podle toho, jak velká písmena zrovna používají. Nadbytečným používáním této značky byste z textu udělali nečitelný guláš slov.
Odkaz
Chcete-li v některém odstavci uvést odkaz na jinou stránku v Internetu (např. uvádíte svůj projekt, o kterém je možno se podrobněji dozvědět na jeho webových stránkách), použijte odkaz podle syntaxe jazyka HTML s plným URL, např.:
... účast na <a href="https://www.server.cz/adresa/">projektu XYZ</a> ve spolupráci s...
Bude zpracováno do podoby:
... účast na projektu XYZ ve spolupráci s...
Pokud nevyplníte některé odstavce, pak se ve výsledné podobě tyto odstavce neobjeví. Neobjeví se ten odstavec, který nemá vyplněn text nebo název.
Pokud některý odstavec nevyužijete a naopak máte zájem včlenit do svého životopisu další bod, jednoduše přeeditujte nadpis rubriky a doplňte text odstavce dle svého uvážení (např. místo Mimouniverzitních aktivitách můžete informovat o svých Projektech).
Pokud si nejste jisti, co napsat do některého odstavce životopisu, můžete prozkoumat následující pasáž. Tytéž příklady se objeví, pokud u příslušného odstavce ve vyplňovacím formuláři kliknete na tlačítko „Příklad“.
Identifikace osoby
Zápis např.
<b>Prof. Dr. Jana Nováková, CSc.</b>, narozena 15.~října 1957 v~Brně, vdaná, 3~děti
vytvoří
Prof. Dr. Jana Nováková, CSc., narozena 15. října 1957 v Brně, vdaná, 3 děti
Vlnovkou ~ zajistíte, aby na místech, kde je to typograficky nevhodné, se nezalomil řádek.
Rector's office
Masaryk University
Žerotínovo nám. 2
602 00 Brno
Funkce na pracovišti
Zápis např.
student postgraduálního studia<li>
systémový administrátor laboratoře výpočetní techniky
vytvoří
student postgraduálního studia
systémový administrátor laboratoře výpočetní techniky
Vzdělání a akademická kvalifikace
Zapište např.
1987: PhD in Theoretical Computer Science; Czechoslovak Academy of Science; theses: „Functional data modelling“, developing a typed-lambda-calculus-based data model for data modelling encompassing formal tools for data description and data manipulation on several levels of abstraction.
nebo
1991: CSc. ve Výpočetní technice, „Operační systémy“ <li>
1986: Ing. z Výpočetní techniky, VUT Brno, „Operační systémy“
Přehled zaměstnání
Zapište např.
1994 - : Vice Director of the Institute of Computer Science, MU<li>
1994 - : Head of the Supercomputing Centre, MU<li>
1994 - : Assistant Professor, FI MU<li>
1991 - 1994: head of the R&D Department, ICS MU, Brno<li>
1989 - 1991: senior researcher, ICS MU, Brno<li>
1984 - 1988: researcher, Institute of Pure Chemicals, Lachema Enterprise, Brno
Pedagogická činnost
Zapiště přehledově nebo pomocí oddělování položkou <li>:
Information Society, Semantics of Program Languages, Types and Proofs, Introduction to Theoretical Computer Science,...
Vědeckovýzkumná činnost
Zapiště přehledově nebo pomocí oddělování položkou <li>:
Information society, general impact of Informatics, ..
Akademické stáže
Jednotlivé pobyty oddělte položkou <li>, zapište ve tvaru rok, dvojtečka, instituce, popis:
1993: three-month research stay at the Department of Computer Science, School of Informatics, City University of London
Ocenění vědeckou komunitou
Zapište opět ve tvaru období, dvojtečka, popis; oddělte <li>
1995 - 1998: member of TUG (TeX Users Group) Board of Directors
V některých případech vám práci s vyplňováním formuláře může ušetřit zkopírování některé již existující verze a následná úprava odlišností. Obvyklým postupem si otevřete editovací stránku životopisu, který chcete takto předvyplnit (v sekci „Vytvoření nového životopisu“) a v pasáži „Předvyplnění obsahu kopírováním z jiného životopisu“ vyberte osobu, od níž chcete životopis převzít. V zobrazené nabídce vyberte, o kterou variantu máte zájem a zda se mají předvyplnit texty nadpisů odstavců či obsahy odstavců (implicitně se naplní oboje). Zobrazeno je také editační okno – pokud vám nevyhovují nabízené varianty, můžete zkusit jinou osobu. Již existující životopisy najdete pod odkazem „Seznam zveřejněných životopisů“ na manipulační stránce.
Předvyplněné rubriky poté běžným způsobem upravíte do finální podoby a uložíte.
V systému je možno připravit si v zásadě libovolný počet životopisů. Tyto se mohou lišit zejména jazykem. Podle toho, jaký typ jazyka zvolíte v úvodní fázi editace nového životopisu, jsou systémem předvyplněny nadpisy rubrik (jde-li o běžný jazyk). U některých jazyků (např. němčina) je možno zvolit z více druhů nadpisů rubrik (jedna např. rozepisuje ostré s jako ss a pod.). Zobrazí-li si na webu někdo váš životopis, je mu vypsána vhodná verze a nabídnuty také odkazy na další zveřejněné jazykové mutace.
Také v rámci jednoho jazyka je možno připravit si více verzí životopisů. První vzniklý životopis daného jazyka je systémem označen např. Czech(1), druhý český životopis Czech(2) a podobně vzestupně.
Typickým využitím více verzí životopisu v jednom jazyce je možnost nabídnout jinou sadu údajů zájemci uvnitř univerzity (klikne-li si na životopis v rámci aplikace IS) a zájemci mimo univerzitu.
To se řeší zveřejňováním. Zveřejňování se upravuje v závěru editačního formuláře daného životopisu nebo v tabulce s přehledem životopisů.
Implicitně je životopis neveřejný (můžete ho prohlížet, upravovat, tisknout a podobně pouze vy); kliknutím na „zveřejnit“ či („povolit“) ho zpřístupníte.
Položka „na webu uvnitř univerzity“ znamená, že si jej mohou prohlédnout pouze uživatelé přihlášení do Informačního systému. Ti si také mohou tento životopis zkopírovat pro předvyplnění
svého životopisu (a opačně vy si můžete zkopírovat jejich takto zveřejněné verze). Položka „na webu světu“ znamená, že životopis je přístupný komukoliv v Internetu.
Takový životopis naleznou nepřihlášení návštěvníci při prohlídce životopisů, nebo ho můžete např. odkazovat ze svých stránek mimo IS.
Označíte-li jako zveřejněné světu více variant v různých jazycích, pak se čtenáři ze zahraničí nabídne primárně jemu jazykově nejbližší verze (podle nastavení jeho prohlížeče). Máte-li např. dvě anglické varianty životopisu a jednu označíte jako zveřejnitelnou světu a druhou pro použití uvnitř IS, pak se čtenářům v IS předloží druhá a komukoli jinému první.
Chcete-li některou variantu životopisu smazat, zvolte na manipulační stránce možnost „zrušit“. Systém vás následně vyzve k potvrzení, zda
tuto variantu chcete opravdu smazat.
Pokud ji nechcete ztratit definitivně, může být vhodnější ji pouze zneveřejnit (v systému stále existuje, ale je dostupná pouze vám).
(Viz též předchozí otázka o zveřejňování životopisů.)
Chcete-li si prohlédnout některou variantu svého životopisu, zvolte na manipulační stránce možnost „zobrazit“. Výpis zformátovaného životopisu
je doplněn také možností zobrazit si ho ve tvaru vhodném pro tisk (HTML tvar bez doplňujících komentářů, tento formát lze vytisknout např. tlačítkem File/Print vašeho prohlížeče),
či exportovat životopis do souboru pro MS Word či LaTeX.
Chcete-li si prohlédnout či vytisknout cizí životopis, použijte odkaz „Seznam v IS zveřejněných životopisů jiných osob“ z manipulační stránky.
Součástí prezentace vašeho životopisu v rámci IS je také výpis vámi vybraných publikací. Jejich úpravu a výběr provedete v rámci bibliografického systému pomocí odkazů
Informační systém Publikace
V aplikaci Životopisy můžete změnit nadpis odstavce „Vybrané publikace“ (pokud vám tento nevyhovuje). V případě, že toto pole ponecháte prázdné, publikace se do životopisu nedoplní.
K životopisu budou zařazeny všechny vaše publikace, které mají nastaven příznak ŽIVOTOPIS. (Více v otázce Jak vystavím publikace na WWW?.) Přehled takto označených publikací naleznete po kliknutí na
„Seznam vybraných publikací“. Pokud publikace označené nemáte, můžete si pomocí volby „Přidat publikace“ otevřít aplikaci pro hromadnou úpravu osobních přiznaků a příznak doplnit.
Cílem je zobrazit nějaký životopis (pokud je aspoň jeden povolen k zobrazování). Pokud je jich dostupných více, pak je potřeba vybrat nejvhodnější. Ve výběru je důležitější jazyk,
teprve pak zda se má zobrazit uvnitř JAMU nebo světu (jde-li o pro příjemce z IS vhodnou jazykovou mutaci, která má nastavení „veřejná pro svět“, „neveřejná pro univerzitu“, stejně se mu nabídne). Ovšem ten, kdo je zevnitř univerzity, by měl nejdříve vidět ten životopis, který je určen pro vnitřek univerzity.
Životopisům je následovně přidělena váha:
životopis, který vůbec nemám právo vidět, se ignoruje,
životopisu, který má shodný jazyk s požadovaným, se přičte váha 6 až 2. Váhu 6 má první jazyk v seznamu požadovaných, váhu 4 má druhý; třetí a každý další v seznamu má váhu 2. Seznam preferovaných jazyků zasílá prohlížeč při žádosti o stránku v proměnné ACCEPT_LANGUAGE,
životopisu v angličtině se připočítává 1,
životopisu, který chce vidět autentizovaná osoba v IS a je určen pro zobrazení autentizovaným, se přičte váha 2.
Pokud má více životopisů shodnou váhu, vybírá se podle čísla varianty (nižší číslo varianty má přednost). Pokud dojde k situaci, že více životopisů má shodnou váhu i číslo varianty, vybere se z nich náhodná jazyková mutace.
Ano. Osoba, které správce práv přidělí právo Manipulace s cizími životopisy (v_zivotopisy), po výběru osoby na manipulační stránce může provést veškerou výše naznačenou agendu.
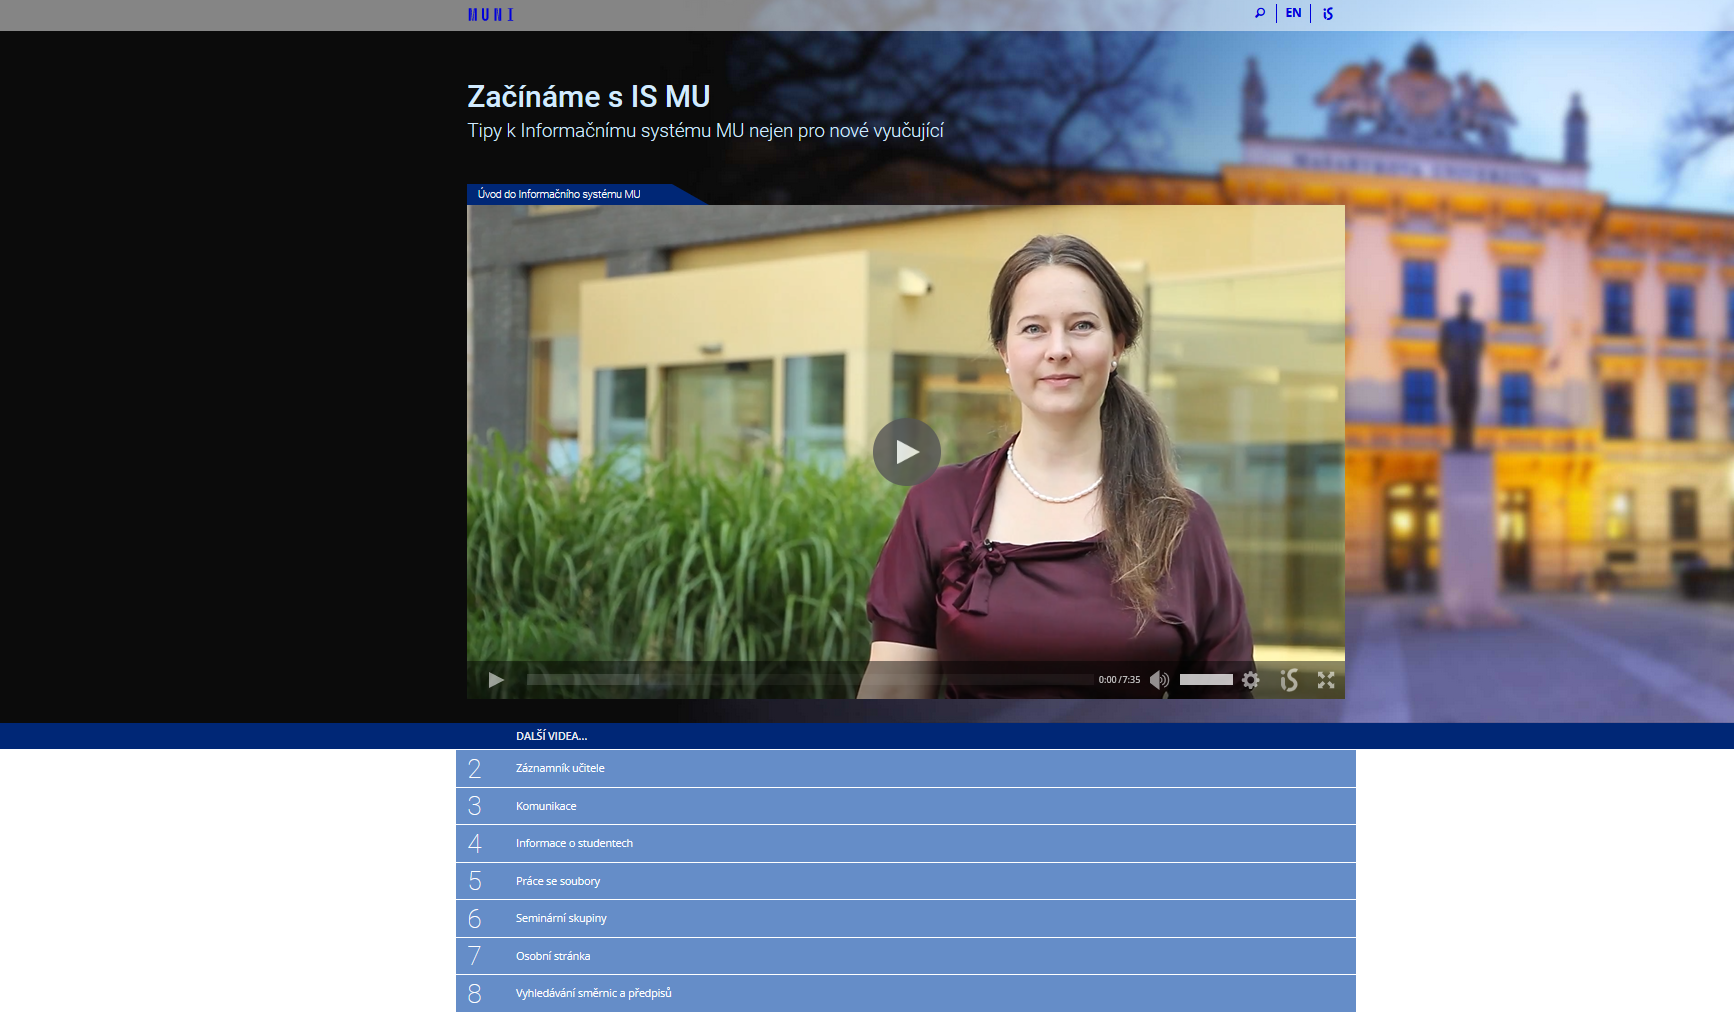
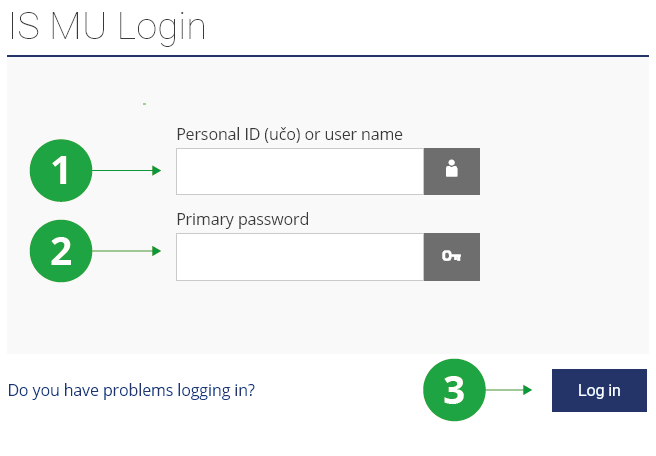


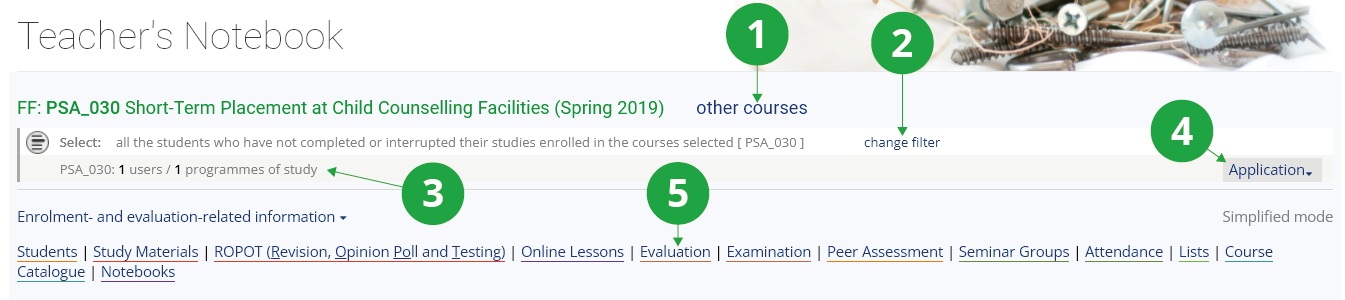
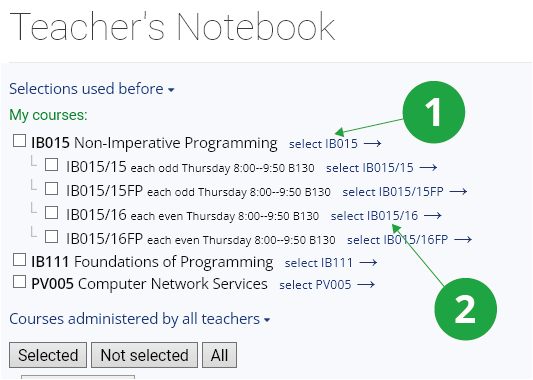
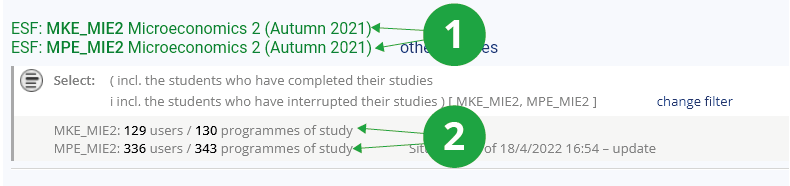
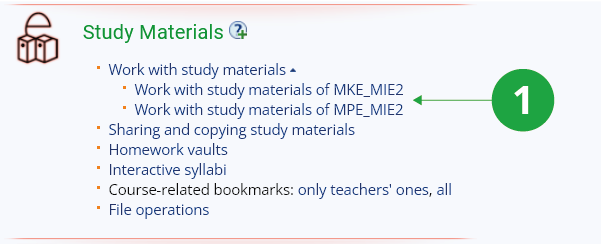
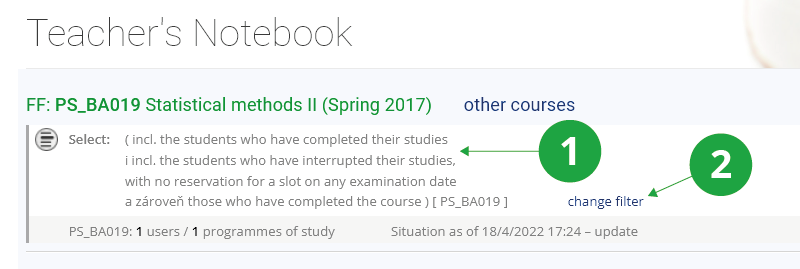
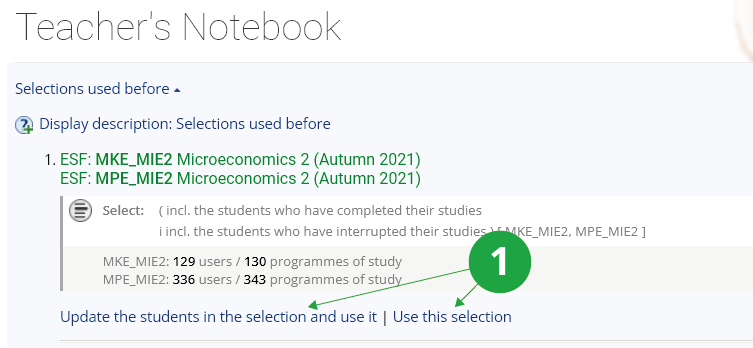
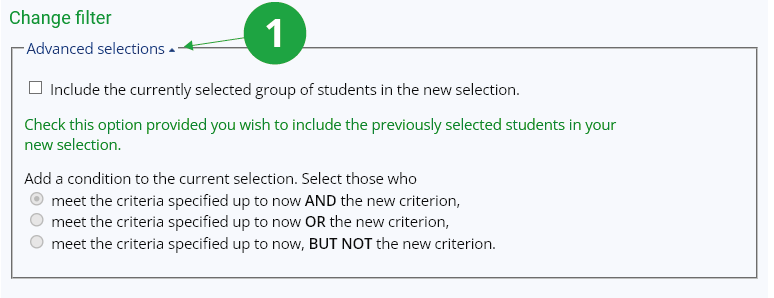

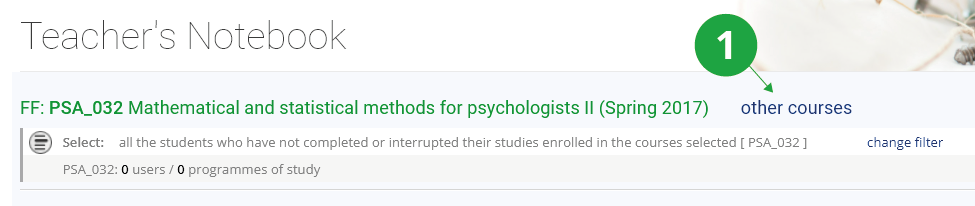
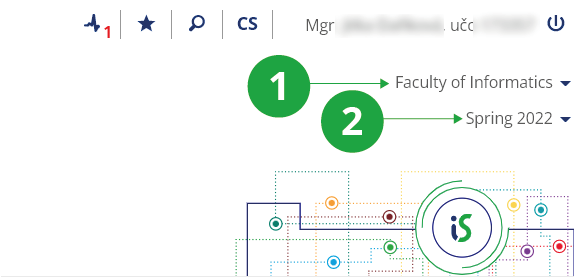

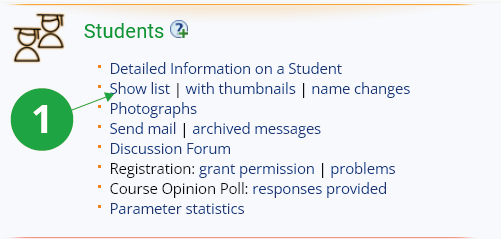
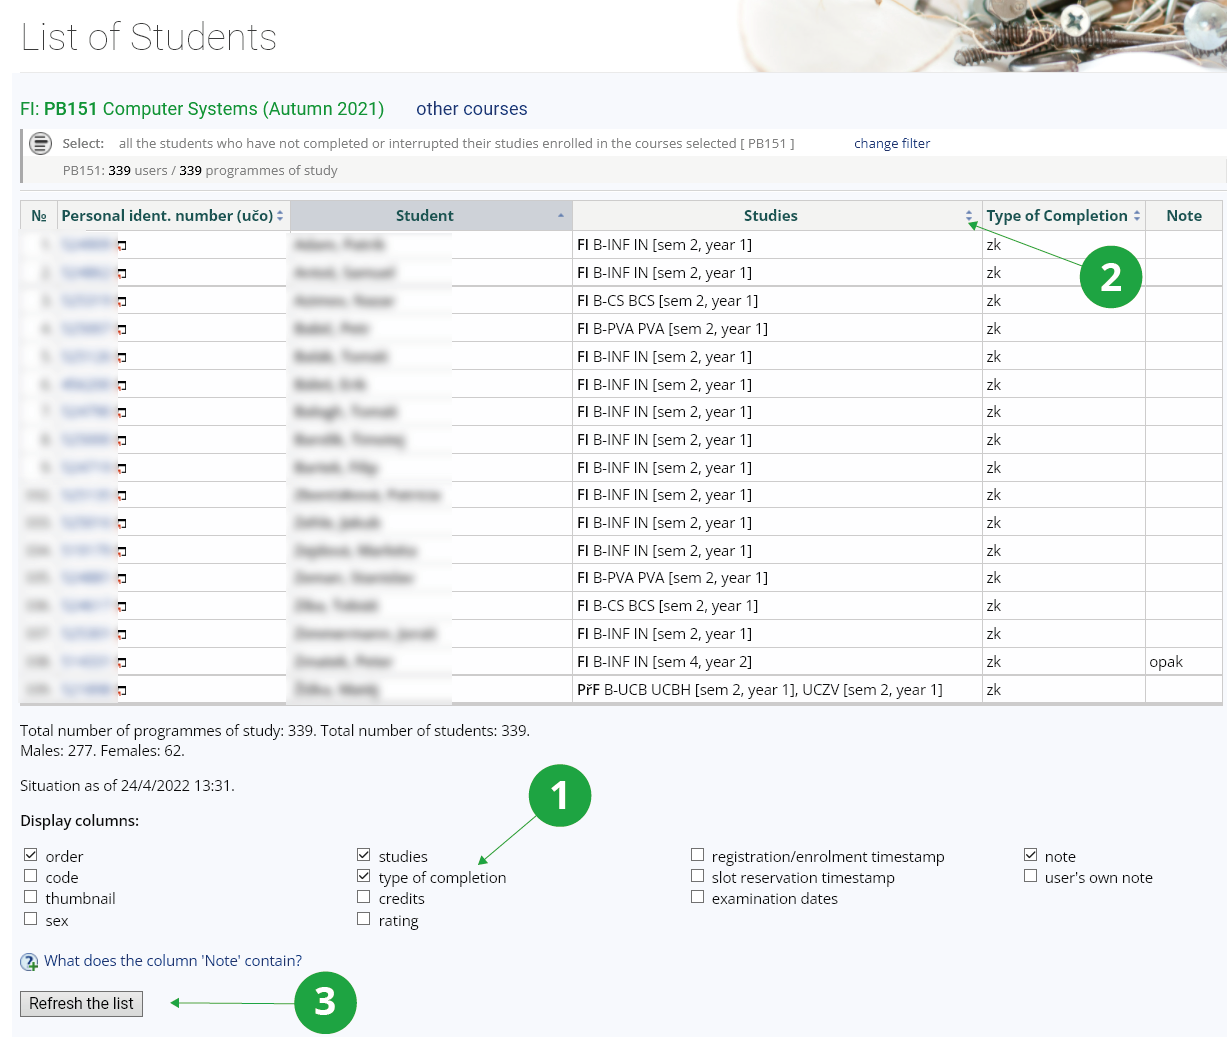
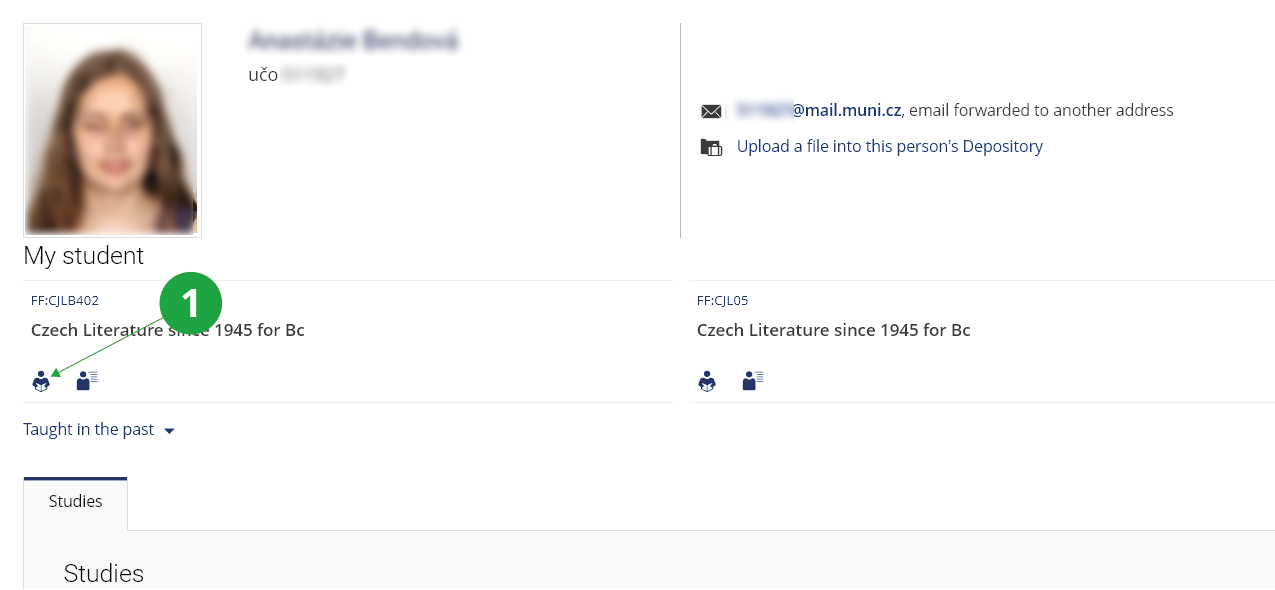
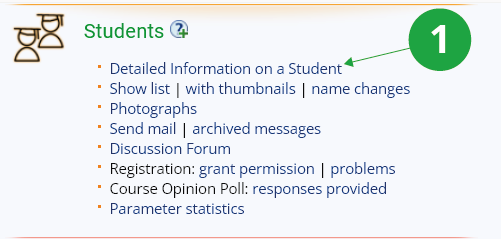
 Bc. Jana Nováková,
 Bc. Jan Novák,
 Jan Novák, PrF B-PSP VNEM combined [sem 5, block B]
 Ing. Jana Nováková, ESF M-HPS NH (completed)
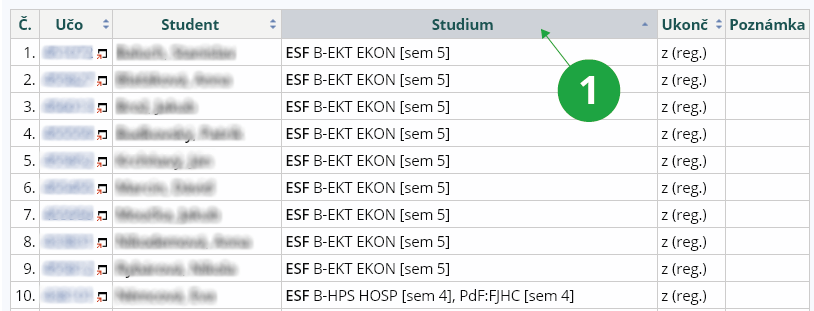

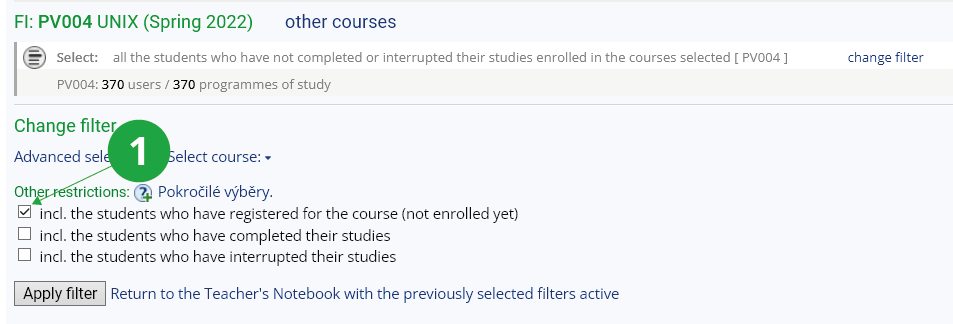
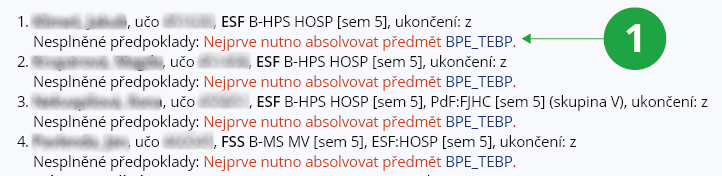
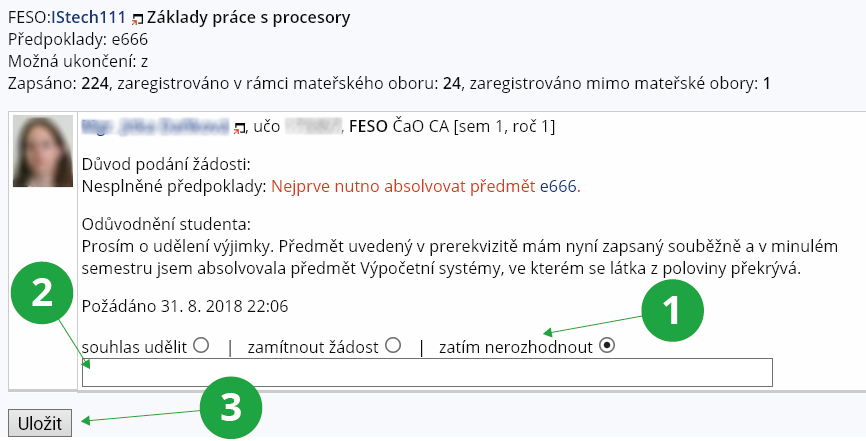
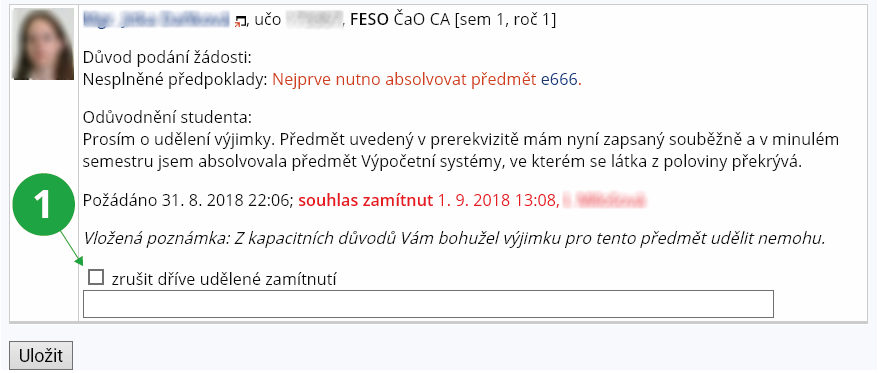
 icon in the top tool menu above the contents of the currently open folder and clicking the Folder
 icon.
If the user has "More Options" turned on in File Manager, he/she will see the Add expanded menu and can create a new folder simply by clicking the Create New Folder
icon.
If the user has "More Options" turned on in File Manager, he/she will see the Add expanded menu and can create a new folder simply by clicking the Create New Folder
 icon.
If the user has "More options" turned on in File Manager, he/she will see the Add menu expanded and can add files simply by clicking on the Upload Files
icon.
If the user has "More options" turned on in File Manager, he/she will see the Add menu expanded and can add files simply by clicking on the Upload Files
 icon.
The optional fields Name, Name of file and Description can be filled in here. If the Name field is not filled in, the file will be saved under the same name under which it is uploaded from the computer.
icon.
The optional fields Name, Name of file and Description can be filled in here. If the Name field is not filled in, the file will be saved under the same name under which it is uploaded from the computer. icon.
If the user has "More Options" turned on in File Manager, he/she will see the Add menu expanded and can upload zipped files simply by clicking on the Extract ZIP
icon.
If the user has "More Options" turned on in File Manager, he/she will see the Add menu expanded and can upload zipped files simply by clicking on the Extract ZIP
 button in the right toolbar. A new window will then open in which you need to enter the address in the IS to which the files are to be copied. This can be done either by typing in the exact address or by searching for the appropriate folder using the Find button. The actual copying is done by clicking on the OK button. In case the user wants to copy all study materials in a given course, it is preferable to use the appropriate copying application in the Teacher agenda. In the case of courses where it is desirable to share the material tree completely, it is preferable (rather than copying) to use the sharing application (the other course will not have its own material tree, both courses will have one common one). This application is again available in the
The Information System Teacher [course selection] (Study Materials) Sharing and copying study materials
button in the right toolbar. A new window will then open in which you need to enter the address in the IS to which the files are to be copied. This can be done either by typing in the exact address or by searching for the appropriate folder using the Find button. The actual copying is done by clicking on the OK button. In case the user wants to copy all study materials in a given course, it is preferable to use the appropriate copying application in the Teacher agenda. In the case of courses where it is desirable to share the material tree completely, it is preferable (rather than copying) to use the sharing application (the other course will not have its own material tree, both courses will have one common one). This application is again available in the
The Information System Teacher [course selection] (Study Materials) Sharing and copying study materials


 icon.
icon. ) located in the right toolbar.
 ).
The Information system Teacher [course selection] Work with study materials Homework VaultsYou can create homework vaults either in this folder, or using the application in the Teacher's Notebook which we recommend, see the question Homework Vault management – simplified). If you set up homework vault directly in the File Manager, you can use the tool:
).
The Information system Teacher [course selection] Work with study materials Homework VaultsYou can create homework vaults either in this folder, or using the application in the Teacher's Notebook which we recommend, see the question Homework Vault management – simplified). If you set up homework vault directly in the File Manager, you can use the tool: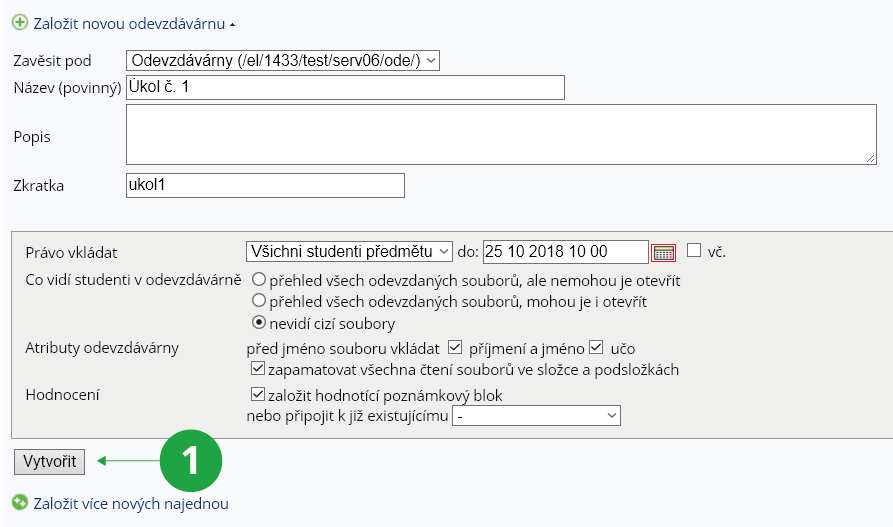
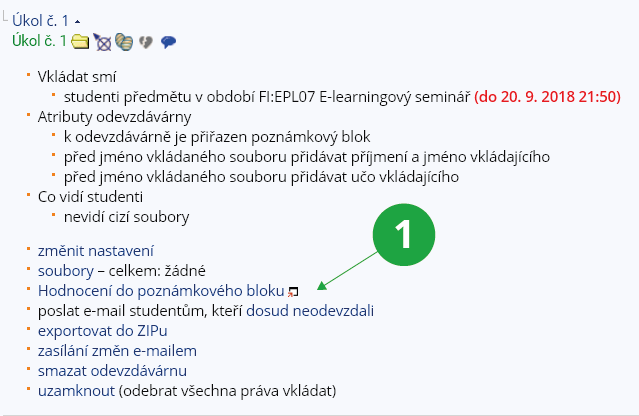
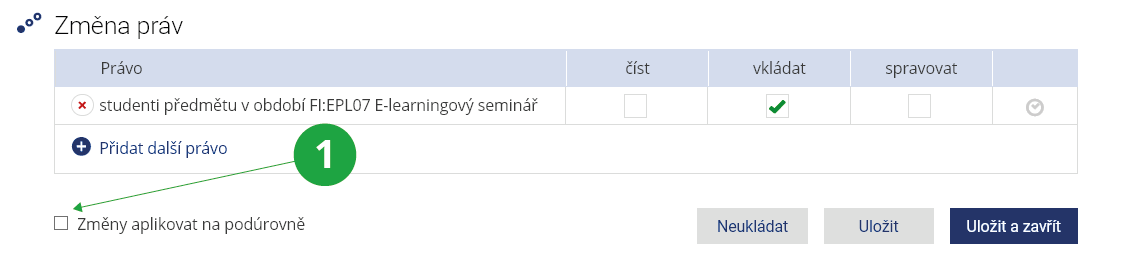
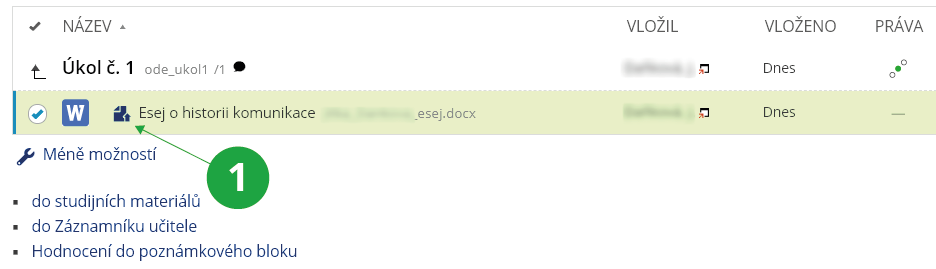
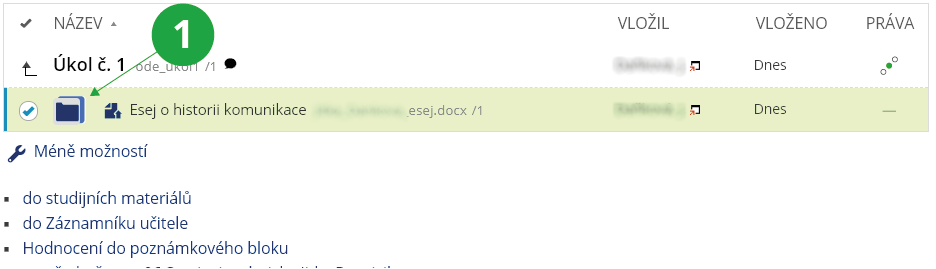
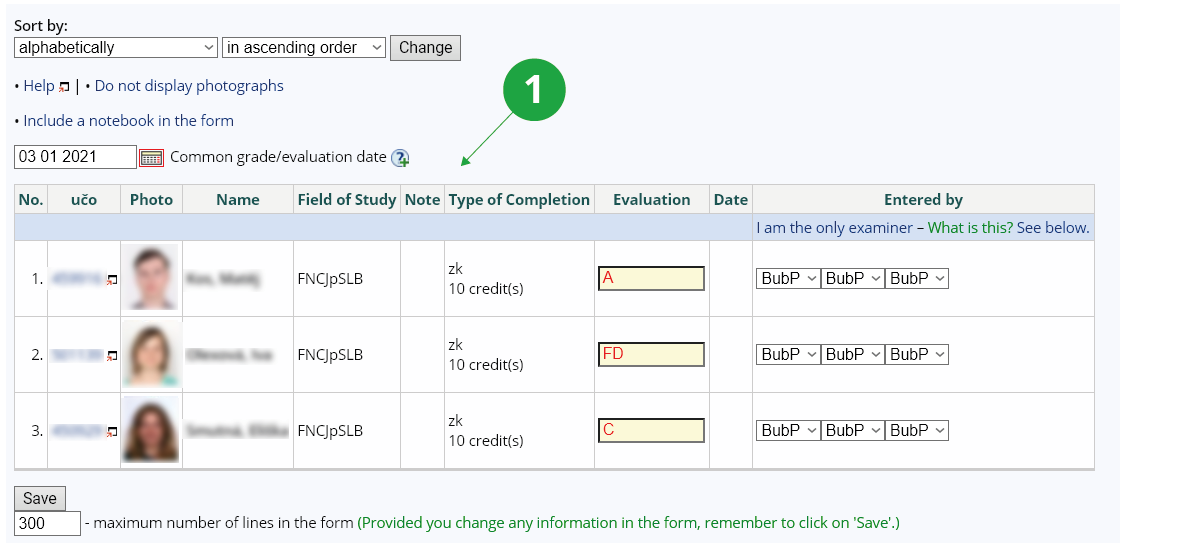
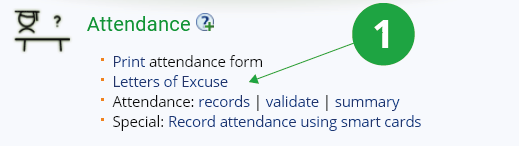

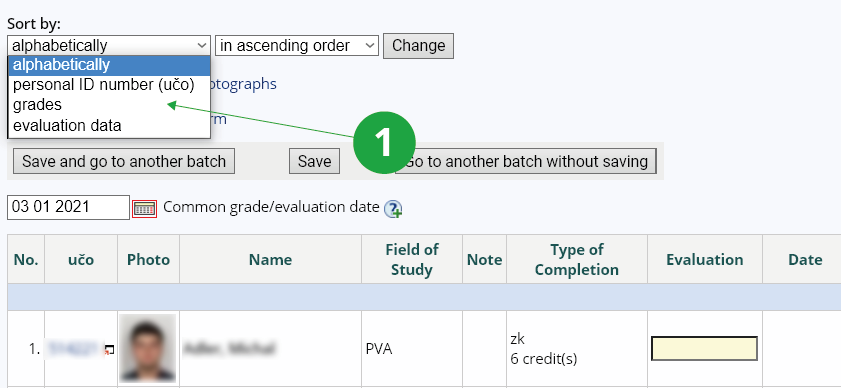
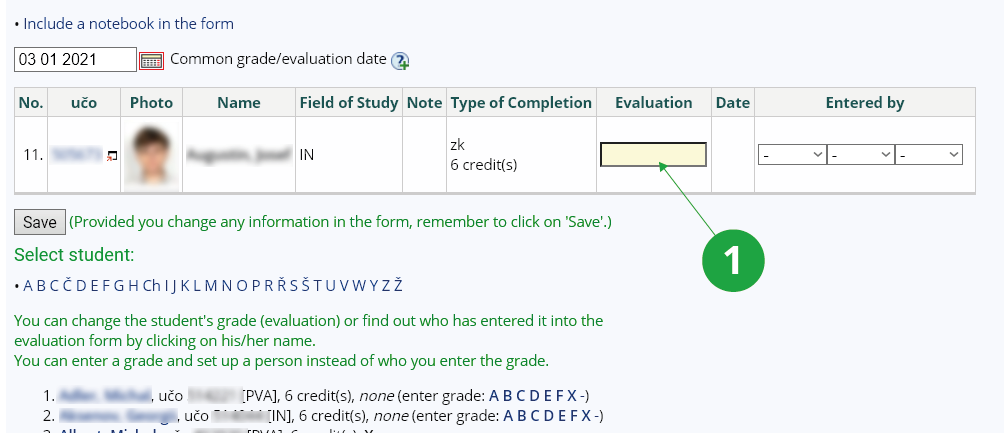

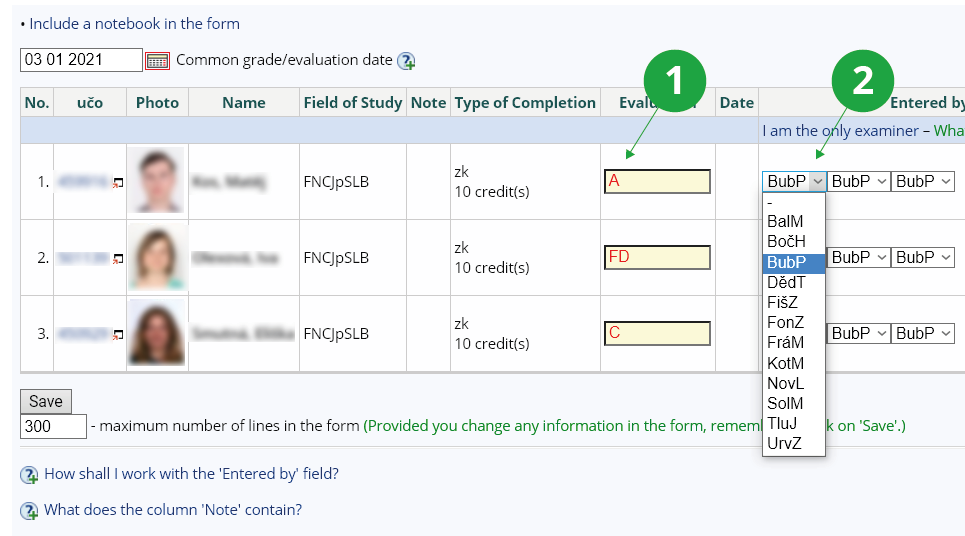
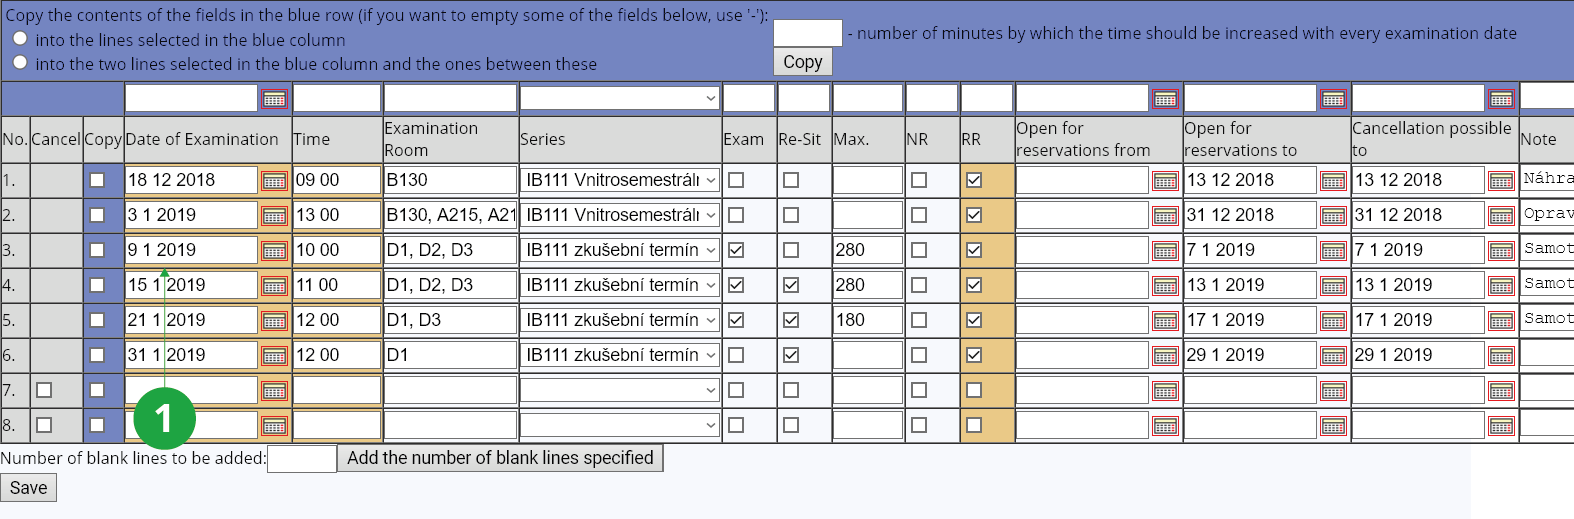
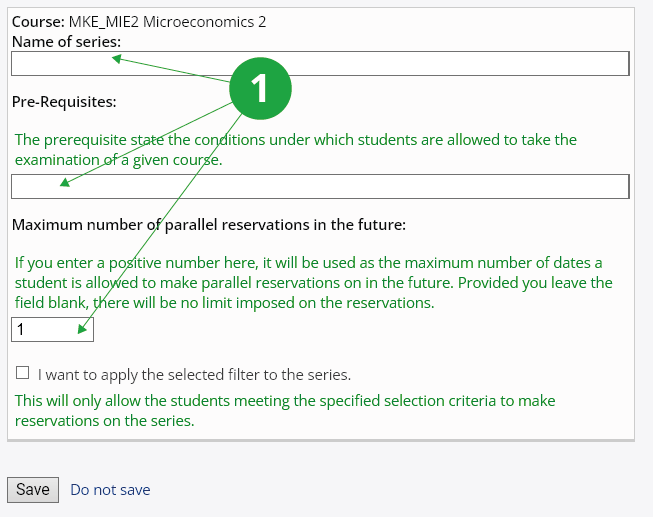
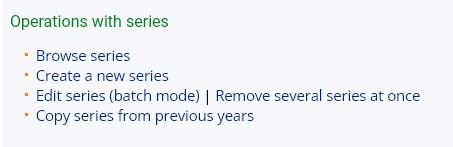
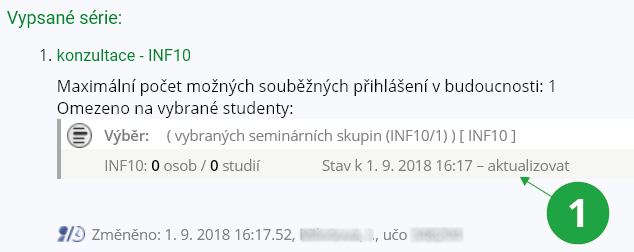
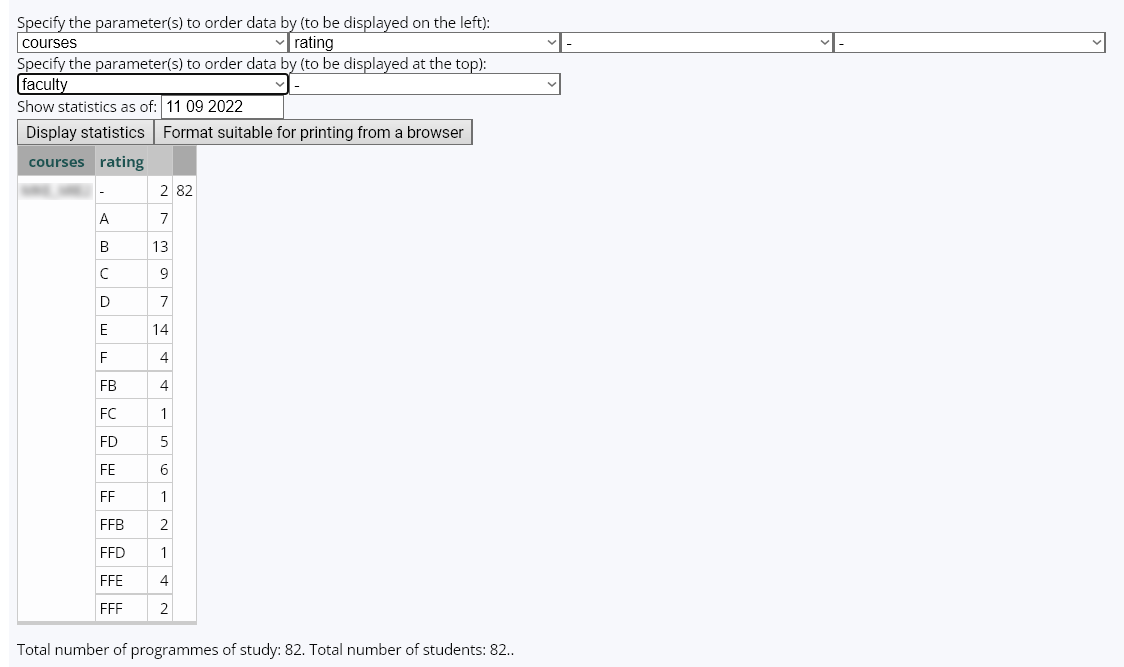
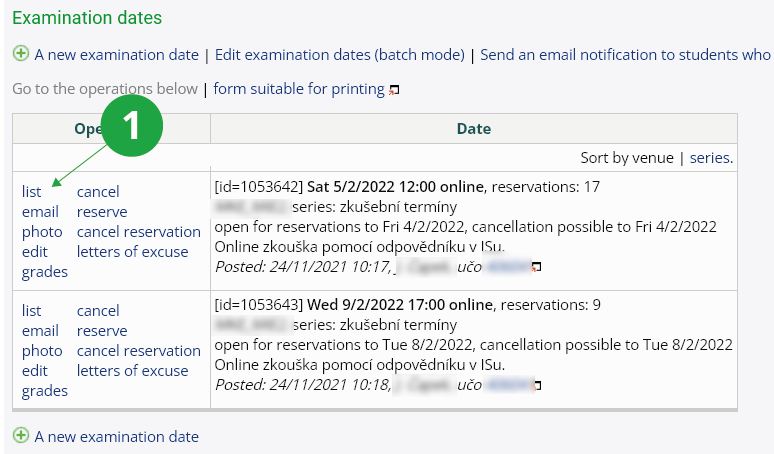
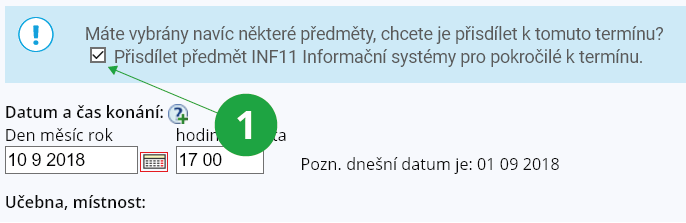
 fi
fi muni
muni